Overview
How to authenticate
You can authenticate with all Shinami services via an access key passed in a header ('X-Api-Key: ACCESS_KEY'). Some service API docs will list additional methods, but this method works across the board. Your API key must be valid for the region URL you’re making a request to.
| Region name | Location | Services offered | Service URL template + example | Only works with API keys made in |
|---|---|---|---|---|
US East - us1 | Eastern United States | All | Template: https://api.us1.shinami.com/CHAIN/SERVICE/v1 Example: https://api.us1.shinami.com/sui/node/v1 | US East - us1 |
Tokyo - apac1 | Tokyo, Japan | Sui Node Mainnet | Template: https://api.apac1.shinami.com/CHAIN/SERVICE/v1 Example: https://api.apac1.shinami.com/sui/node/v1 | Tokyo - apac1 |
Security callout: when to send from your backend
Gas Station and Wallet Services - always send from your backend You will need to send requests to our Gas Station and Wallet Services APIs from your backend. These services do not support CORS, so if you attempt to make requests to them from the FE you’ll get a CORS error. We do this because exposing these keys on the FE is a security risk. With a Gas Station key access key, an attacker could drain your Gas Station fund associated with the key by using it to sponsor transactions. With a wallet services access key, a bad actor could sign transactions from your user’s wallets. Node Service - send from your backend when possible You may send Node Service requests from either your frontend or backend, but we recommend backend when possible. If you expose a key with Node Service rights, a bad actor could make requests that count against your daily request allotment and your key’s QPS. If exposure on frontend is necessary, you can enable a domain allowlist as a security measure. You should also create separate keys for your frontend and backend. Doing so enables you to assign each one a different maximum QPS from your total QPS allotment so that one key’s requests don’t lead to rate limits for the other. It also allows you to rotate them separately (see next section).Rotating API access keys
You can disable an API access key and create a new one as needed (see Disable, enable, or delete a key).API Access Key Limit
You can make a total of 10 API access keys. You may use this allotment across whatever combination of Shinami services and (Chain, Network) pairs that works best for you.Create an Access Key
1. Select your desired region
| Region | Services offered |
|---|---|
US East - us1 | All services for Aptos, Movement, and Sui |
Tokyo - apac1 | Sui Node Service Mainnet only |
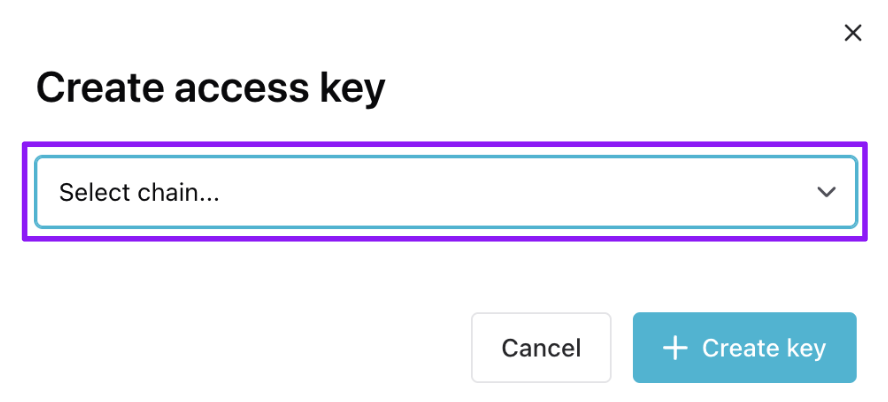
2. Visit the Access Keys page and choose a chain
All access key creations start with clicking ”+ Create Key” on the Access Keys page of your dashboard and then selecting a chain.
Click "+ Create key"
Click chain-selection the dropdown.
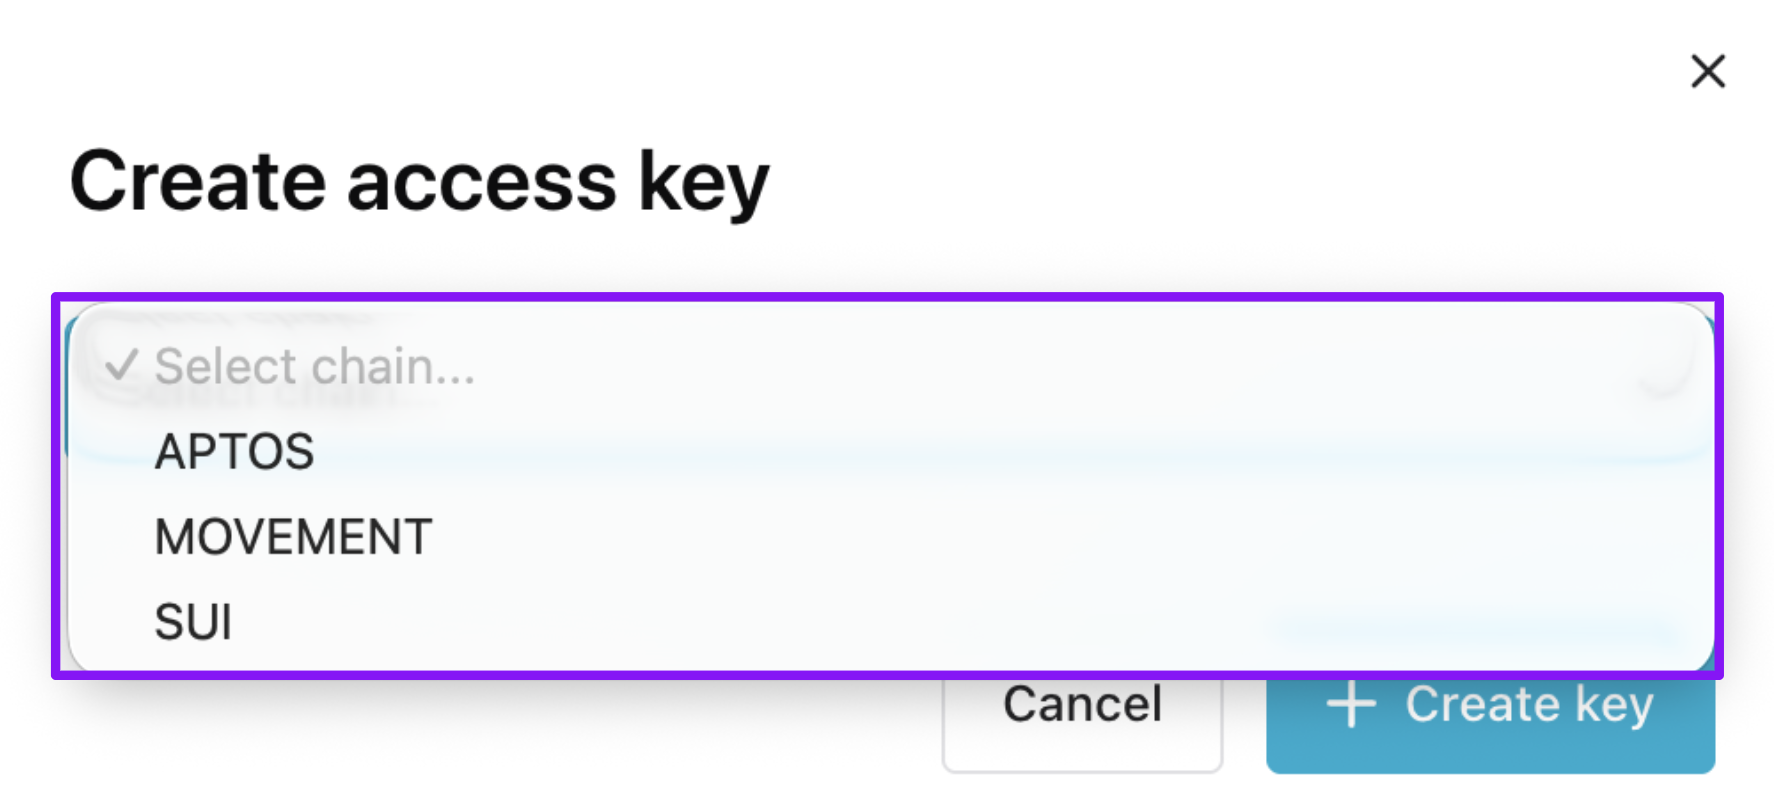
Choose your desired chain.
3a. Aptos key configuration
Below, we show the creation of a Testnet access key with all services selected. Choose only the services you need for your key.You can’t add or remove a service to a key after creating it (but you can make a new key).
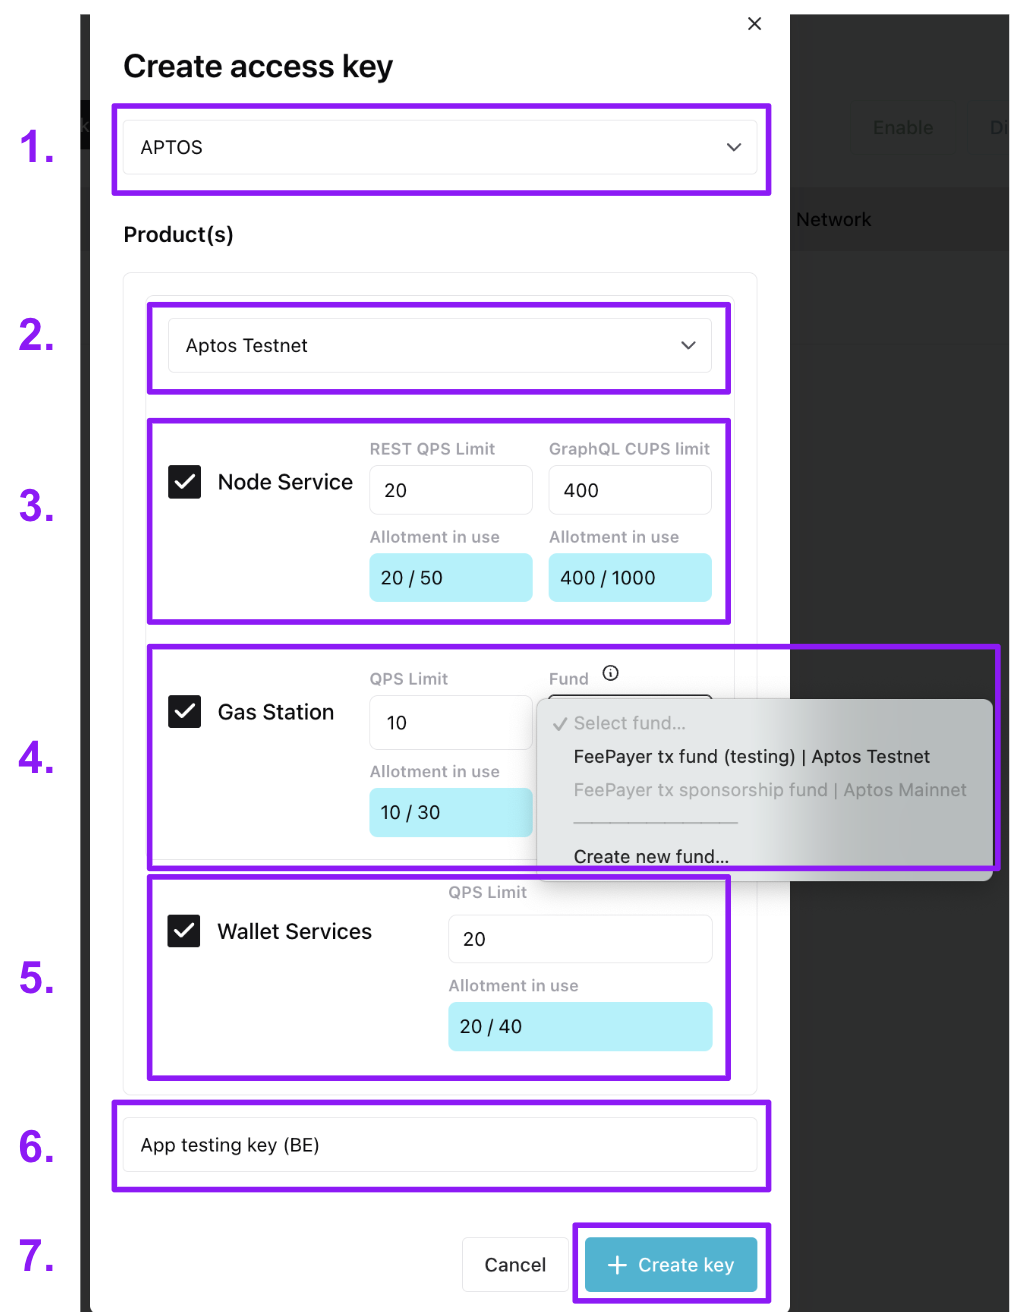
- The chain the key works for (Aptos)
- Select the network the key works for (Aptos Testnet or Aptos Mainnet).
- If making Node service requests, select the “Node Service” checkbox to give the key Node Service rights.
- Select the REST API QPS (requests per second) and the GraphQL API compute units per second for the key. For more on QPS and CUPS, see our Help Center’s Aptos Node Service doc. Your QPS allotment per network is based on your Node Service plan.
- If sponsoring transactions, select the “Gas Station” checkbox to give the key Gas Station rights.
- Assign a max QPS (requests per second) to the key. If you need more QPS, reach out to us at `[email protected] and let us know the email you sign in to your workspace with, how much QPS you need and for how long (a one-time event vs sustained high QPS needs).
- Then, link the key to a Gas Station fund on the network. If you don’t already have one, you can create it through the modal. This link cannot later be changed to a different fund (but you can make a new key). All requests for sponsorship using the key will draw APT from the linked fund. For guidance on creating a Gas Station fund see the Aptos Gas Station page of our Help Center.
- If using our Invisible Wallets, select the “Wallet Services” checkbox to give the key Wallet Services rights.
- Assign a max QPS (requests per second) to the key (noting that you’ll need to periodically create a session token for interacting with each a wallet). Your QPS allotment per network is based on your Wallet Services plan.
- Note that Invisible Wallet keys will need rights to all services to use certain methods, like submitting a sponsored transaction on behalf of a wallet.
- Give the key a name. We recommend something useful, describing the app or service the key is for as well as whether you intend it for the frontend or backend, e.g. “Best Swap App FE testing”.
- Click ”+ Create key”. The key will then show up in the Access Keys table.
3b. Movement key configuration
Below, we show the creation of a Testnet access key.You can’t add or remove a service to a key after creating it (but you can make a new key).
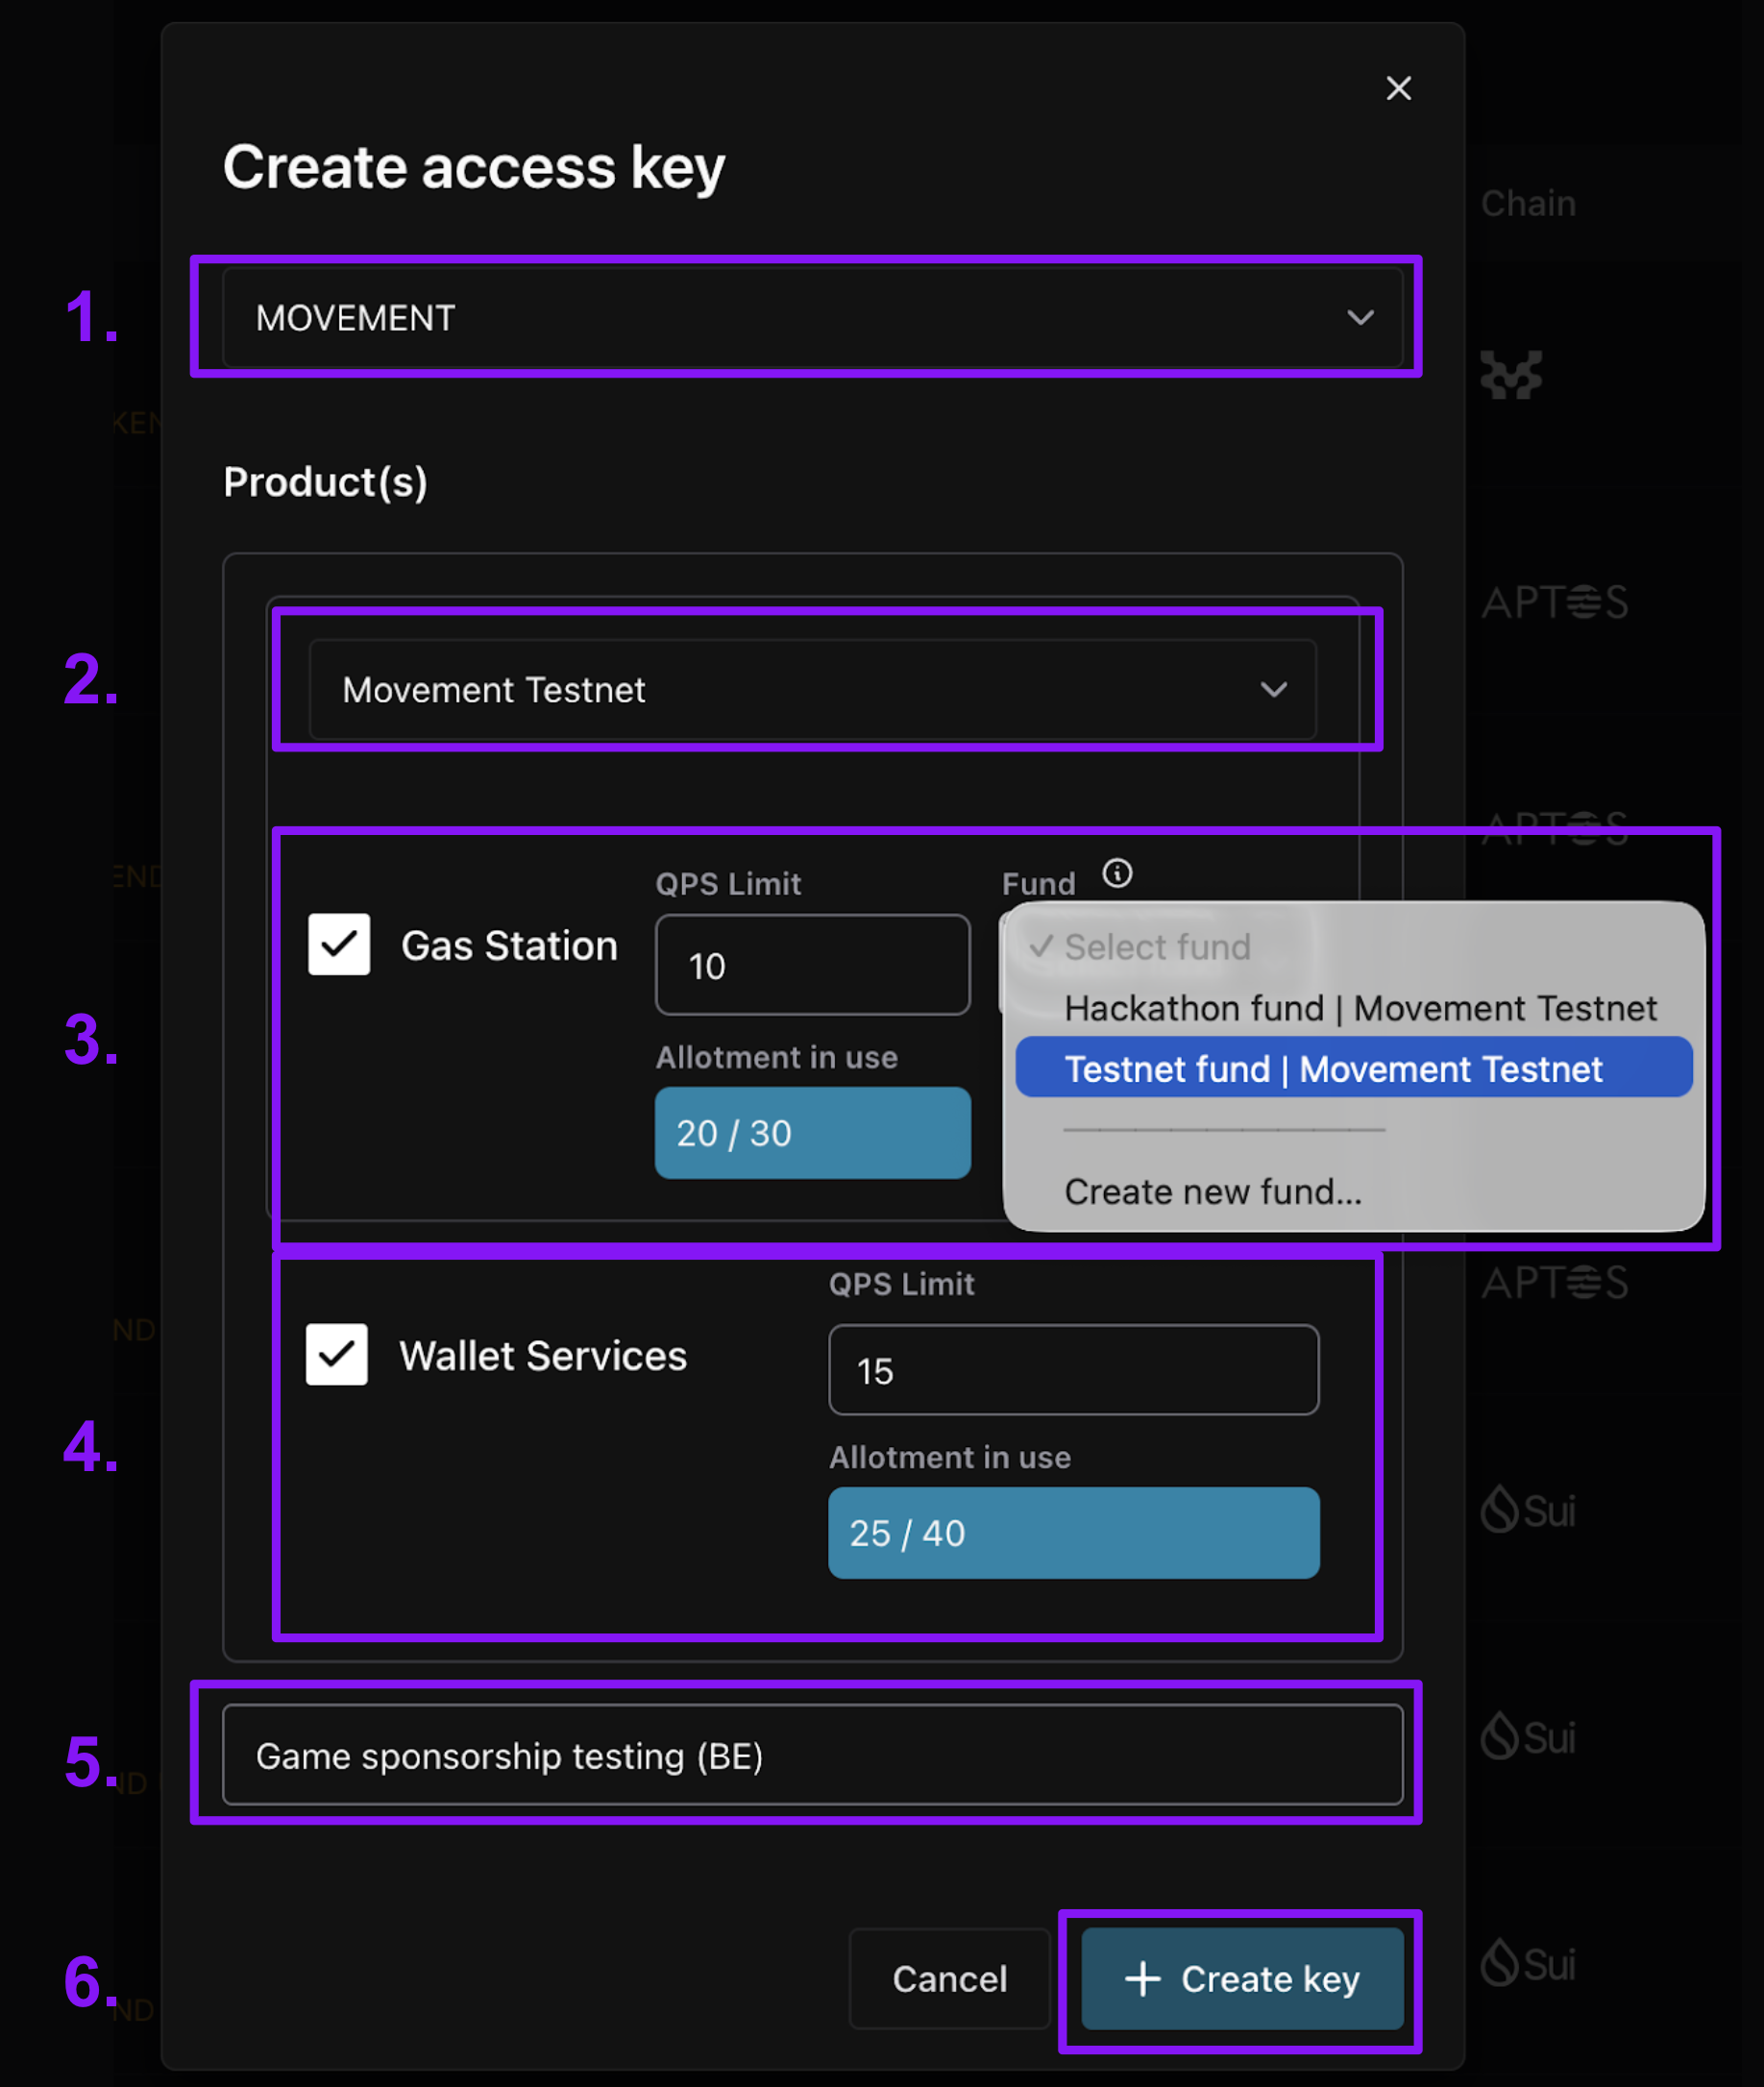
- The chain the key works for (Movement)
- Select the network the key works for (Movement Testnet or Movement Mainnet).
- If sponsoring transactions, select the “Gas Station” checkbox to give the key Gas Station rights.
- Assign a max QPS (requests per second) to the key. If you need more QPS, reach out to us at
[email protected]and let us know the email you sign in to your workspace with, how much QPS you need and for how long (a one-time event vs sustained high QPS needs). - Then, link the key to a Gas Station fund on the network. If you don’t already have one, you can create it through the modal. This link cannot later be changed to a different fund (but you can make a new key). All requests for sponsorship using the key will draw MOVE from the linked fund. For guidance on creating a Gas Station fund see the Movement Gas Station page of our Help Center.
- Assign a max QPS (requests per second) to the key. If you need more QPS, reach out to us at
- If using our Invisible Wallets, select the “Wallet Services” checkbox to give the key Wallet Services rights.
- Assign a max QPS (requests per second) to the key (noting that you’ll need to periodically create a session token for interacting with each a wallet). Your QPS allotment per network is based on your Wallet Services plan.
- Note that Invisible Wallet keys will need rights to all services to use certain methods, like submitting a sponsored transaction on behalf of a wallet.
- Give the key a name. We recommend something useful, describing the app or service the key is for, e.g. “Best Swap App BE sponsorship”.
- Click ”+ Create key”. The key will then show up in the Access Keys table.
3c. Sui key configuration
Below, we show the creation of a Testnet access key with all services selected. Choose only the services you need for your key.You can’t add or remove a service to a key after creating it (but you can make a new key).
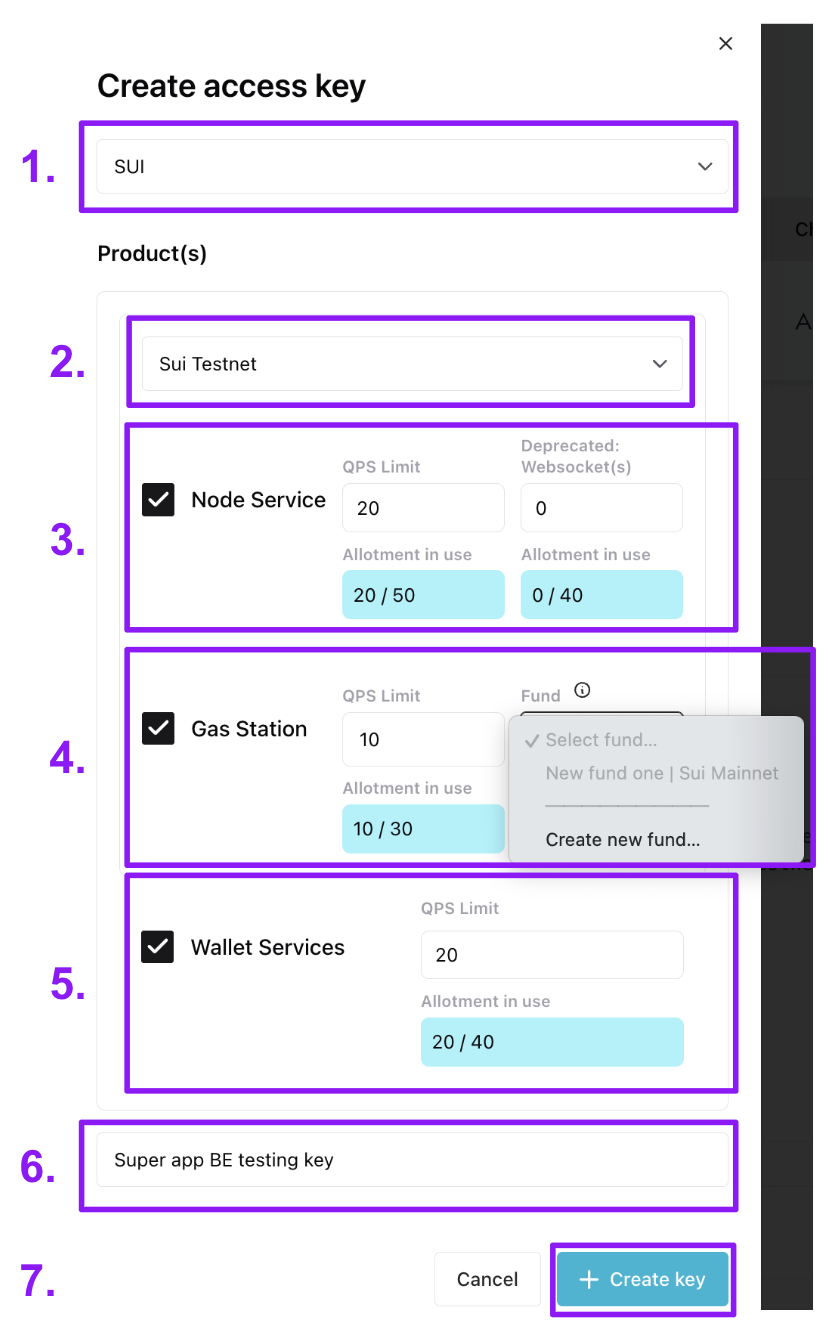
- The chain the key works for (Sui)
- Select the network the key works for (Sui Testnet or Sui Mainnet).
- If making Node service requests, select the “Node Service” checkbox to give the key Node Service rights.
- Select the REST API QPS (requests per second). Your QPS allotment per network is based on your Node Service plan.
- (not recommended) Set total active WebSocket Service connections and the total active subscriptions the key is allowed. The number you set applies to both connections and subscriptions. (Note: websocket service is being retired by Mysten VERY soon. See the notice at the top of the WebSocket API doc. )
- If sponsoring transactions, select the “Gas Station” checkbox to give the key Gas Station rights.
- Assign a max QPS (requests per second) to the key. If you need more QPS, reach out to us at
[email protected]and let us know the email you sign in to your workspace with, how much QPS you need and for how long (a one-time event vs sustained high QPS needs). - Then, link the key to a Gas Station fund on the network. If you don’t already have one, you can create it through the modal. This link cannot later be changed to a different fund (but you can make a new key). All requests for sponsorship using the key will draw SUI from the linked fund. For guidance on creating a Gas Station fund see the Sui Gas Station page of our Help Center.
- Assign a max QPS (requests per second) to the key. If you need more QPS, reach out to us at
- If using our Invisible Wallets or zkLogin wallet API, select the “Wallet Services” checkbox to give the key Wallet Services rights.
- Assign a max QPS (requests per second) to the key (noting that for Invisible Wallets you’ll need to periodically create a session token for interacting with each wallet). Your QPS allotment per network is based on your Wallet Services plan.
- Note that Invisible Wallet keys will need rights to all services to use certain methods, like submitting a sponsored transaction on behalf of a wallet.
- Give the key a name. We recommend something useful, describing the app or service the key is for as well as whether you intend it for the frontend or backend, e.g. “Best Swap App FE testing”.
- Click ”+ Create key”. The key will then show up in the Access Keys table.
Key management
Change a key’s name
(see #2 in the image below)Update a key’s QPS/CUPS values
(see #4 and #6 in the image below)Find Service URLs and sample code for a key
(see #7, #8, and #9 in the image below)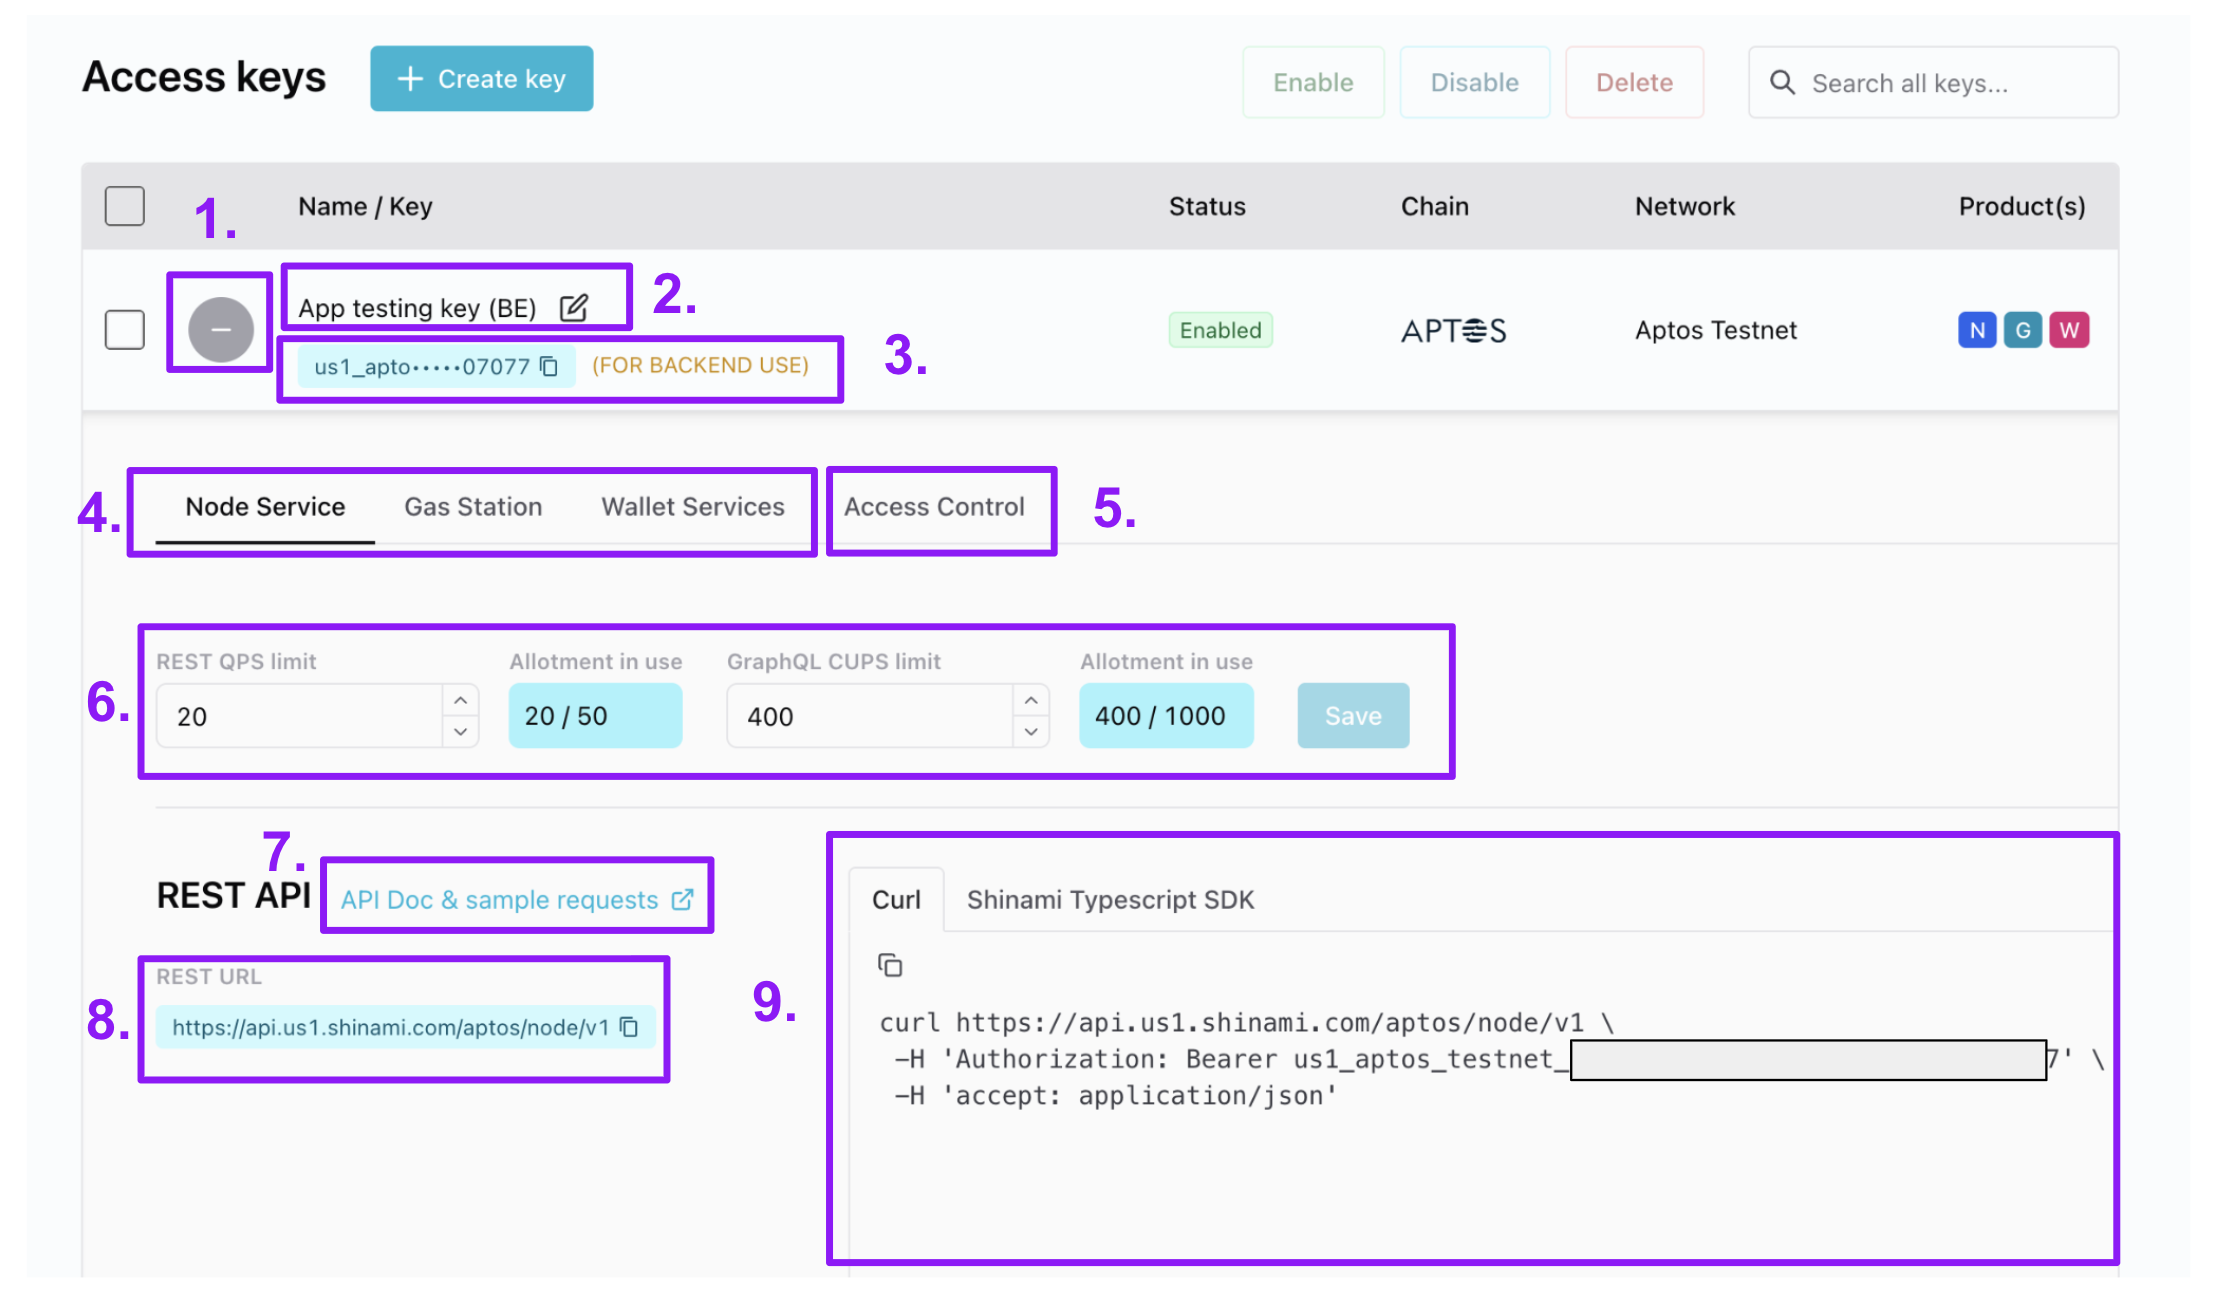
An Aptos key is shown, but the same layout applies to all keys.
- In the Access Keys table, expand and collapse the expanded tray for a key.
- Change the name of a key.
- Copy your key value. We put “(FOR BACKEND USE)” next to any key with Gas Station and/or Wallet Services rights because those services do not support CORS and are intended for BE-only use for security reasons.
- Switch between services for a given key.
- If needed, set an IP allowlist (BE keys) or a domain allowlist (FE keys) - see the next section below.
- Update the QPS/CUPS allotments for the service for the key (and click “Save”). See our note on partially successful Node Service updates in the appendix.
- Visit the API docs for the service.
- Find the relevant URL(s) for the service.
- Find sample code you can copy and paste to make a sample request to get you up and running quickly (your API key value is already added to the code). The SDK examples aren’t meant as a production code template, since you’ll likely import your API key value, etc.
Set sender domain and IP address allowlists for a key
When a key’s allowlists are empty, we accept all valid requests that use that key. If you’ve entered values into an allowlist, we check against it when getting a request that uses that access key. If the domain and/or IP address the request originates from is not in the corresponding allowlist, we’ll return aHTTP 401 Unauthorized. If you have entries in both lists, we’ll check that a request satisfies both lists. You can add up to 10 entries in both domain and IP allowlists.
General advice
- Test with empty allowlists first to ensure your requests are working properly.
- Frontend keys: Bad actors can see your API key when looking at network requests. Use a domain allowlist to prevent unwanted requests with this key. You can prefix the domain with
*.to allow all sub-domains, e.g.*.example.com. Do not use an IP whitelist, since users may visit from any IP address. - Backend keys: Allowlists are generally not needed because HTTPs means others can’t see your key.
- IP whitelists are rare and should only be considered when requests are guaranteed to come from a fixed set of IP addresses.
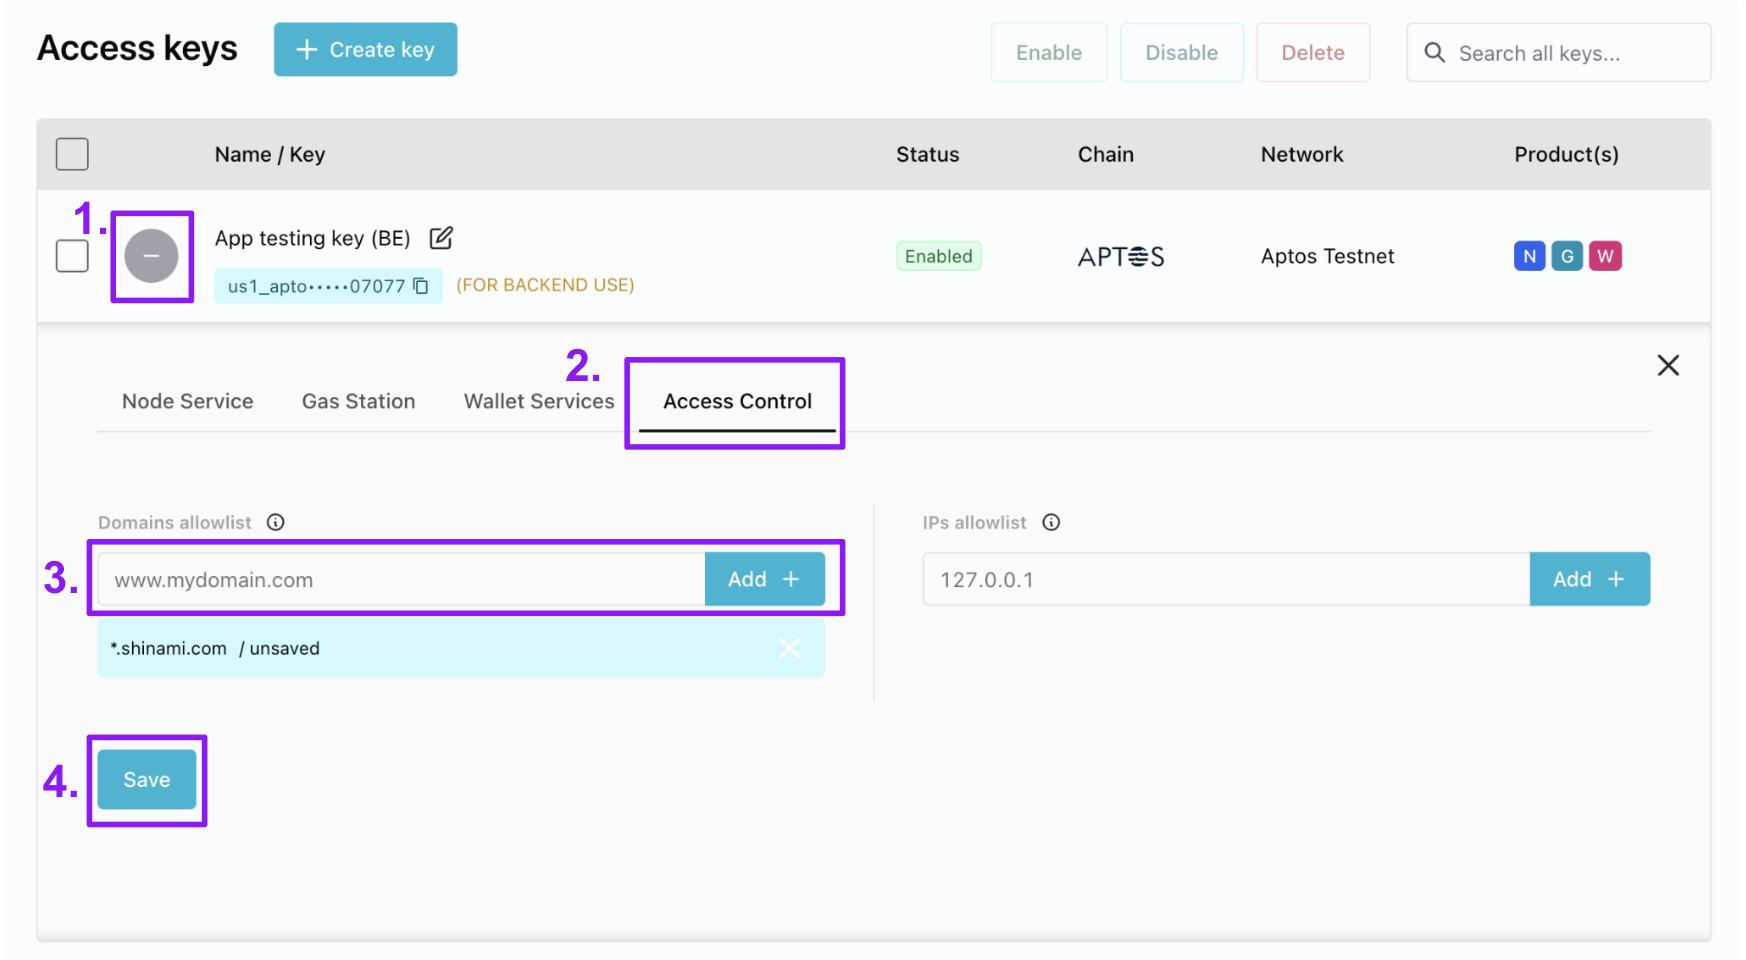
- In the Access Keys table, click the ”+” to open the key’s details tray. The icon then becomes a ”-” you can click to collapse the tray.
- Select the “Access Control” tab.
- Enter the value you want and click “Add +”. We show an example domain and not IP list because the most common use is for domain lists in production apps using a frontend node key.
- Click “Save”
Note:It may take up to five minutes for the changes to take effect.
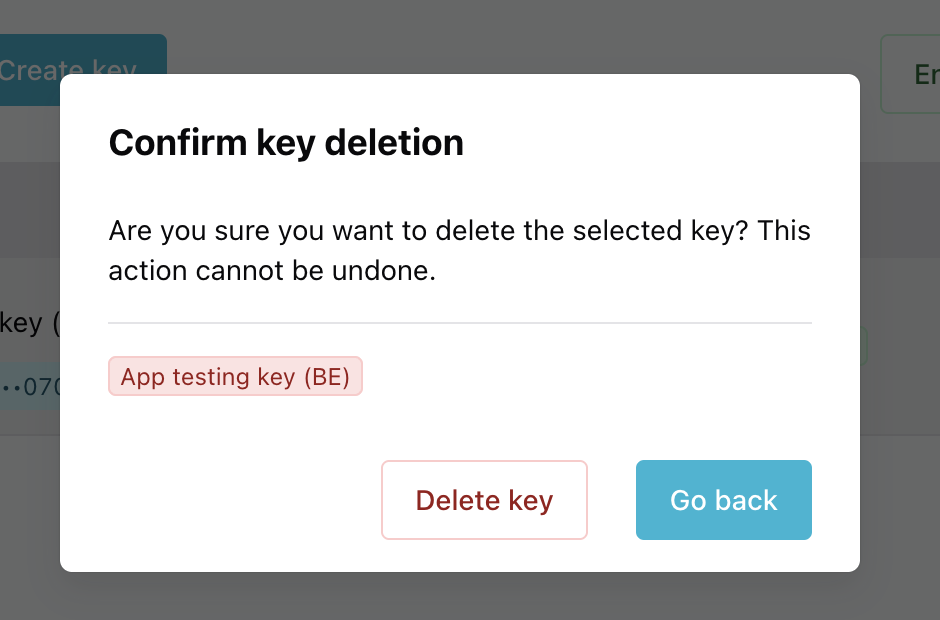
Disable-enable or delete a key
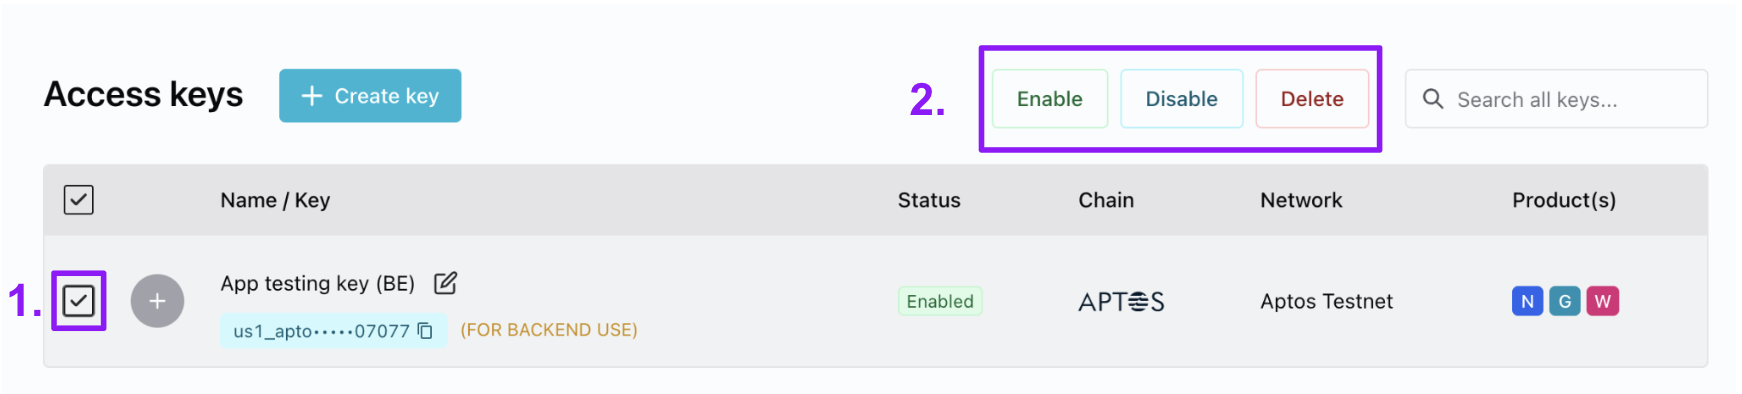
- In the Access Keys table, select the key(s) you want to update.
- Choose the action you want to take for the key(s).
Appendix
Node service sticky-routing
Applies to Aptos and Sui Node Services Context: we run multiple nodes for great uptime and freshness We run multiple nodes behind our node services to provide you with the best up-time and the freshest blockchain data possible. For example, to ensure high availability, we do rolling restarts for the regular protocol upgrades that Aptos and Sui have so that one or more nodes is live at all times. Additionally, on occasion a node can build up a small backlog of transaction blocks/checkpoints that it’s processing. If it falls behind by more than a few seconds, we’ll block it from serving requests until it catches up so that all your reads have fresh data. While the above means we can provide you a performant and reliable service, there are times when you as a user want to ensure that consecutive reads are made from the same node. Issue: Time traveling reads If one node is just a few seconds behind the latest transaction block/checkpoint, we’ll still let it answer requests to provide you with great uptime. Still, a few seconds can mean the difference between a user owning an NFT and not, if that time period is when the user bought or sold the NFT.Read example without sticky routing
Read example without sticky routing
A user sells an NFT at block/checkpoint X. Shinami is running two nodes: N1, N2.
The user saw the contents of their wallet jump from 3 to 4 to 3 again because the second read was from a node a block/checkpoint behind the other!
| Request time from your system | Request | Shinami Node fulfilling the request | Latest transaction/Block checkpoint the node is aware of | Number of items returned for the user’s wallet |
|---|---|---|---|---|
| 12:00:00 | read user wallet contents | N1 | X | 3 |
| 12:00:02 | read user wallet contents | N2 | X - 1 | 4 |
| 12:00:04 | read user wallet contents | N1 | X + 1 | 3 |
Write example without sticky routing
Write example without sticky routing
Your app creates a transaction for the user to buy an NFT that is finalized at block/checkpoint X. Shinami is running two nodes: N1, N2.
We polled node N1 to ask when the transaction’s effects were processed, but then we read the user’s wallet contents from N2, which was a block/checkpoint behind. So, we thought the purchase would be reflected but the user still has 3 NFTs and not 4!
| Request time from your system | Request | Shinami Node fulfilling the request | Latest transaction/Block checkpoint the node is aware of | Number of items returned for the user’s wallet |
|---|---|---|---|---|
| 12:00:00 | read user wallet contents | N1 | X - 2 | 3 |
| 12:00:02 | execute transaction to buy an NFT | N1 | X - 1 | N/A |
| 12:00:04 | wait for transaction (poll node until it’s processed aware of transaction’s effects) | N1 | X | N/A |
| 12:00:06 | read user wallet contents | N2 | X - 1 | 3 |
(IP address, API key) pair go to the same node. This will solve the inconsistency issues referenced above save for a few edge scenarios:
- A protocol upgrade where we issue rolling restarts of our nodes
- A node falls behind on backlog processing and is taken out of rotation.
Read example with sticky routing
Read example with sticky routing
A user sells an NFT at block/checkpoint X. Shinami is running two nodes: N1, N2.
In this case, regardless of whether node N2 is fully up to date or is processing a backlog of a couple transaction blocks/checkpoints, you and your users will experience events in the order they happened and have a consistent view of the wallet.
| Request time from your system | Shinami Node answering the request | Latest transaction/Block checkpoint the node is aware of | Number of items returned for the user’s wallet |
|---|---|---|---|
| 12:00:00 | N2 | X - 2 | 4 |
| 12:00:02 | N2 | X - 1 | 4 |
| 12:00:04 | N2 | X | 3 |
Write example with sticky routing
Write example with sticky routing
Your app creates a transaction for the user to buy an NFT that is finalized at block/checkpoint X. Shinami is running two nodes: N1, N2.
In this case, we can be confident that once we get a response from Shinami Node Service that the node we’re talking to knows about the transaction we care about, a subsequent read will reflect the results of that transaction (since it’s a read from the same node).
| Request time from your system | Request | Shinami Node fulfilling the request | Latest transaction/Block checkpoint the node is aware of | Number of items returned for the user’s wallet |
|---|---|---|---|---|
| 12:00:00 | read a user’s wallet contents | N1 | X - 2 | 3 |
| 12:00:02 | transaction to buy an NFT | N1 | X - 1 | N/A |
| 12:00:02 | wait for transaction (poll node until it’s processed and aware of transaction’s effects) | N1 | X | N/A |
| 12:00:04 | read user wallet contents | N1 | X | 4 |
Opting out of sticky routing
If your use case has more relaxed consistency requirements and does not require sticky routing, you have the option to disable it by using the following header on requests that don’t need it:Shinami-Disable-Sticky: true. Generally, API keys you use on the FE for your end users will get distributed across nodes even with sticky routing because they’ll have different IP addresses.
Reasons why you might want to use the Shinami-Disable-Sticky: true header:
- You have an Enterprise dedicated node plan and you send requests from a very limited set of (
IP, API key) pairs (e.g. you use one or two backend keys sent from one or two locations). In this case, disabling sticky routing on certain requests will mean we’ll route those requests to the node with the most capacity to spare. This means you’ll better distribute your requests across your nodes for improved stability and latency at high request volumes. - You have a Free or Pay-As-You-Go account and you want to be kind to us and your fellow Shinami users. Disabling sticky routing on requests that don’t need it will route them to the node with the most capacity to spare, which helps ensure the best stability and latency for you and your fellow Shinami users.
Partial Node Service QPS/CUPS updates
You might successfully update one limit but not the second because the second would have taken the key above your total QPS/CUPS allotment for that service. In the case of a failure, you’ll see an error message on the top right of the screen that describes it. If you’re not sure what happened, look at your the values for your key and you may notice that only one changed: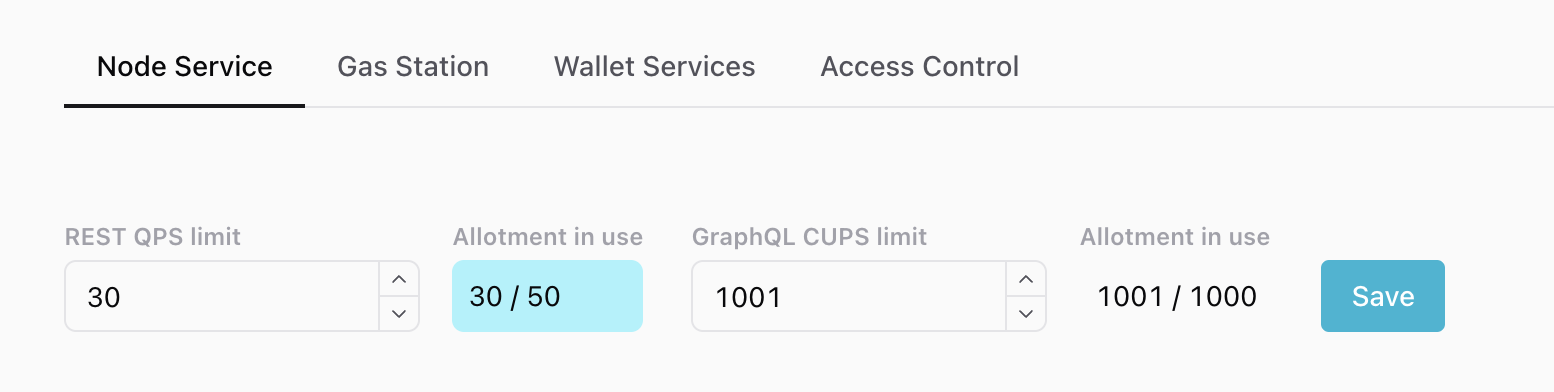
We're attempting to change the REST QPS to 30 and the GraphQL CUPS limit to 1001 - over the 1000 limit!
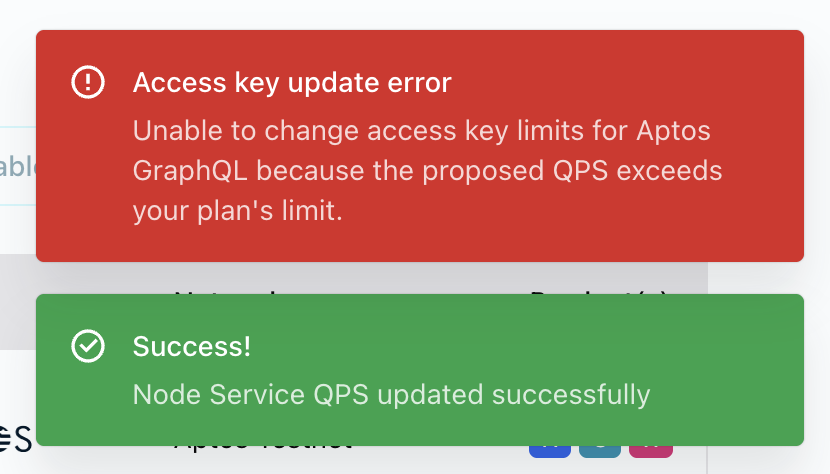
As a result, we get one success message, and one error message.
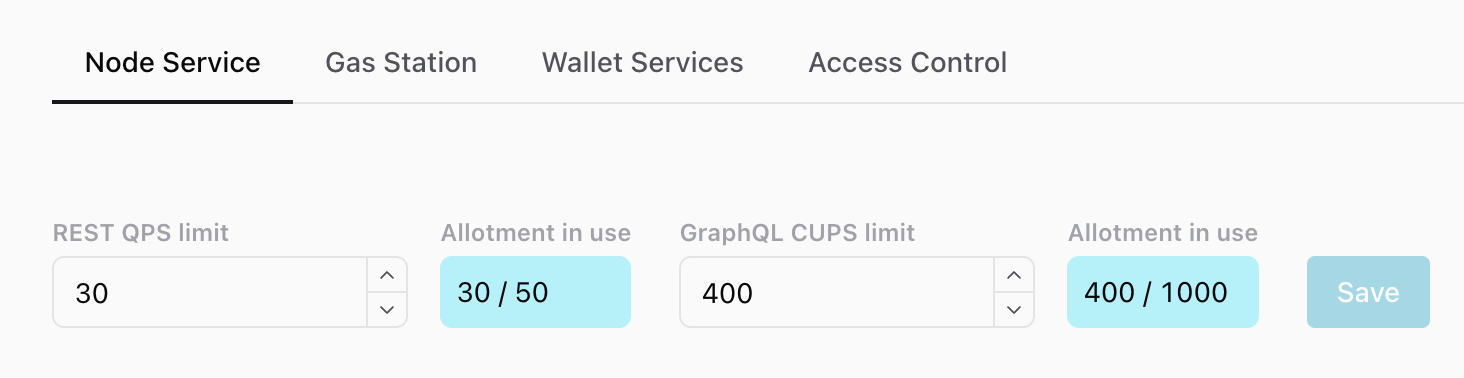
And when we look at the values, the REST limit changed but the GraphQL limit did not.