> ## Documentation Index
> Fetch the complete documentation index at: https://docs.shinami.com/llms.txt
> Use this file to discover all available pages before exploring further.
# Gas Station: backend-only
> Provides multiple code examples for using the service with step-by-step explanations. Also provides guidance on common questions and issues developers have when using the service.
## Overview
In this tutorial you'll learn how to sponsor transactions with Shinami's Gas Station and submit them for execution on the Sui blockchain. We also cover key tips for using our Gas Station.
For our examples, we'll be constructing our [programmable transactions](https://docs.sui.io/guides/developer/sui-101/building-ptb) using the [Sui TypeScript SDK](https://github.com/MystenLabs/ts-sdks/tree/main/packages/typescript) provided by Mysten. We'll also use the [Shinami Clients SDK](https://www.npmjs.com/package/@shinami/clients) to make JSON-RPC calls to Shinami Gas Station for transaction sponsorship. This is not meant as a complete template for production code, but as a way to show you how to perform all the requests our Gas Station API supports.
### What is a sponsored transaction?
When calling [`sui_executeTransactionBlock`](/api-docs/sui/node-service/json-rpc#sui-executetransactionblock) a Base64 encoded string is passed in which encodes the transactions to be executed, the sender address, and the gas information for the transaction block. This unit is called a `TransactionData` object. Along with one or more signatures, it's what's needed to write to the chain.
When a transaction is being sponsored, the sponsor sends Shinami Gas Station two parts of a `TransactionData` object: the sender address and the transaction block to be executed - with gas information omitted this is considered a `TransactionKind` object. Gas Station attaches a `GasData` object from your Gas Station fund that will pay for the transaction. Then, it produces the BCS-serialized, Base64-encoded string that represents the full `TransactionData` object, and sends it back to you along with the sponsor signature authorizing this transaction. From there, the last piece needed to call `sui_executeTransactionBlock` is the sender's signature over the `TransactionData`. We'll go through all of this below.
### Requests must be from your BE
Our Gas Station does not support CORS, so if you attempt to make requests to it from your frontend you'll get a CORS error. We do this because exposing a Gas Station API key on the frontend is a security risk - an attacker could drain the SUI in your Gas Station fund associated with the key by using it to sponsor transactions. For an example flow of combining frontend signing and/or transaction inputs with backend sponsorship, see our [Frontend signing + backend sponsorship](/developer-guides/sui/tutorials/gas-station-with-frontend-signing) tutorial.
### Understanding errors
Check the error code and message of any errors you get. We outline common errors in our Error Reference - make sure to check out the [section specific to Sui Gas Station](/developer-guides/core-integration-topics/error-reference#sui-gas-station-api) as well as the "General Error Codes" section at the top that apply to all Shinami services.
### Usage and Billing FAQ
Make sure to check out the Sui Gas Station [product usage FAQ](/help-center/sui/gas-station-faq) and [billing FAQ](/help-center/billing/sui-faq#gas-station) in our Help Center for answers to common questions.
## Required setup
**Notes:**
* This tutorial requires a Shinami account. If you do not have one, you can sign up [here](https://app.shinami.com/signup).
* We take you through the process step-by-step below, but if you get stuck you can [reach out to us](/help-center/overview#contacting-support).
### 1. Create a Shinami Gas Station fund on Testnet
See the [Sui Gas Station page of our Help Center](/help-center/sui/gas-station-faq) for guidance on how to set up a fund on Testnet if you don't already have one. When you create a Testnet fund, we add some SUI to it so you can test immediately.
### 2. Clone the github repo
Clone the [shinami-examples github repo](https://github.com/shinamicorp/shinami-examples/tree/main), cd into the `shinami-examples/sui/typescript/backend_examples` directory, and run `npm install`to install the dependencies for running the code. Run `tsc` in your terminal, and if the command isn't found run `npm install typescript --save-dev` (see other options [here](https://www.typescriptlang.org/download/) ) . If you need to install npm and Node.js, [see here](https://docs.npmjs.com/downloading-and-installing-node-js-and-npm). Below, we'll be using the `gas_station.ts` file in the `shinami-examples/sui/typescript/backend_examples/src` directory.
### 3: Create an API access key and copy it into the file.
**Create a key**
You use API access keys to interact with Shinami's services. For this tutorial, we'll create one access key that has `Gas Station` rights for Testnet (see our [Authentication and API Keys guide](/developer-guides/core-integration-topics/authentication-and-api-keys#/create-an-access-key) to see how to make a key).
**Add it to the gas\_station.ts file**
Once you have your key, use it as the value for the `GAS_STATION_ACCESS_KEY` constant. You'll see that we immediately use it to instantiate a Gas Station client (for sponsoring transactions). We also create and a Node client for executing them (we're using the Mysten free Node Service in this example, but you'll need to find another provider for your production app).
```bash Shinami Typescript SDK theme={null}
// 2. Copy your Testnet Gas Station API key value
const GAS_STATION_ACCESS_KEY = "{{API_KEY_VALUE}}";
// 3. Set up your Gas Station and Node Service clients
// Use any Sui RPC provider of your choice. It MUST target the same network as GAS_ACCESS_KEY.
const nodeClient = new SuiClient({ url: getFullnodeUrl("testnet") });
const gasStationClient = new GasStationClient(GAS_STATION_ACCESS_KEY);
```
### 4. Generate a new Keypair and log its secret key for subsequent runs
We need a Sui address to act as the sender, so we'll generate a new KeyPair. On the first run, the secret key will be printed to the console. We'll reuse the same address for all runs, so you can see all the history in one account.
**Notes:**
Your app should have its own way to manage accounts and keys. This is just meant as a convenience when doing your initial tests with Gas Station using our tutorial code. Some examples require the sender to have a SUI coin, so maintaining a consistent sender is required.
Here's what you'll do:
1. Run the code by running the `tsc` command in a terminal at the root of the `shinami-examples/sui/typescript/backend_examples` directory to transpile the `.ts` files in the `/src` directory to JavaScript.
2. Run `node build/gas_station.js` to run the resulting file.
3. A secret key will be printed to the console, e.g. `secretKey: suiprivkey...` value.
4. Before running the code again, replace the call to `generateSecretKey()` with the value of the secret key.
**Initial code:**
```bash Shinami Typescript SDK theme={null}
// 4. Create a KeyPair to act as the sender
async function generateSecretKey() : Promise {
const keyPair = new Ed25519Keypair();
console.log("secretKey:", keyPair.getSecretKey())
return keyPair.getSecretKey();
}
const ENCODED_SECRET_KEY = await generateSecretKey();
```
**After running the code, change it to:**
```bash Shinami Typescript SDK theme={null}
// 4. Create a KeyPair to act as the sender
async function generateSecretKey() : Promise {
const keyPair = new Ed25519Keypair();
console.log("secretKey:", keyPair.getSecretKey())
return keyPair.getSecretKey();
}
const ENCODED_SECRET_KEY = "suiprivkey1qqdn8409tumvyq" //await generateSecretKey();
// the value above is too short for a real key
```
### 5. Open your Shinami dashboard
Technically not required, but we recommend visiting the ["Completed transactions" tab of the Sui Gas Station page](https://app.shinami.com/sui/gas/#sui_gas_completed_tx) of your Shinami dashboard. This tab, and the "In flight transactions" tab (for sponsored transactions that haven't yet been executed) can be helpful when testing.
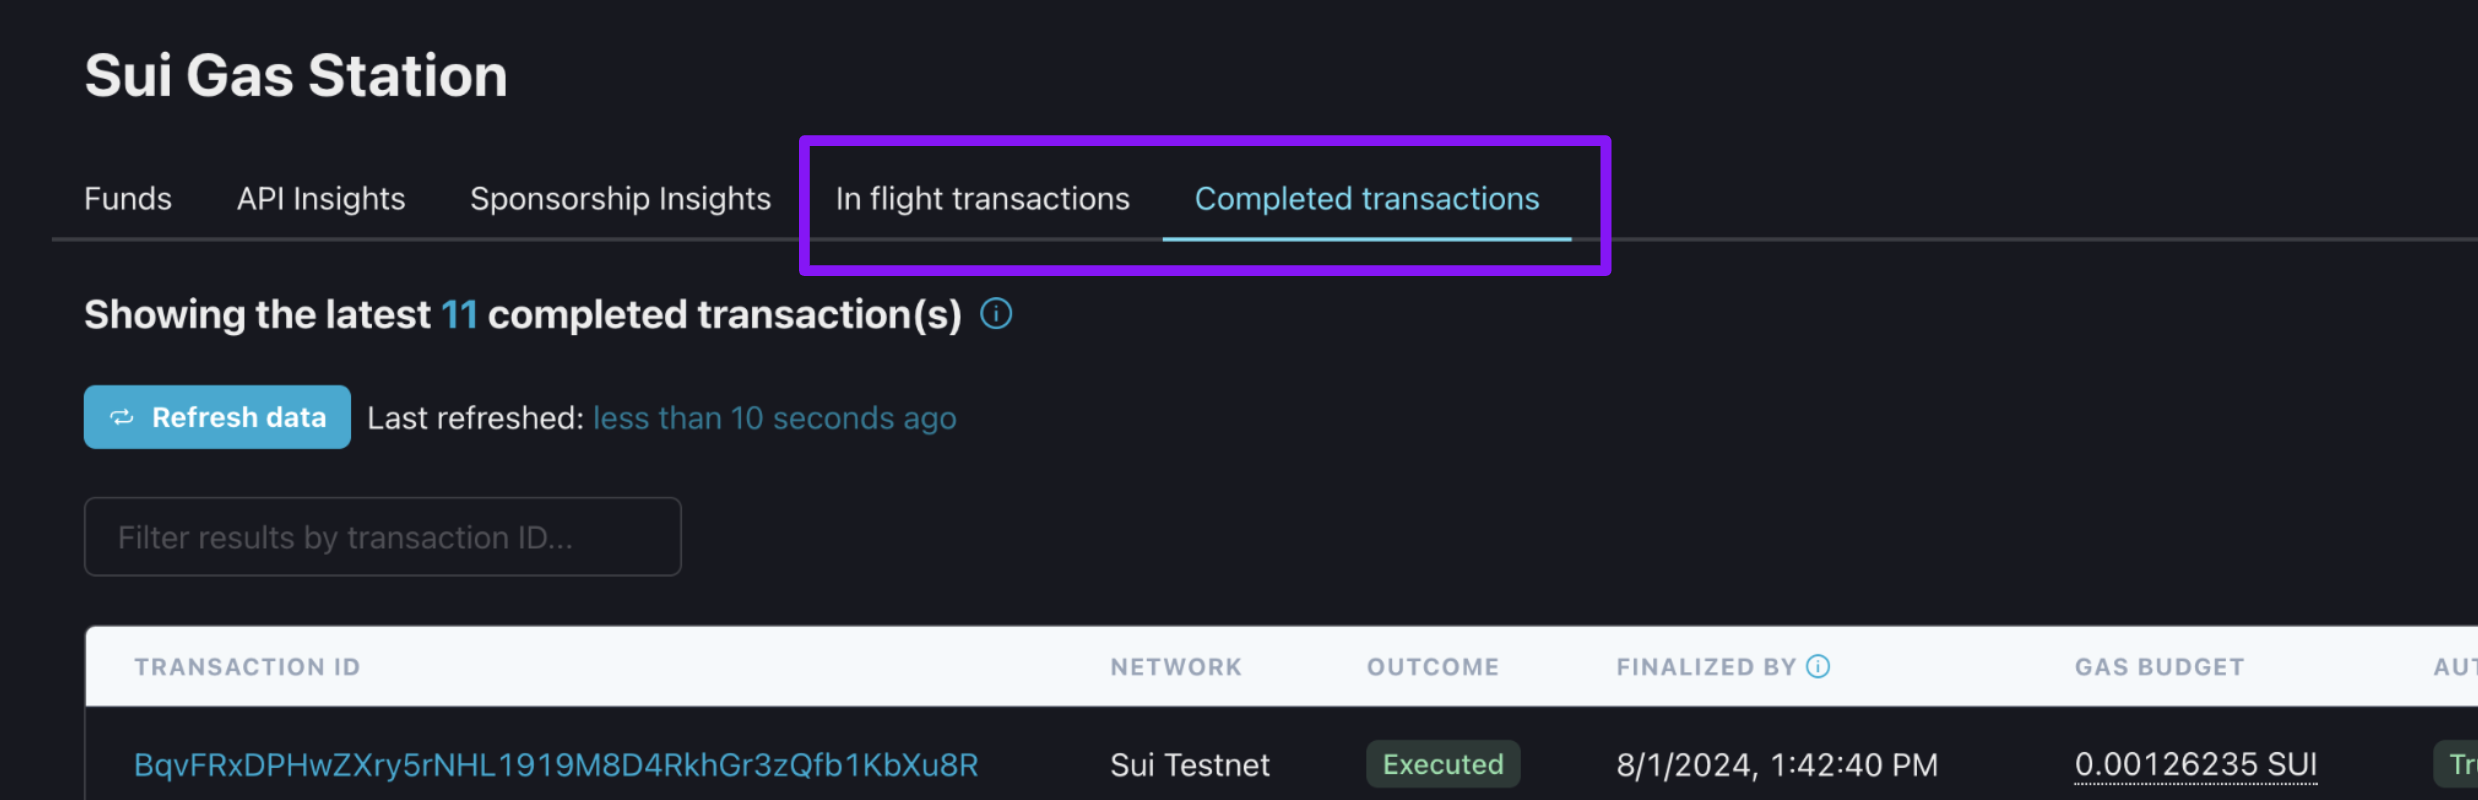 After running the examples below, take a look at these pages. It may take a few moments or clicking "Refresh data", but you'll see the digest of the transaction you sponsored appear. The code you run will execute the transaction, but note that a transaction can remain in the "In flight transactions" table for a minute or two (until our Gas Station updates the status of the associated gas objects).
## Code examples
### Overview
Below, we'll review some of our sample code functions and how to run them. At a high-level, you'll uncomment just one function that builds a Shinami type `GaslessTransaction` for sponsorship - e.g. `clockMoveCallGaslessTransaction()` in the code block below. Then, save any changes you made to the file, run `tsc` in the `shinami-examples/sui/typescript/backend_examples` directory to transpile the code to JavaScript, and finally run `node build/gas_station.js` to run the resulting file. The functions that take arguments require setting values for the associated constant (generally the object id of a SUI coin or other object owned by the sender).
At a high level, we do the same three things each time:
1. Generate a transaction without gas info (Step 5).
2. Sponsor, sign, and submit the transaction to the Sui blockchain (Step 6).
3. Poll a Full node until the transaction is check-pointed and received by the node, then print the status (Step 7).
```bash Shinami Typescript SDK expandable theme={null}
// 5. Generate the GaslessTransaction for sponsorship
const gaslessTx = await
clockMoveCallGaslessTransaction();
// clockMoveCallGaslessTransactionAlternateVersion();
// clockMoveCallGaslessTransactionOfflineBuildManualBudget();
// checkFundBalanceAndDepositIfNeeded(SUI_COIN_TO_DEPOSIT_ID);
// splitCoinOwnedByGaslessTransaction(COIN_TO_SPLIT_FROM_ID, SENDER_ADDRESS);
// mergeCoinsGaslessTransaction(COIN_TO_SPLIT_FROM_ID, COIN_TO_MERGE_ID);
// transferObjectToRecipientGaslessTransaction(OBJ_ID_TO_TRANSFER, RECIPIENT_ADDRESS);
if (gaslessTx) {
gaslessTx.sender = SENDER_ADDRESS;
// 6. Sponsor, sign, and execute the transaction
const txDigest = await sponsorAndExecuteTransactionForKeyPairSender(
gaslessTx, keyPairFromSecretKey
);
// 7. Wait until the node has processed the transaction and print the status
const txInfo = await nodeClient.waitForTransaction({
digest: txDigest,
options: { showEffects: true }
});
// You can look up the digest in a Sui explorer - make sure to switch to Testnet
console.log("\ntxDigest: ", txDigest);
console.log("status:", txInfo.effects?.status.status);
}
```
### Sponsor, sign, and execute flow
The `sponsorAndExecuteTransactionForKeyPairSender` does the following:
1. Asks Shinami Gas Station to sponsor the transaction we generated above using the Gas Station fund tied to the access key you're using. Gas Station returns the full transaction - now with gas payment information - as well as the sponsor signature. We use Shinami's auto-budgeting feature because we omit a `gasBudget`. To learn more about auto-budgeting (and manual budgeting) see the Appendix.
2. Generates the sender signature.
3. Submits the full transaction data, along with the sender and sponsor signatures to the Sui blockchain.
```bash Shinami Typescript SDK expandable theme={null}
async function sponsorAndExecuteTransactionForKeyPairSender(
gaslessTx: GaslessTransaction, keypair: Ed25519Keypair): Promise {
// 1. Send the GaslessTransaction to Shinami Gas Station for sponsorship.
let sponsoredResponse = await gasStationClient.sponsorTransaction(
gaslessTx // by not setting gaslessTx.gasBudget we take advantage of Shinami auto-budgeting
);
console.log("\nsponsorTransactionBlock response (includes sender 'signature' and 'txBytes' with gas info now included):");
console.log(sponsoredResponse);
// 2. Sign the full transaction payload with the sender's key.
let senderSig = await Transaction.from(sponsoredResponse?.txBytes).sign(
{ signer: keypair }
);
// 3. Submit the full transaction payload, along with the gas owner
// and sender signatures, for execution on the Sui network
let executeResponse = await nodeClient.executeTransactionBlock({
transactionBlock: sponsoredResponse?.txBytes,
signature: [senderSig?.signature, sponsoredResponse?.signature]
});
return executeResponse.digest;
}
```
### Sponsor and execute a Move call
**Understand the code**
The `clockMoveCallGaslessTransaction` function builds a TransactionBlock that calls a function on a Move module we've [deployed to Testnet](https://testnet.suivision.xyz/package/0xfa0e78030bd16672174c2d6cc4cd5d1d1423d03c28a74909b2a148eda8bcca16). This is a very simple Move module based on a [sample Move project](https://docs.sui.io/guides/developer/sui-101/access-time) from Mysten. We're calling its one function, `access`, which takes a read-only reference to the `sui::clock::Clock` instance located at address `0x6` as its single parameter. The function emits a single event that contains the current timestamp obtained from the `Clock` instance. We print the GaslessTransaction to the console so you can see it's shape.
```bash Typescript theme={null}
async function clockMoveCallGaslessTransaction() : Promise {
const gaslessTx = await buildGaslessTransaction(
(txb) => {
txb.moveCall({
target: "0xfa0e78030bd16672174c2d6cc4cd5d1d1423d03c28a74909b2a148eda8bcca16::clock::access",
arguments: [txb.object('0x6')],
});
},
{
sui: nodeClient
}
);
console.log("\nbuildGaslessTransaction response (your GaslessTransaction for sponsorship):");
console.log(gaslessTx);
return gaslessTx
}
```
**Run the code**
Make sure you've saved your changes to the file from above (adding your API key and setting a fixed private key value). Run `tsc` in the `shinami-examples/sui/typescript/backend_examples` directory to transpile the code to JavaScript. Then, run `node build/gas_station.js`. You'll see a lot of output in the console - we added a lot of printing so you can see the shape of API call responses and function results. Of course, once you understand them you can comment out the `console.log()` statements.
**View the transaction in an explorer**
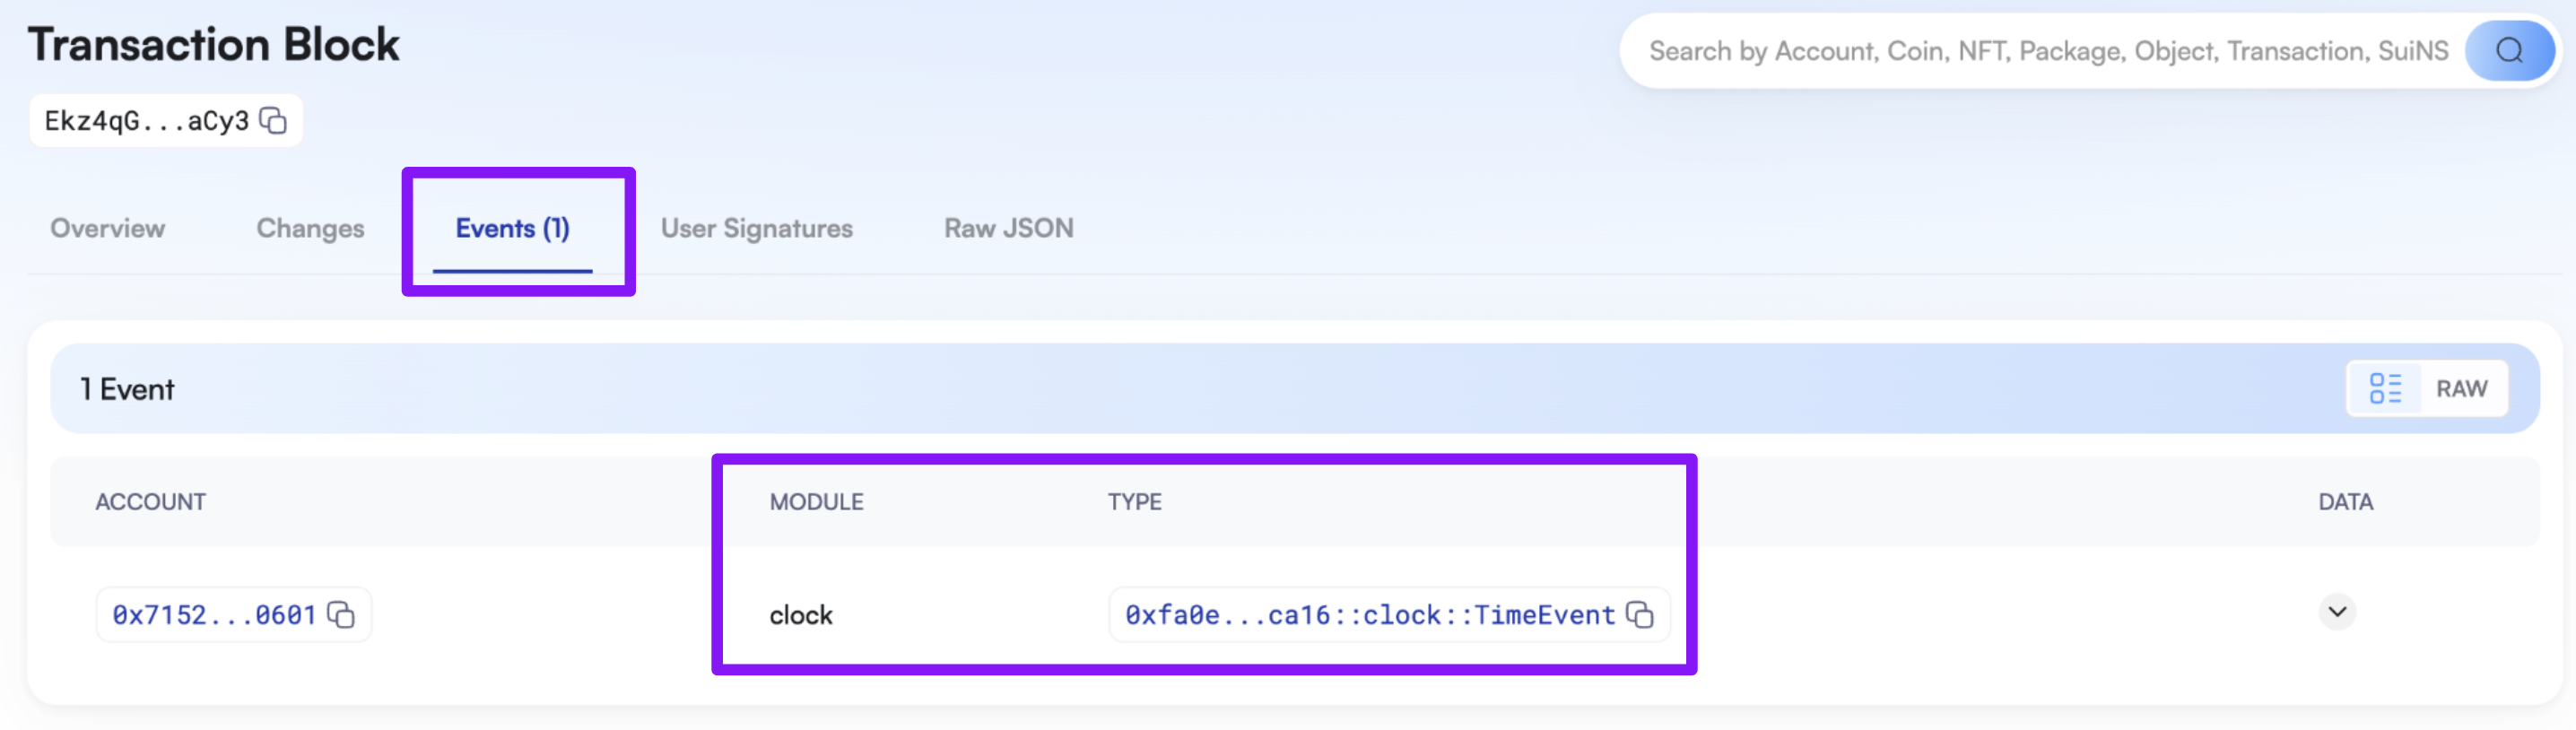
The last thing printed to the console is the digest of the transaction you sponsored. It will be the same value as the `txDigest` returned by our `gasStationClient.sponsorTransactionBlock` request, since at that point the digest is created over the full TransactionData that will be submitted to the chain (which includes transaction operations, gas object, and sender address). Your digest will of course be different than my example since the sponsorship gas object and the sender are different:
```bash Terminal theme={null}
txDigest: Ekz4qGTtSrZeznz1VZKgHqKcksY9WCrsfHPpF489aCy3
status: success
```
You can look up the digest in a Sui explorer like [Suivision](https://testnet.suivision.xyz/) or [Suiscan](https://suiscan.xyz/testnet/home) (make sure you've set the explorer to Testnet first). This is an image from Suivision showing that my transaction emitted one `TimeEvent` as mentioned above:
After running the examples below, take a look at these pages. It may take a few moments or clicking "Refresh data", but you'll see the digest of the transaction you sponsored appear. The code you run will execute the transaction, but note that a transaction can remain in the "In flight transactions" table for a minute or two (until our Gas Station updates the status of the associated gas objects).
## Code examples
### Overview
Below, we'll review some of our sample code functions and how to run them. At a high-level, you'll uncomment just one function that builds a Shinami type `GaslessTransaction` for sponsorship - e.g. `clockMoveCallGaslessTransaction()` in the code block below. Then, save any changes you made to the file, run `tsc` in the `shinami-examples/sui/typescript/backend_examples` directory to transpile the code to JavaScript, and finally run `node build/gas_station.js` to run the resulting file. The functions that take arguments require setting values for the associated constant (generally the object id of a SUI coin or other object owned by the sender).
At a high level, we do the same three things each time:
1. Generate a transaction without gas info (Step 5).
2. Sponsor, sign, and submit the transaction to the Sui blockchain (Step 6).
3. Poll a Full node until the transaction is check-pointed and received by the node, then print the status (Step 7).
```bash Shinami Typescript SDK expandable theme={null}
// 5. Generate the GaslessTransaction for sponsorship
const gaslessTx = await
clockMoveCallGaslessTransaction();
// clockMoveCallGaslessTransactionAlternateVersion();
// clockMoveCallGaslessTransactionOfflineBuildManualBudget();
// checkFundBalanceAndDepositIfNeeded(SUI_COIN_TO_DEPOSIT_ID);
// splitCoinOwnedByGaslessTransaction(COIN_TO_SPLIT_FROM_ID, SENDER_ADDRESS);
// mergeCoinsGaslessTransaction(COIN_TO_SPLIT_FROM_ID, COIN_TO_MERGE_ID);
// transferObjectToRecipientGaslessTransaction(OBJ_ID_TO_TRANSFER, RECIPIENT_ADDRESS);
if (gaslessTx) {
gaslessTx.sender = SENDER_ADDRESS;
// 6. Sponsor, sign, and execute the transaction
const txDigest = await sponsorAndExecuteTransactionForKeyPairSender(
gaslessTx, keyPairFromSecretKey
);
// 7. Wait until the node has processed the transaction and print the status
const txInfo = await nodeClient.waitForTransaction({
digest: txDigest,
options: { showEffects: true }
});
// You can look up the digest in a Sui explorer - make sure to switch to Testnet
console.log("\ntxDigest: ", txDigest);
console.log("status:", txInfo.effects?.status.status);
}
```
### Sponsor, sign, and execute flow
The `sponsorAndExecuteTransactionForKeyPairSender` does the following:
1. Asks Shinami Gas Station to sponsor the transaction we generated above using the Gas Station fund tied to the access key you're using. Gas Station returns the full transaction - now with gas payment information - as well as the sponsor signature. We use Shinami's auto-budgeting feature because we omit a `gasBudget`. To learn more about auto-budgeting (and manual budgeting) see the Appendix.
2. Generates the sender signature.
3. Submits the full transaction data, along with the sender and sponsor signatures to the Sui blockchain.
```bash Shinami Typescript SDK expandable theme={null}
async function sponsorAndExecuteTransactionForKeyPairSender(
gaslessTx: GaslessTransaction, keypair: Ed25519Keypair): Promise {
// 1. Send the GaslessTransaction to Shinami Gas Station for sponsorship.
let sponsoredResponse = await gasStationClient.sponsorTransaction(
gaslessTx // by not setting gaslessTx.gasBudget we take advantage of Shinami auto-budgeting
);
console.log("\nsponsorTransactionBlock response (includes sender 'signature' and 'txBytes' with gas info now included):");
console.log(sponsoredResponse);
// 2. Sign the full transaction payload with the sender's key.
let senderSig = await Transaction.from(sponsoredResponse?.txBytes).sign(
{ signer: keypair }
);
// 3. Submit the full transaction payload, along with the gas owner
// and sender signatures, for execution on the Sui network
let executeResponse = await nodeClient.executeTransactionBlock({
transactionBlock: sponsoredResponse?.txBytes,
signature: [senderSig?.signature, sponsoredResponse?.signature]
});
return executeResponse.digest;
}
```
### Sponsor and execute a Move call
**Understand the code**
The `clockMoveCallGaslessTransaction` function builds a TransactionBlock that calls a function on a Move module we've [deployed to Testnet](https://testnet.suivision.xyz/package/0xfa0e78030bd16672174c2d6cc4cd5d1d1423d03c28a74909b2a148eda8bcca16). This is a very simple Move module based on a [sample Move project](https://docs.sui.io/guides/developer/sui-101/access-time) from Mysten. We're calling its one function, `access`, which takes a read-only reference to the `sui::clock::Clock` instance located at address `0x6` as its single parameter. The function emits a single event that contains the current timestamp obtained from the `Clock` instance. We print the GaslessTransaction to the console so you can see it's shape.
```bash Typescript theme={null}
async function clockMoveCallGaslessTransaction() : Promise {
const gaslessTx = await buildGaslessTransaction(
(txb) => {
txb.moveCall({
target: "0xfa0e78030bd16672174c2d6cc4cd5d1d1423d03c28a74909b2a148eda8bcca16::clock::access",
arguments: [txb.object('0x6')],
});
},
{
sui: nodeClient
}
);
console.log("\nbuildGaslessTransaction response (your GaslessTransaction for sponsorship):");
console.log(gaslessTx);
return gaslessTx
}
```
**Run the code**
Make sure you've saved your changes to the file from above (adding your API key and setting a fixed private key value). Run `tsc` in the `shinami-examples/sui/typescript/backend_examples` directory to transpile the code to JavaScript. Then, run `node build/gas_station.js`. You'll see a lot of output in the console - we added a lot of printing so you can see the shape of API call responses and function results. Of course, once you understand them you can comment out the `console.log()` statements.
**View the transaction in an explorer**
The last thing printed to the console is the digest of the transaction you sponsored. It will be the same value as the `txDigest` returned by our `gasStationClient.sponsorTransactionBlock` request, since at that point the digest is created over the full TransactionData that will be submitted to the chain (which includes transaction operations, gas object, and sender address). Your digest will of course be different than my example since the sponsorship gas object and the sender are different:
```bash Terminal theme={null}
txDigest: Ekz4qGTtSrZeznz1VZKgHqKcksY9WCrsfHPpF489aCy3
status: success
```
You can look up the digest in a Sui explorer like [Suivision](https://testnet.suivision.xyz/) or [Suiscan](https://suiscan.xyz/testnet/home) (make sure you've set the explorer to Testnet first). This is an image from Suivision showing that my transaction emitted one `TimeEvent` as mentioned above:
 ## Appendix
### You can't access the gas coin in a sponsored transaction
In a sponsored transaction, you cannot use the gas object provided by Shinami for other purposes. For example, you cannot write `const [coin] = txb.splitCoins(txb.gas,[txb.pure(100)]);` because it's accessing `txb.gas`. If you try to sponsor a TransactionKind that uses the gas object you will [get a JSON-RPC -32602 error](/developer-guides/core-integration-topics/error-reference#sui-gas-station-api).
### Check a fund's balance and deposit more SUI in the fund
You can use our [`gas_getFund`](/api-docs/sui/gas-station/api#gas-getfund) endpoint to check the balance of the Gas Station fund tied to the request's API access key. We generate a deposit address for the fund when you look it up in the Shinami dashboard - go ahead and do that now ([see how](/help-center/sui/gas-station-faq#faq)). If you don't, the `depositAddress` will be `null` - which is why we guard against it in the code below.
**Understand the `checkFundBalanceAndDepositIfNeeded`**
**Note:**
In order to run the `checkFundBalanceAndDepositIfNeeded` function, you'll need to have a SUI coin in the address controlled by the KeyPair we're using as a sender. It takes that coin's object id as its lone argument. A simple options is to [use the faucet](https://docs.sui.io/guides/developer/getting-started/get-coins) to send 1 SUI to that address.
The function does the following:
1. Sets a minimum fund balance (in MIST), above which it will make a deposit.
2. Calls `getFund` to obtain the fund information.
3. Checks that it has a deposit address and if the MIST available for new sponsorships is less than the minimum fund balance. We subtract `inFlight` from `balance`, because `inFlight` is what's already reserved for your existing, active sponsorships.
4. If the conditions are met, it creates a `GaslessTransaction` that transfers the coin passed into the function to your fund. Otherwise, it returns `underfined` so we know not to poll the Full node for a transaction.
Replace all instances of `{{name}}` with the actual value for that name.
```bash Shinami Typescript SDK expandable theme={null}
async function checkFundBalanceAndDepositIfNeeded(suiCoinObjectIdToDeposit: string):
Promise {
const MIN_FUND_BALANCE_MIST = 50_000_000_000; // 50 SUI
const { balance, inFlight, depositAddress } = await gasStationClient.getFund();
// Deposit address can be null - see our Help Center for how to generate an address:
// (/help-center/sui/gas-station-faq
if (depositAddress && ((balance - inFlight) < MIN_FUND_BALANCE_MIST)) {
// We're not actually checking it's a SUI coin we're transferring, which you should do.
// We're also going to sponsor this with the gas fund we're depositing to, which only
// works if there's a little SUI left.
return await transferObjectToRecipientGaslessTransaction(
suiCoinObjectIdToDeposit,
depositAddress
);
}
console.log("No deposit because no deposit address or a balance above the minimum you've set.");
return undefined;
}
```
**Set the sender-owned SUI coin ID and Un-comment the function**
1. Set the value of `SUI_COIN_TO_DEPOSIT_ID` to the object ID of a SUI coin owned by the sender. This function is one of the reasons we started the tutorial by having you hard code a private key: so that you had a fixed sender you could send a SUI coin to.
2. Make sure the `checkFundBalanceAndDepositIfNeeded` function is the only sample code function uncommented.
```bash Shinami TypeScript SDK expandable theme={null}
// Values for some of the commented out function calls.
// Objects must be owned by the sender controlled by the KeyPair.
const SUI_COIN_TO_DEPOSIT_ID = "0x0d0c06d477"; // too short for an actual ID
const COIN_TO_SPLIT_FROM_ID = "{{SUIcoinObjectID}}";
const COIN_TO_MERGE_ID = "{{SUIcoinObjectID}}";
const OBJ_ID_TO_TRANSFER = "{{objId}}";
const RECIPIENT_ADDRESS = "{{SuiAddress}}";
// 5. Generate the GaslessTransaction for sponsorship
const gaslessTx = await
// clockMoveCallGaslessTransaction();
// clockMoveCallGaslessTransactionAlternateVersion();
// clockMoveCallGaslessTransactionOfflineBuildManualBudget();
checkFundBalanceAndDepositIfNeeded(SUI_COIN_TO_DEPOSIT_ID);
// splitCoinOwnedByGaslessTransaction(COIN_TO_SPLIT_FROM_ID, SENDER_ADDRESS);
// mergeCoinsGaslessTransaction(COIN_TO_SPLIT_FROM_ID, COIN_TO_MERGE_ID);
// transferObjectToRecipientGaslessTransaction(OBJ_ID_TO_TRANSFER, RECIPIENT_ADDRESS);
```
**Run the code**
Make sure you've saved your changes to the file from above. Run `tsc` in the `shinami-examples/sui/typescript/backend_examples` directory to transpile the code to JavaScript. Then, run `node build/gas_station.js`. You can look up the digest printed to the console in a Sui explorer like [Suivision](https://testnet.suivision.xyz/) or [Suiscan](https://suiscan.xyz/testnet/home) (make sure you've set the explorer to Testnet first). You can also [view the deposit history of your fund](/help-center/aptos/gas-station-faq#faq) on the ["Funds" tab of the Sui Gas Station page](https://app.shinami.com/sui/gas/#sui_gas_funds) of your Shinami Dashboard.
### Tips for setting your sponsorship budget
**Auto-budgeting**
When you omit the `gasBudget` parameter in a sponsorship request using our [Gas Station API](/api-docs/sui/gas-station/api#gas-sponsortransactionblock) or our [Invisible Wallet API](/api-docs/sui/wallet-services/invisible-wallet-api#shinami-wal-executegaslesstransactionblock), we estimate the transaction cost for you. We then add a buffer of 5% for non-shared objects and 25% for shared objects. The larger buffer for shared objects is because in the time between sponsorship and execution, shared objects can change in a way that increases their transaction cost due to transactions from other apps and individuals. Therefore, we encourage you to execute sponsored transactions quickly if possible.
While we believe our buffers work well in most cases, we encourage you to monitor the success rate of your auto-budgeted transactions to gauge whether your specific use-case requires manually setting an even larger gasBudget.
As a part of auto-budgeting, we put your `transactionBytes` through a [sui\_dryRunTransactionBlock](/api-docs/sui/node-service/json-rpc/write-api#sui-dryruntransactionblock) request as a free service before we attempt to sponsor it. This call will generate error messages for certain invalid transactions, such as if the `transactionBytes` are transferring an object that's not owned by the `sender` address you provide. We'll return these errors back to you, which should be the same as if you had made a `sui_dryRunTransactionBlock` request yourself. We do not do this step if you manually budget, so any issues that would be caught by `sui_dryRunTransactionBlock` will instead produce an error when you try to execute the transaction.
**Manual budgeting**
When you provide a value for the `gasBudget` parameter, remember that:
1. The budget set for a transaction along with a fee will be "held" from your gas credits fund while the transaction is in-flight. Funds withheld cannot be used for new sponsorships. Our sponsorship fee is also a percentage of your gas budget (see full explanation in the ["Sui Gas Station" tab of the Billing page](https://app.shinami.com/billing/#sui_gas) in your Shinami dashboard. So, you don't want to set your gas budget unnecessarily high.
2. However, if your budget is set too low for the chain to process, the transaction will fail, but gas credits will still be deducted for the computation cost of running the failed transaction on the Sui blockchain. Note that the reference gas price and storage price can change over time, so a similar transaction's cost one day might be different on another day.
This ends up being an exercise in fine tuning so your budgeted gas is enough to push a transaction through, but not overly provisioned that you are inefficient in your gas credit usage. One place to review the cost of your successful transactions is in a Sui explorer like [Suivision](https://suivision.xyz/) or [Suiscan](https://suiscan.xyz/).
You can also use [`sui_devInspectTransactionBlock`](/api-docs/sui/node-service/json-rpc/write-api#sui-devinspecttransactionblock) to estimate the gas cost needed by the transaction. However, `sui_devInspectTransactionBlock` does not catch all transaction execution errors and should not be used for testing the correctness of a transaction. [`sui_dryRunTransactionBlock`](/api-docs/sui/node-service/json-rpc/write-api#sui-dryruntransactionblock) is better for testing transaction correctness but requires an attached gas object, making it a little harder to test with.
There's an overview of how gas fees are calculated [here](https://docs.sui.io/concepts/tokenomics/gas-in-sui) for more detail.
### Other Transaction examples
There are more types of [transactions](https://docs.sui.io/guides/developer/sui-101/building-ptb) than a Move function call like we did above. Below are some additional examples you can sponsor and execute.
To run any one of them, you need to:
1. Uncomment only that function in Step 5.
2. Set the required values for the constants that represent its arguments
This is the example for `splitCoinOwnedByGaslessTransaction`. Note that
```bash TypeScript expandable theme={null}
const SENDER_ADDRESS = keyPairFromSecretKey.toSuiAddress();
console.log("sender address:", SENDER_ADDRESS);
// Values for some of the commented out function calls.
// Objects must be owned by the sender controlled by the KeyPair.
const SUI_COIN_TO_DEPOSIT_ID = "{{SUIcoinObjectID}}";
const COIN_TO_SPLIT_FROM_ID = "0x0d0c06d477"; // too short for an actual ID
const COIN_TO_MERGE_ID = "{{SUIcoinObjectID}}";
const OBJ_ID_TO_TRANSFER = "{{objId}}";
const RECIPIENT_ADDRESS = "{{SuiAddress}}";
// 5. Generate the GaslessTransaction for sponsorship
const gaslessTx = await
// clockMoveCallGaslessTransaction();
// clockMoveCallGaslessTransactionAlternateVersion();
// clockMoveCallGaslessTransactionOfflineBuildManualBudget();
// checkFundBalanceAndDepositIfNeeded(SUI_COIN_TO_DEPOSIT_ID);
splitCoinOwnedByGaslessTransaction(COIN_TO_SPLIT_FROM_ID, SENDER_ADDRESS);
// mergeCoinsGaslessTransaction(COIN_TO_SPLIT_FROM_ID, COIN_TO_MERGE_ID);
// transferObjectToRecipientGaslessTransaction(OBJ_ID_TO_TRANSFER, RECIPIENT_ADDRESS);
```
Once you've set things for the transaction you want:
Save your changes. Run `tsc` in the `shinami-examples/sui/typescript/backend_examples` directory to transpile the code to JavaScript. Then, run `node build/gas_station.js`. You can look up the digest printed to the console in a Sui explorer like [Suivision](https://testnet.suivision.xyz/) or [Suiscan](https://suiscan.xyz/testnet/home) (make sure you've set the explorer to Testnet first).
### Another way to build a TransactionKind
Above, we called the `clockMoveCallGaslessTransaction` function, which uses the `buildGaslessTransaction` helper function in our TypeScript SDK to build the transaction bytes and turn the bytes into a Base64 string in one request. If you have a need, you can also break those two steps up. The `clockMoveCallGaslessTransactionAlternateVersion()` does this by:
1. Creating a new `Transaction` and populating it with the Move call.
2. Building the transaction (with `onlyTransactionKind: true` because this will be a sponsored transaction).
3. Converting the result to a Base64 string
4. Returning a `GaslessTransaction`.
```bash TypeScript expandable theme={null}
async function clockMoveCallGaslessTransactionAlternateVersion() : Promise {
let txb = new Transaction();
txb.moveCall({
target: "0xfa0e78030bd16672174c2d6cc4cd5d1d1423d03c28a74909b2a148eda8bcca16::clock::access",
arguments: [txb.object('0x6')]
});
// generate the bcs serialized transaction data without any gas object data
const gaslessPayloadBytes = await txb.build({ client: nodeClient, onlyTransactionKind: true});
// convert the byte array to a base64 encoded string
const gaslessPayloadBase64 = btoa(
gaslessPayloadBytes
.reduce((data, byte) => data + String.fromCharCode(byte), '')
);
console.log("\nTransactionKind base64 string for sponsorship:");
console.log(gaslessPayloadBase64);
return {
txKind: gaslessPayloadBase64,
sender: SENDER_ADDRESS,
gasBudget: undefined,
gasPrice: undefined
};
}
```
**Note:**
Building transaction blocks will issue requests to your configured node RPC. For more information on how Sui's programmable transaction blocks are built, see our [TransactionBlock.build() guide](/developer-guides/sui/move-guides/transaction-block-build-requests).
**Run the code**
**Un-comment the function**
Make sure the `clockMoveCallGaslessTransactionAlternateVersion` is the only function un-commented in Step 5:
```bash Shinami TypeScript SDK theme={null}
// 5. Generate the GaslessTransaction for sponsorship
const gaslessTx = await
// clockMoveCallGaslessTransaction();
clockMoveCallGaslessTransactionAlternateVersion();
// clockMoveCallGaslessTransactionOfflineBuildManualBudget();
// checkFundBalanceAndDepositIfNeeded(SUI_COIN_TO_DEPOSIT_ID);
// splitCoinOwnedByGaslessTransaction(COIN_TO_SPLIT_FROM_ID, SENDER_ADDRESS);
// mergeCoinsGaslessTransaction(COIN_TO_SPLIT_FROM_ID, COIN_TO_MERGE_ID);
// transferObjectToRecipientGaslessTransaction(OBJ_ID_TO_TRANSFER, RECIPIENT_ADDRESS);
```
**Run the code**
Make sure you've saved your changes to the file from above. Run `tsc` in the `shinami-examples/sui/typescript/backend_examples` directory to transpile the code to JavaScript. Then, run `node build/gas_station.js`. You can look up the digest printed to the console in a Sui explorer like [Suivision](https://testnet.suivision.xyz/) or [Suiscan](https://suiscan.xyz/testnet/home) (make sure you've set the explorer to Testnet first).
### Check the status of a sponsorship
**Why you may not need to check the status of a sponsorship**
For many use cases, you will not need to check the status of your sponsorships. This is because when you get a successful response from the `gas_sponsorTransactionBlock` request, you will immediately get a sender signature and submit it to your Node Service for execution (and therefore you'll know the status).
Even in the case when a long time elapses between sponsoring the transaction and submitting it to the Sui network, there may not be a need to check the status. If the transaction is executed more than an hour after sponsorship, there will be an error with the associated gas object (because we enforce a 1 hour TTL). If you and the user still want to proceed with the transaction, you can just go through the process again to re-build it and re-sponsor it.
Finally, we return the transaction digest of the sponsored transaction in the `txDigest` response field. This can be used with a [`sui_getTransactionBlock` request](/api-docs/sui/node-service/json-rpc/read-api-events-transactions#sui-gettransactionblock) to a Sui Node service to check on the status of the transaction. So, you have the option to check on the status of the transaction directly, rather than indirectly through checking the attached sponsorship.
**How to check the status of a sponsorship**
All of that said, there may be certain cases where your application needs to check the status of a sponsorship. To use our method for this:
1. Uncomment out the `await checkSponsorshipStatusExample();` line beneath the `checkSponsorshipStatusExample` function, as shown below.
2. Save the changes, transpile the code to JavaScript by running the `tsc` command, and then run the resulting file with `node build/gas_station.js`
```bash TypeScript theme={null}
async function checkSponsorshipStatusExample() : Promise {
const gaslessTx = await clockMoveCallGaslessTransaction();
gaslessTx.sender = SENDER_ADDRESS;
const sponsorship = await gasStationClient.sponsorTransaction(gaslessTx);
const sponsorshipStatus = await gasStationClient.getSponsoredTransactionStatus(
sponsorship.txDigest
);
console.log("sponsored txDigest:", sponsorship.txDigest);
console.log("Sponsorship Status:", sponsorshipStatus);
}
await checkSponsorshipStatusExample();
```
**Note:**
Note that the status will likely be `IN_FLIGHT` even if you've just executed the transaction. This is because it can take a little time after execution for our system to register that the gas object for the transaction has been used. You can read about the possible sponsorship statuses on our [Sui Gas Station API doc](/api-docs/sui/gas-station/api#gas-getsponsoredtransactionblockstatus).
### Getting the lowest latency possible
**Options to consider**
Generally, customers don't have latency concerns with our Gas Station. At the time of writing this, our Mainnet p95 sponsorship latency across all customers in the last month was 102.7ms, with an average of 45.5ms. This is the latency from when a request hits our server to when we return a response. This latency includes sponsorships that use our auto-budgeting (the vast majority) and those that don't.
If your use case requires the lowest latency possible, you can try one or both of the options below. The size of the savings varies a lot depending on your location and your transactions, so you should test with and without these behaviors and only use one if it's meaningful for you. Also, note that the latencies you see on Testnet may not be the same on Mainnet (but should give you an idea of the magnitude of the savings you can achieve).
1. Build your transaction [offline](https://docs.sui.io/guides/developer/sui-101/building-ptb#building-offline). This can save a few requests that would otherwise get made to a Fullnode client [via the `Transaction.build()` request](/developer-guides/sui/move-guides/transaction-block-build-requests). Note, though, that those requests are usually *extremely* fast to fulfill once they reach your Node provider - often sub 10ms - so this is only a latency concern if your servers are geographically far from our those of your Node Service provider.
2. Manually budget your transaction by providing a `gasBudget` value. This skips the [`sui_dryRunTransactionBlock`](/api-docs/sui/node-service/json-rpc/write-api#sui-dryruntransactionblock) request we do as a part of auto-budgeting to determine the right gas budget for your transaction. This `sui_dryRunTransactionBlock` request also catches some transaction errors pre-sponsorship, so you'll lose this check. We generally recommend auto-budgeting because it's fast and sets an ideal budget for you, but if you need the lowest latency possible, manual budgeting speeds things up. How much depends on the complexity of your transactions. Again, our recent p95 for sponsorships- *including* those where we auto-budget and run a `sui_dryRunTransactionBlock` - was just over 100ms on Mainnet. Still, we see some customers whose `sui_dryRunTransactionBlock` p95 latency by itself is > 100ms. So, if you're sponsoring very complex transactions, you could save a meaningful amount of time with manual budgeting.
1. If you choose to do manual budgeting, you still have the option to do a `sui_dryRunTransactionBlock` before requesting sponsorship so that you maintain low latency from the point of asking for a sponsorship onward and you still get the benefits of error checks on your transaction and better gas estimation.
**Understand the code**
We added a method to our sample code that shows how to do both of these things called `clockMoveCallGaslessTransactionOfflineBuildManualBudget()`. The method:
1. Provides all the information needed about the input object offline (see [this doc](https://docs.sui.io/guides/developer/sui-101/building-ptb#building-offline) for more info).
2. Builds the transaction without a Full node client and sets the gas budget manually.
```bash TypeScript expandable theme={null}
async function clockMoveCallGaslessTransactionOfflineBuildManualBudget(): Promise {
// Step 1. Provide all the needed info about our input object offline
// this requires the following import at the top of the file:
// import { Inputs } from "@mysten/sui/transactions";
const sharedClockInput = Inputs.SharedObjectRef({
objectId: "0x6",
mutable: false,
initialSharedVersion: 1
});
// Step 2: Build the Tranasction without a Full node client and
// set the gas budget manually
return await buildGaslessTransaction(
(txb) => {
txb.moveCall({
target: "0xfa0e78030bd16672174c2d6cc4cd5d1d1423d03c28a74909b2a148eda8bcca16::clock::access",
arguments: [txb.object(sharedClockInput)],
});
}, // 'buildGaslessTransaction' includes a Transaction.build() call. We don't pass in a node client since we're building offline.
{
// See our manual bugeting tips:(/developer-guides/sui/tutorials/gas-station-backend-only#tips-for-setting-your-sponsorship-budget
gasBudget: 15_000_000
}
);
}
```
**Run the code**
**Un-comment the function**
Make sure the `clockMoveCallGaslessTransactionAlternateVersion` is the only function un-commented in Step 5:
```bash Shinami TypeScript SDK theme={null}
// 5. Generate the GaslessTransaction for sponsorship
const gaslessTx = await
// clockMoveCallGaslessTransaction();
//clockMoveCallGaslessTransactionAlternateVersion();
clockMoveCallGaslessTransactionOfflineBuildManualBudget();
// checkFundBalanceAndDepositIfNeeded(SUI_COIN_TO_DEPOSIT_ID);
// splitCoinOwnedByGaslessTransaction(COIN_TO_SPLIT_FROM_ID, SENDER_ADDRESS);
// mergeCoinsGaslessTransaction(COIN_TO_SPLIT_FROM_ID, COIN_TO_MERGE_ID);
// transferObjectToRecipientGaslessTransaction(OBJ_ID_TO_TRANSFER, RECIPIENT_ADDRESS);
```
**Run the code**
Make sure you've saved your changes to the file from above. Run `tsc` in the `shinami-examples/sui/typescript/backend_examples` directory to transpile the code to JavaScript. Then, run `node build/gas_station.js`. You can look up the digest printed to the console in a Sui explorer like [Suivision](https://testnet.suivision.xyz/) or [Suiscan](https://suiscan.xyz/testnet/home) (make sure you've set the explorer to Testnet first).
### Integrating Gas Station with Shinami zkLogin wallet API
Shinami's [zkLogin Wallet API](/api-docs/sui/wallet-services/zklogin-wallet-api) powers user-controlled wallets that are fully compatible with transactions sponsored by Shinami Gas Station. After generating a zkProof, you can create a gas-less transaction, sponsor it with your Gas Station fund with the zkLogin wallet address as the sender, and sign the transaction with with zkWallet's ephemeral private key. For more information on zkLogin and the order of operations for producing and submitting a transaction to Sui, see [Mysten's zkLogin doc](https://docs.sui.io/concepts/cryptography/zklogin#the-complete-zklogin-flow). For an end-to-end tutorial showing you how to create your first zkLogin Next.js app that integrates with Shinami's Gas Station API and zkLogin Wallet API, see our [zkLogin wallet Next.js Tutorial](/developer-guides/sui/tutorials/zklogin-nextjs-app-template).
### Integrating Gas Station with Shinami Invisible Wallets
Shinami [Invisible Wallets](/api-docs/sui/wallet-services/invisible-wallet-api) are app-controlled wallets you can use to abstract away web3 elements like seed phrases, third-party wallet connections, gas fees, and signing popups. They have native integration with Gas Station, including a method that allow you to sponsor, sign, and execute a transaction in one method call. We've created a [tutorial for Invisible Wallets](/developer-guides/sui/tutorials/invisible-wallets) that includes using them with Gas Station.
## Appendix
### You can't access the gas coin in a sponsored transaction
In a sponsored transaction, you cannot use the gas object provided by Shinami for other purposes. For example, you cannot write `const [coin] = txb.splitCoins(txb.gas,[txb.pure(100)]);` because it's accessing `txb.gas`. If you try to sponsor a TransactionKind that uses the gas object you will [get a JSON-RPC -32602 error](/developer-guides/core-integration-topics/error-reference#sui-gas-station-api).
### Check a fund's balance and deposit more SUI in the fund
You can use our [`gas_getFund`](/api-docs/sui/gas-station/api#gas-getfund) endpoint to check the balance of the Gas Station fund tied to the request's API access key. We generate a deposit address for the fund when you look it up in the Shinami dashboard - go ahead and do that now ([see how](/help-center/sui/gas-station-faq#faq)). If you don't, the `depositAddress` will be `null` - which is why we guard against it in the code below.
**Understand the `checkFundBalanceAndDepositIfNeeded`**
**Note:**
In order to run the `checkFundBalanceAndDepositIfNeeded` function, you'll need to have a SUI coin in the address controlled by the KeyPair we're using as a sender. It takes that coin's object id as its lone argument. A simple options is to [use the faucet](https://docs.sui.io/guides/developer/getting-started/get-coins) to send 1 SUI to that address.
The function does the following:
1. Sets a minimum fund balance (in MIST), above which it will make a deposit.
2. Calls `getFund` to obtain the fund information.
3. Checks that it has a deposit address and if the MIST available for new sponsorships is less than the minimum fund balance. We subtract `inFlight` from `balance`, because `inFlight` is what's already reserved for your existing, active sponsorships.
4. If the conditions are met, it creates a `GaslessTransaction` that transfers the coin passed into the function to your fund. Otherwise, it returns `underfined` so we know not to poll the Full node for a transaction.
Replace all instances of `{{name}}` with the actual value for that name.
```bash Shinami Typescript SDK expandable theme={null}
async function checkFundBalanceAndDepositIfNeeded(suiCoinObjectIdToDeposit: string):
Promise {
const MIN_FUND_BALANCE_MIST = 50_000_000_000; // 50 SUI
const { balance, inFlight, depositAddress } = await gasStationClient.getFund();
// Deposit address can be null - see our Help Center for how to generate an address:
// (/help-center/sui/gas-station-faq
if (depositAddress && ((balance - inFlight) < MIN_FUND_BALANCE_MIST)) {
// We're not actually checking it's a SUI coin we're transferring, which you should do.
// We're also going to sponsor this with the gas fund we're depositing to, which only
// works if there's a little SUI left.
return await transferObjectToRecipientGaslessTransaction(
suiCoinObjectIdToDeposit,
depositAddress
);
}
console.log("No deposit because no deposit address or a balance above the minimum you've set.");
return undefined;
}
```
**Set the sender-owned SUI coin ID and Un-comment the function**
1. Set the value of `SUI_COIN_TO_DEPOSIT_ID` to the object ID of a SUI coin owned by the sender. This function is one of the reasons we started the tutorial by having you hard code a private key: so that you had a fixed sender you could send a SUI coin to.
2. Make sure the `checkFundBalanceAndDepositIfNeeded` function is the only sample code function uncommented.
```bash Shinami TypeScript SDK expandable theme={null}
// Values for some of the commented out function calls.
// Objects must be owned by the sender controlled by the KeyPair.
const SUI_COIN_TO_DEPOSIT_ID = "0x0d0c06d477"; // too short for an actual ID
const COIN_TO_SPLIT_FROM_ID = "{{SUIcoinObjectID}}";
const COIN_TO_MERGE_ID = "{{SUIcoinObjectID}}";
const OBJ_ID_TO_TRANSFER = "{{objId}}";
const RECIPIENT_ADDRESS = "{{SuiAddress}}";
// 5. Generate the GaslessTransaction for sponsorship
const gaslessTx = await
// clockMoveCallGaslessTransaction();
// clockMoveCallGaslessTransactionAlternateVersion();
// clockMoveCallGaslessTransactionOfflineBuildManualBudget();
checkFundBalanceAndDepositIfNeeded(SUI_COIN_TO_DEPOSIT_ID);
// splitCoinOwnedByGaslessTransaction(COIN_TO_SPLIT_FROM_ID, SENDER_ADDRESS);
// mergeCoinsGaslessTransaction(COIN_TO_SPLIT_FROM_ID, COIN_TO_MERGE_ID);
// transferObjectToRecipientGaslessTransaction(OBJ_ID_TO_TRANSFER, RECIPIENT_ADDRESS);
```
**Run the code**
Make sure you've saved your changes to the file from above. Run `tsc` in the `shinami-examples/sui/typescript/backend_examples` directory to transpile the code to JavaScript. Then, run `node build/gas_station.js`. You can look up the digest printed to the console in a Sui explorer like [Suivision](https://testnet.suivision.xyz/) or [Suiscan](https://suiscan.xyz/testnet/home) (make sure you've set the explorer to Testnet first). You can also [view the deposit history of your fund](/help-center/aptos/gas-station-faq#faq) on the ["Funds" tab of the Sui Gas Station page](https://app.shinami.com/sui/gas/#sui_gas_funds) of your Shinami Dashboard.
### Tips for setting your sponsorship budget
**Auto-budgeting**
When you omit the `gasBudget` parameter in a sponsorship request using our [Gas Station API](/api-docs/sui/gas-station/api#gas-sponsortransactionblock) or our [Invisible Wallet API](/api-docs/sui/wallet-services/invisible-wallet-api#shinami-wal-executegaslesstransactionblock), we estimate the transaction cost for you. We then add a buffer of 5% for non-shared objects and 25% for shared objects. The larger buffer for shared objects is because in the time between sponsorship and execution, shared objects can change in a way that increases their transaction cost due to transactions from other apps and individuals. Therefore, we encourage you to execute sponsored transactions quickly if possible.
While we believe our buffers work well in most cases, we encourage you to monitor the success rate of your auto-budgeted transactions to gauge whether your specific use-case requires manually setting an even larger gasBudget.
As a part of auto-budgeting, we put your `transactionBytes` through a [sui\_dryRunTransactionBlock](/api-docs/sui/node-service/json-rpc/write-api#sui-dryruntransactionblock) request as a free service before we attempt to sponsor it. This call will generate error messages for certain invalid transactions, such as if the `transactionBytes` are transferring an object that's not owned by the `sender` address you provide. We'll return these errors back to you, which should be the same as if you had made a `sui_dryRunTransactionBlock` request yourself. We do not do this step if you manually budget, so any issues that would be caught by `sui_dryRunTransactionBlock` will instead produce an error when you try to execute the transaction.
**Manual budgeting**
When you provide a value for the `gasBudget` parameter, remember that:
1. The budget set for a transaction along with a fee will be "held" from your gas credits fund while the transaction is in-flight. Funds withheld cannot be used for new sponsorships. Our sponsorship fee is also a percentage of your gas budget (see full explanation in the ["Sui Gas Station" tab of the Billing page](https://app.shinami.com/billing/#sui_gas) in your Shinami dashboard. So, you don't want to set your gas budget unnecessarily high.
2. However, if your budget is set too low for the chain to process, the transaction will fail, but gas credits will still be deducted for the computation cost of running the failed transaction on the Sui blockchain. Note that the reference gas price and storage price can change over time, so a similar transaction's cost one day might be different on another day.
This ends up being an exercise in fine tuning so your budgeted gas is enough to push a transaction through, but not overly provisioned that you are inefficient in your gas credit usage. One place to review the cost of your successful transactions is in a Sui explorer like [Suivision](https://suivision.xyz/) or [Suiscan](https://suiscan.xyz/).
You can also use [`sui_devInspectTransactionBlock`](/api-docs/sui/node-service/json-rpc/write-api#sui-devinspecttransactionblock) to estimate the gas cost needed by the transaction. However, `sui_devInspectTransactionBlock` does not catch all transaction execution errors and should not be used for testing the correctness of a transaction. [`sui_dryRunTransactionBlock`](/api-docs/sui/node-service/json-rpc/write-api#sui-dryruntransactionblock) is better for testing transaction correctness but requires an attached gas object, making it a little harder to test with.
There's an overview of how gas fees are calculated [here](https://docs.sui.io/concepts/tokenomics/gas-in-sui) for more detail.
### Other Transaction examples
There are more types of [transactions](https://docs.sui.io/guides/developer/sui-101/building-ptb) than a Move function call like we did above. Below are some additional examples you can sponsor and execute.
To run any one of them, you need to:
1. Uncomment only that function in Step 5.
2. Set the required values for the constants that represent its arguments
This is the example for `splitCoinOwnedByGaslessTransaction`. Note that
```bash TypeScript expandable theme={null}
const SENDER_ADDRESS = keyPairFromSecretKey.toSuiAddress();
console.log("sender address:", SENDER_ADDRESS);
// Values for some of the commented out function calls.
// Objects must be owned by the sender controlled by the KeyPair.
const SUI_COIN_TO_DEPOSIT_ID = "{{SUIcoinObjectID}}";
const COIN_TO_SPLIT_FROM_ID = "0x0d0c06d477"; // too short for an actual ID
const COIN_TO_MERGE_ID = "{{SUIcoinObjectID}}";
const OBJ_ID_TO_TRANSFER = "{{objId}}";
const RECIPIENT_ADDRESS = "{{SuiAddress}}";
// 5. Generate the GaslessTransaction for sponsorship
const gaslessTx = await
// clockMoveCallGaslessTransaction();
// clockMoveCallGaslessTransactionAlternateVersion();
// clockMoveCallGaslessTransactionOfflineBuildManualBudget();
// checkFundBalanceAndDepositIfNeeded(SUI_COIN_TO_DEPOSIT_ID);
splitCoinOwnedByGaslessTransaction(COIN_TO_SPLIT_FROM_ID, SENDER_ADDRESS);
// mergeCoinsGaslessTransaction(COIN_TO_SPLIT_FROM_ID, COIN_TO_MERGE_ID);
// transferObjectToRecipientGaslessTransaction(OBJ_ID_TO_TRANSFER, RECIPIENT_ADDRESS);
```
Once you've set things for the transaction you want:
Save your changes. Run `tsc` in the `shinami-examples/sui/typescript/backend_examples` directory to transpile the code to JavaScript. Then, run `node build/gas_station.js`. You can look up the digest printed to the console in a Sui explorer like [Suivision](https://testnet.suivision.xyz/) or [Suiscan](https://suiscan.xyz/testnet/home) (make sure you've set the explorer to Testnet first).
### Another way to build a TransactionKind
Above, we called the `clockMoveCallGaslessTransaction` function, which uses the `buildGaslessTransaction` helper function in our TypeScript SDK to build the transaction bytes and turn the bytes into a Base64 string in one request. If you have a need, you can also break those two steps up. The `clockMoveCallGaslessTransactionAlternateVersion()` does this by:
1. Creating a new `Transaction` and populating it with the Move call.
2. Building the transaction (with `onlyTransactionKind: true` because this will be a sponsored transaction).
3. Converting the result to a Base64 string
4. Returning a `GaslessTransaction`.
```bash TypeScript expandable theme={null}
async function clockMoveCallGaslessTransactionAlternateVersion() : Promise {
let txb = new Transaction();
txb.moveCall({
target: "0xfa0e78030bd16672174c2d6cc4cd5d1d1423d03c28a74909b2a148eda8bcca16::clock::access",
arguments: [txb.object('0x6')]
});
// generate the bcs serialized transaction data without any gas object data
const gaslessPayloadBytes = await txb.build({ client: nodeClient, onlyTransactionKind: true});
// convert the byte array to a base64 encoded string
const gaslessPayloadBase64 = btoa(
gaslessPayloadBytes
.reduce((data, byte) => data + String.fromCharCode(byte), '')
);
console.log("\nTransactionKind base64 string for sponsorship:");
console.log(gaslessPayloadBase64);
return {
txKind: gaslessPayloadBase64,
sender: SENDER_ADDRESS,
gasBudget: undefined,
gasPrice: undefined
};
}
```
**Note:**
Building transaction blocks will issue requests to your configured node RPC. For more information on how Sui's programmable transaction blocks are built, see our [TransactionBlock.build() guide](/developer-guides/sui/move-guides/transaction-block-build-requests).
**Run the code**
**Un-comment the function**
Make sure the `clockMoveCallGaslessTransactionAlternateVersion` is the only function un-commented in Step 5:
```bash Shinami TypeScript SDK theme={null}
// 5. Generate the GaslessTransaction for sponsorship
const gaslessTx = await
// clockMoveCallGaslessTransaction();
clockMoveCallGaslessTransactionAlternateVersion();
// clockMoveCallGaslessTransactionOfflineBuildManualBudget();
// checkFundBalanceAndDepositIfNeeded(SUI_COIN_TO_DEPOSIT_ID);
// splitCoinOwnedByGaslessTransaction(COIN_TO_SPLIT_FROM_ID, SENDER_ADDRESS);
// mergeCoinsGaslessTransaction(COIN_TO_SPLIT_FROM_ID, COIN_TO_MERGE_ID);
// transferObjectToRecipientGaslessTransaction(OBJ_ID_TO_TRANSFER, RECIPIENT_ADDRESS);
```
**Run the code**
Make sure you've saved your changes to the file from above. Run `tsc` in the `shinami-examples/sui/typescript/backend_examples` directory to transpile the code to JavaScript. Then, run `node build/gas_station.js`. You can look up the digest printed to the console in a Sui explorer like [Suivision](https://testnet.suivision.xyz/) or [Suiscan](https://suiscan.xyz/testnet/home) (make sure you've set the explorer to Testnet first).
### Check the status of a sponsorship
**Why you may not need to check the status of a sponsorship**
For many use cases, you will not need to check the status of your sponsorships. This is because when you get a successful response from the `gas_sponsorTransactionBlock` request, you will immediately get a sender signature and submit it to your Node Service for execution (and therefore you'll know the status).
Even in the case when a long time elapses between sponsoring the transaction and submitting it to the Sui network, there may not be a need to check the status. If the transaction is executed more than an hour after sponsorship, there will be an error with the associated gas object (because we enforce a 1 hour TTL). If you and the user still want to proceed with the transaction, you can just go through the process again to re-build it and re-sponsor it.
Finally, we return the transaction digest of the sponsored transaction in the `txDigest` response field. This can be used with a [`sui_getTransactionBlock` request](/api-docs/sui/node-service/json-rpc/read-api-events-transactions#sui-gettransactionblock) to a Sui Node service to check on the status of the transaction. So, you have the option to check on the status of the transaction directly, rather than indirectly through checking the attached sponsorship.
**How to check the status of a sponsorship**
All of that said, there may be certain cases where your application needs to check the status of a sponsorship. To use our method for this:
1. Uncomment out the `await checkSponsorshipStatusExample();` line beneath the `checkSponsorshipStatusExample` function, as shown below.
2. Save the changes, transpile the code to JavaScript by running the `tsc` command, and then run the resulting file with `node build/gas_station.js`
```bash TypeScript theme={null}
async function checkSponsorshipStatusExample() : Promise {
const gaslessTx = await clockMoveCallGaslessTransaction();
gaslessTx.sender = SENDER_ADDRESS;
const sponsorship = await gasStationClient.sponsorTransaction(gaslessTx);
const sponsorshipStatus = await gasStationClient.getSponsoredTransactionStatus(
sponsorship.txDigest
);
console.log("sponsored txDigest:", sponsorship.txDigest);
console.log("Sponsorship Status:", sponsorshipStatus);
}
await checkSponsorshipStatusExample();
```
**Note:**
Note that the status will likely be `IN_FLIGHT` even if you've just executed the transaction. This is because it can take a little time after execution for our system to register that the gas object for the transaction has been used. You can read about the possible sponsorship statuses on our [Sui Gas Station API doc](/api-docs/sui/gas-station/api#gas-getsponsoredtransactionblockstatus).
### Getting the lowest latency possible
**Options to consider**
Generally, customers don't have latency concerns with our Gas Station. At the time of writing this, our Mainnet p95 sponsorship latency across all customers in the last month was 102.7ms, with an average of 45.5ms. This is the latency from when a request hits our server to when we return a response. This latency includes sponsorships that use our auto-budgeting (the vast majority) and those that don't.
If your use case requires the lowest latency possible, you can try one or both of the options below. The size of the savings varies a lot depending on your location and your transactions, so you should test with and without these behaviors and only use one if it's meaningful for you. Also, note that the latencies you see on Testnet may not be the same on Mainnet (but should give you an idea of the magnitude of the savings you can achieve).
1. Build your transaction [offline](https://docs.sui.io/guides/developer/sui-101/building-ptb#building-offline). This can save a few requests that would otherwise get made to a Fullnode client [via the `Transaction.build()` request](/developer-guides/sui/move-guides/transaction-block-build-requests). Note, though, that those requests are usually *extremely* fast to fulfill once they reach your Node provider - often sub 10ms - so this is only a latency concern if your servers are geographically far from our those of your Node Service provider.
2. Manually budget your transaction by providing a `gasBudget` value. This skips the [`sui_dryRunTransactionBlock`](/api-docs/sui/node-service/json-rpc/write-api#sui-dryruntransactionblock) request we do as a part of auto-budgeting to determine the right gas budget for your transaction. This `sui_dryRunTransactionBlock` request also catches some transaction errors pre-sponsorship, so you'll lose this check. We generally recommend auto-budgeting because it's fast and sets an ideal budget for you, but if you need the lowest latency possible, manual budgeting speeds things up. How much depends on the complexity of your transactions. Again, our recent p95 for sponsorships- *including* those where we auto-budget and run a `sui_dryRunTransactionBlock` - was just over 100ms on Mainnet. Still, we see some customers whose `sui_dryRunTransactionBlock` p95 latency by itself is > 100ms. So, if you're sponsoring very complex transactions, you could save a meaningful amount of time with manual budgeting.
1. If you choose to do manual budgeting, you still have the option to do a `sui_dryRunTransactionBlock` before requesting sponsorship so that you maintain low latency from the point of asking for a sponsorship onward and you still get the benefits of error checks on your transaction and better gas estimation.
**Understand the code**
We added a method to our sample code that shows how to do both of these things called `clockMoveCallGaslessTransactionOfflineBuildManualBudget()`. The method:
1. Provides all the information needed about the input object offline (see [this doc](https://docs.sui.io/guides/developer/sui-101/building-ptb#building-offline) for more info).
2. Builds the transaction without a Full node client and sets the gas budget manually.
```bash TypeScript expandable theme={null}
async function clockMoveCallGaslessTransactionOfflineBuildManualBudget(): Promise {
// Step 1. Provide all the needed info about our input object offline
// this requires the following import at the top of the file:
// import { Inputs } from "@mysten/sui/transactions";
const sharedClockInput = Inputs.SharedObjectRef({
objectId: "0x6",
mutable: false,
initialSharedVersion: 1
});
// Step 2: Build the Tranasction without a Full node client and
// set the gas budget manually
return await buildGaslessTransaction(
(txb) => {
txb.moveCall({
target: "0xfa0e78030bd16672174c2d6cc4cd5d1d1423d03c28a74909b2a148eda8bcca16::clock::access",
arguments: [txb.object(sharedClockInput)],
});
}, // 'buildGaslessTransaction' includes a Transaction.build() call. We don't pass in a node client since we're building offline.
{
// See our manual bugeting tips:(/developer-guides/sui/tutorials/gas-station-backend-only#tips-for-setting-your-sponsorship-budget
gasBudget: 15_000_000
}
);
}
```
**Run the code**
**Un-comment the function**
Make sure the `clockMoveCallGaslessTransactionAlternateVersion` is the only function un-commented in Step 5:
```bash Shinami TypeScript SDK theme={null}
// 5. Generate the GaslessTransaction for sponsorship
const gaslessTx = await
// clockMoveCallGaslessTransaction();
//clockMoveCallGaslessTransactionAlternateVersion();
clockMoveCallGaslessTransactionOfflineBuildManualBudget();
// checkFundBalanceAndDepositIfNeeded(SUI_COIN_TO_DEPOSIT_ID);
// splitCoinOwnedByGaslessTransaction(COIN_TO_SPLIT_FROM_ID, SENDER_ADDRESS);
// mergeCoinsGaslessTransaction(COIN_TO_SPLIT_FROM_ID, COIN_TO_MERGE_ID);
// transferObjectToRecipientGaslessTransaction(OBJ_ID_TO_TRANSFER, RECIPIENT_ADDRESS);
```
**Run the code**
Make sure you've saved your changes to the file from above. Run `tsc` in the `shinami-examples/sui/typescript/backend_examples` directory to transpile the code to JavaScript. Then, run `node build/gas_station.js`. You can look up the digest printed to the console in a Sui explorer like [Suivision](https://testnet.suivision.xyz/) or [Suiscan](https://suiscan.xyz/testnet/home) (make sure you've set the explorer to Testnet first).
### Integrating Gas Station with Shinami zkLogin wallet API
Shinami's [zkLogin Wallet API](/api-docs/sui/wallet-services/zklogin-wallet-api) powers user-controlled wallets that are fully compatible with transactions sponsored by Shinami Gas Station. After generating a zkProof, you can create a gas-less transaction, sponsor it with your Gas Station fund with the zkLogin wallet address as the sender, and sign the transaction with with zkWallet's ephemeral private key. For more information on zkLogin and the order of operations for producing and submitting a transaction to Sui, see [Mysten's zkLogin doc](https://docs.sui.io/concepts/cryptography/zklogin#the-complete-zklogin-flow). For an end-to-end tutorial showing you how to create your first zkLogin Next.js app that integrates with Shinami's Gas Station API and zkLogin Wallet API, see our [zkLogin wallet Next.js Tutorial](/developer-guides/sui/tutorials/zklogin-nextjs-app-template).
### Integrating Gas Station with Shinami Invisible Wallets
Shinami [Invisible Wallets](/api-docs/sui/wallet-services/invisible-wallet-api) are app-controlled wallets you can use to abstract away web3 elements like seed phrases, third-party wallet connections, gas fees, and signing popups. They have native integration with Gas Station, including a method that allow you to sponsor, sign, and execute a transaction in one method call. We've created a [tutorial for Invisible Wallets](/developer-guides/sui/tutorials/invisible-wallets) that includes using them with Gas Station.