> ## Documentation Index
> Fetch the complete documentation index at: https://docs.shinami.com/llms.txt
> Use this file to discover all available pages before exploring further.
# Gas Station: backend-only
> Full sample code for building, sponsoring, signing, and submitting a sponsored transaction.
## Overview
In this tutorial you'll learn how to sponsor transactions with Shinami's Gas Station. For more on the benefits of sponsoring transactions and to see an image of an end-to-end sponsorship flow, see our [Gas Station high-level guide](/product-overviews/movement/gas-station) The full code for this TypeScript tutorial is available on [GitHub](https://github.com/shinamicorp/shinami-examples).
Movement is a [fork of Aptos](https://github.com/movementlabsxyz/aptos-core), so developing for both of these chains is very similar. If you're getting started with Movement, they have some [developer docs](https://docs.movementnetwork.xyz/general) to help.
**Orderless transactions:** We currently don't support sponsoring [orderless transactions](https://aptos.dev/en/build/sdks/ts-sdk/building-transactions/orderless-transactions) but plan to add this support in the future. If you need this support, please reach out to us at `support@shinami.com`.
### Requests must be from your BE
Our Gas Station does not support CORS, so if you attempt to make requests to it from the FE you'll get a CORS error. We do this because exposing a Gas Station API key on the FE is a security risk - an attacker could drain the MOVE in your Gas Station fund associated with the key by using it to sponsor transactions.
For an overview of ways to integrate frontend signing with backend sponsorship, see our [Frontend signing + backend sponsorship tutorial](/developer-guides/movement/tutorials/gas-station-with-frontend-signing).
### Understanding errors
Check the error code and message of any errors you get. We outline common errors in our Error Reference - make sure to check out the [section specific to Movement Gas Station](/developer-guides/core-integration-topics/error-reference#movement-gas-station-api) as well as the "General Error Codes" section at the top that apply to all Shinami services.
## Usage and Billing FAQ
Make sure to check out the Movement Gas Station [product usage FAQ](/help-center/movement/gas-station-faq) and [billing FAQ](/help-center/billing/movement-faq#gas-station) in our Help Center for answers to common questions.
## Required setup
**Notes:**
* This tutorial requires a Shinami account. You can sign up for one [here](https://app.shinami.com/signup).
* If you have questions not covered by the tutorial you can [reach out to us](/help-center/overview#contacting-support).
### 1. Create a Shinami Gas Station fund on Testnet
You'll need a Testnet Gas Station fund in order to sponsor transactions. We have guidance on creating one in the [Movement Gas Station page of our Help Center](/help-center/movement/gas-station-faq#how-do-i-create-a-fund%3F). When you make a Testnet fund we deposit some MOVE in it so you can start testing immediately.
### 2. Clone the github repo and install dependencies
Clone the [shinami-examples github repo](https://github.com/shinamicorp/shinami-examples/tree/main), cd into the `shinami-examples/movement/typescript/backend_examples` directory, and run `npm install`to install the dependencies for running the code. If you need to install npm and Node.js, [see here](https://docs.npmjs.com/downloading-and-installing-node-js-and-npm) . Below, we'll be using the `gas_station.ts` file in the `shinami-examples/movement/typescript/backend_examples/src` directory.
### 3. Create an API access key and copy it into the file.
**Create an access key with Testnet Node Service and Gas Station rights**
You use API access keys to interact with Shinami's services. For this tutorial, we'll create one access key that has `Gas Station` rights for Testnet transaction sponsorship.
See our [Authentication and API Keys guide](/developer-guides/core-integration-topics/authentication-and-api-keys#create-an-access-key) for info on how to create a key. Make sure to link it to the fund you created in step 1.
**Add it to the gas\_station.ts file**
Once you have your key, use it as the value for the `TESTNET_MOVEMENT_GAS_STATION_API_KEY` constant. You'll see that we immediately use it to instantiate a Gas Station client (for sponsoring transactions).
```bash TypeScript theme={null}
const TESTNET_MOVEMENT_GAS_STATION_API_KEY = "TESTNET_MOVEMENT_GAS_STATION_API_KEY";
const gasStationClient = new GasStationClient(TESTNET_MOVEMENT_GAS_STATION_API_KEY);
```
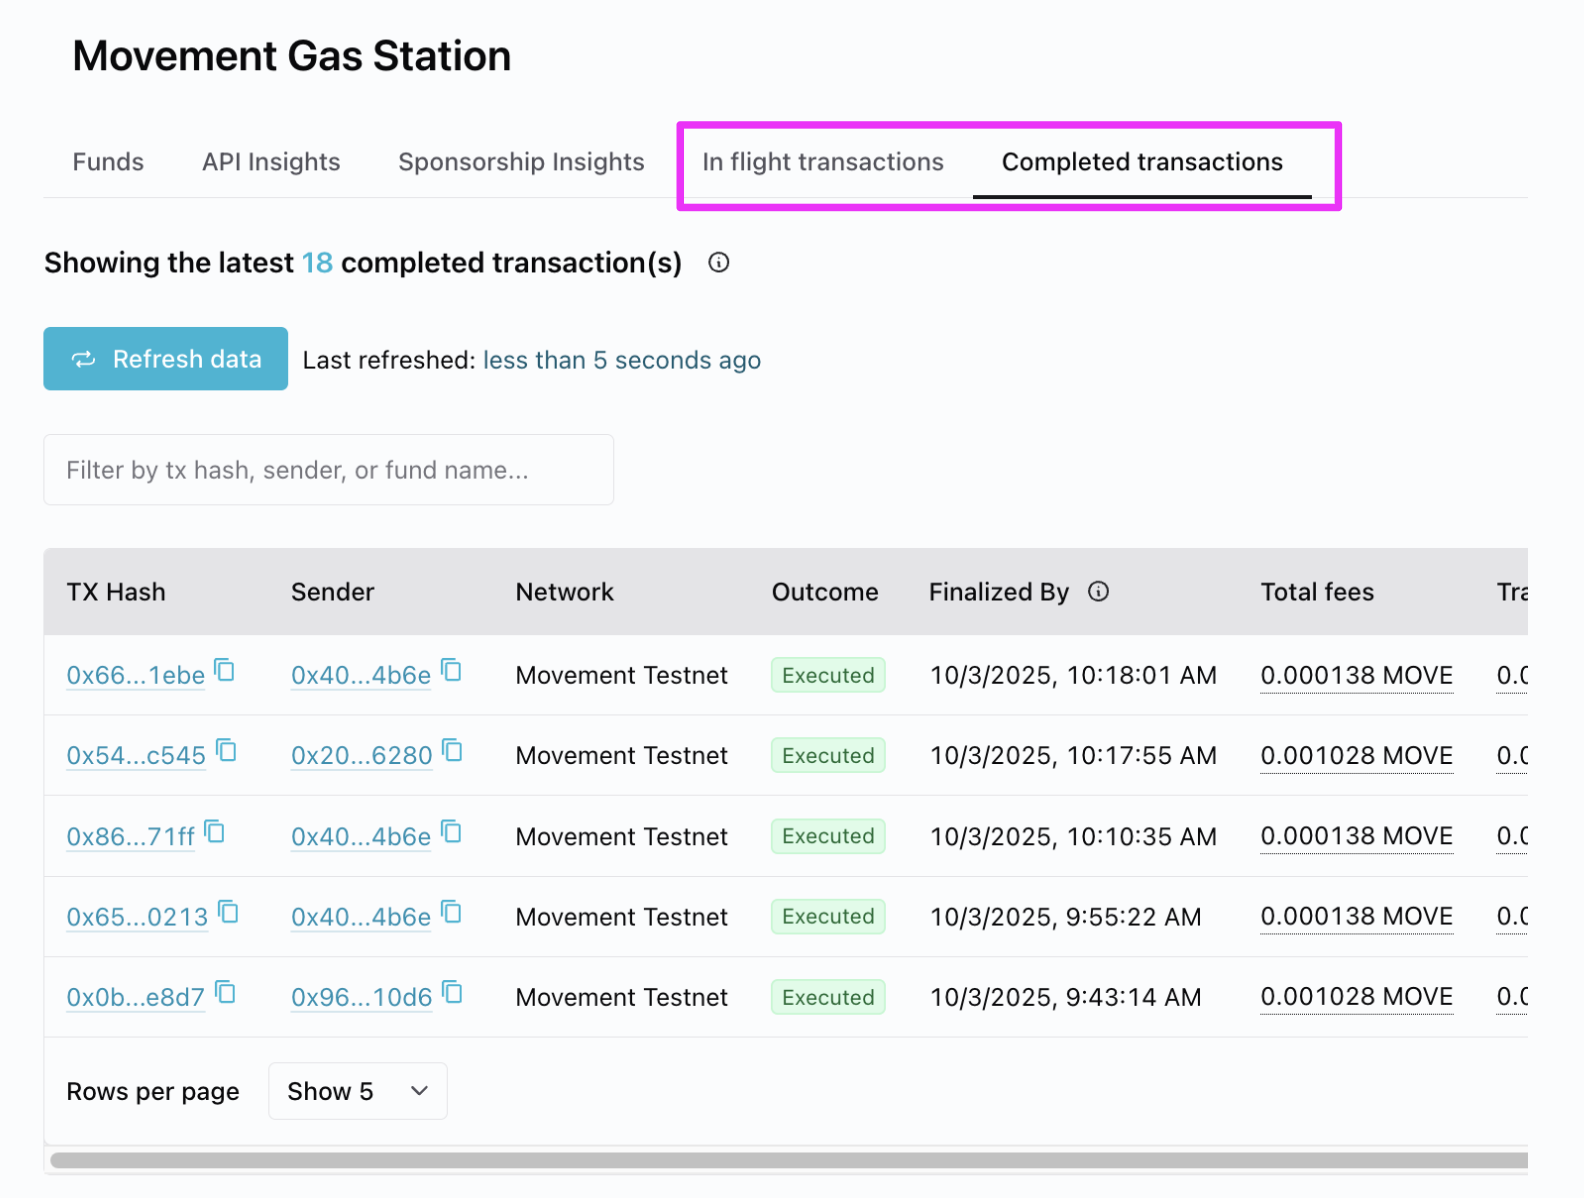
### 4: Open your Shinami dashboard
Technically not required, but we recommend visiting the ["Completed transactions" tab of the Movement Gas Station page](https://app.shinami.com/movement/gas/#movement_gas_completed_tx) of your Shinami dashboard. After running the code examples, take a look at this page. It may take a moment, but you'll see the digests of transactions you sponsor that are committed to the blockchain appear as in the image below. This tab, and the "In flight transactions" tab (for sponsored transactions that haven't yet been committed to the Movement blockchain) can be helpful when testing.
 ## Code examples
### Overview
Below, we'll review each of our sample code functions and how to run them. At a high-level, you'll uncomment just one sample code function - e.g. `sponsorTransactionSimple()` in the code block below. Then, save the change, Run `tsc` in the `shinami-examples/movement/typescript/backend_examples` directory to transpile, and run `node build/gas_station.js` to run. This will work as downloaded for the simple transaction examples, but the multi-agent ones require compiling a Move script (explained in the Appendix).
```bash TypeScript expandable theme={null}
const committedTransaction = await
sponsorTransactionSimple();
// sponsorTransactionMultiAgent(fundedSenderAccount, fundedSecondarySignerAccount);
// sponsorAndSubmitSignedTransactionSimple();
// sponsorAndSubmitSignedTransactionMultiAgent(fundedSenderAccount, fundedSecondarySignerAccount);
// checkFundBalanceAndDepositIfNeeded(fundedSenderAccount);
// Wait for the transaction to move past the pending state
if (committedTransaction) {
console.log("Polling for tx hash: ", committedTransaction.hash);
const executedTransaction = await movementClient.waitForTransaction({
transactionHash: committedTransaction.hash
});
console.log("Transaction status:", executedTransaction.vm_status);
} else {
console.log("There was an issue with building and submitting the transaction.");
}
```
Each of the sample code functions returns a `Promise`. If our function was successful, we wait for the transaction to be committed to the blockchain and then print out the hash and status. Example:
```
Polling for tx hash: 0x0ef95fed63f9ca8d8ce4b1b1676511cfb5a61cd97b3e43b47cdc3224788f4346
Transaction status: Executed successfully
```
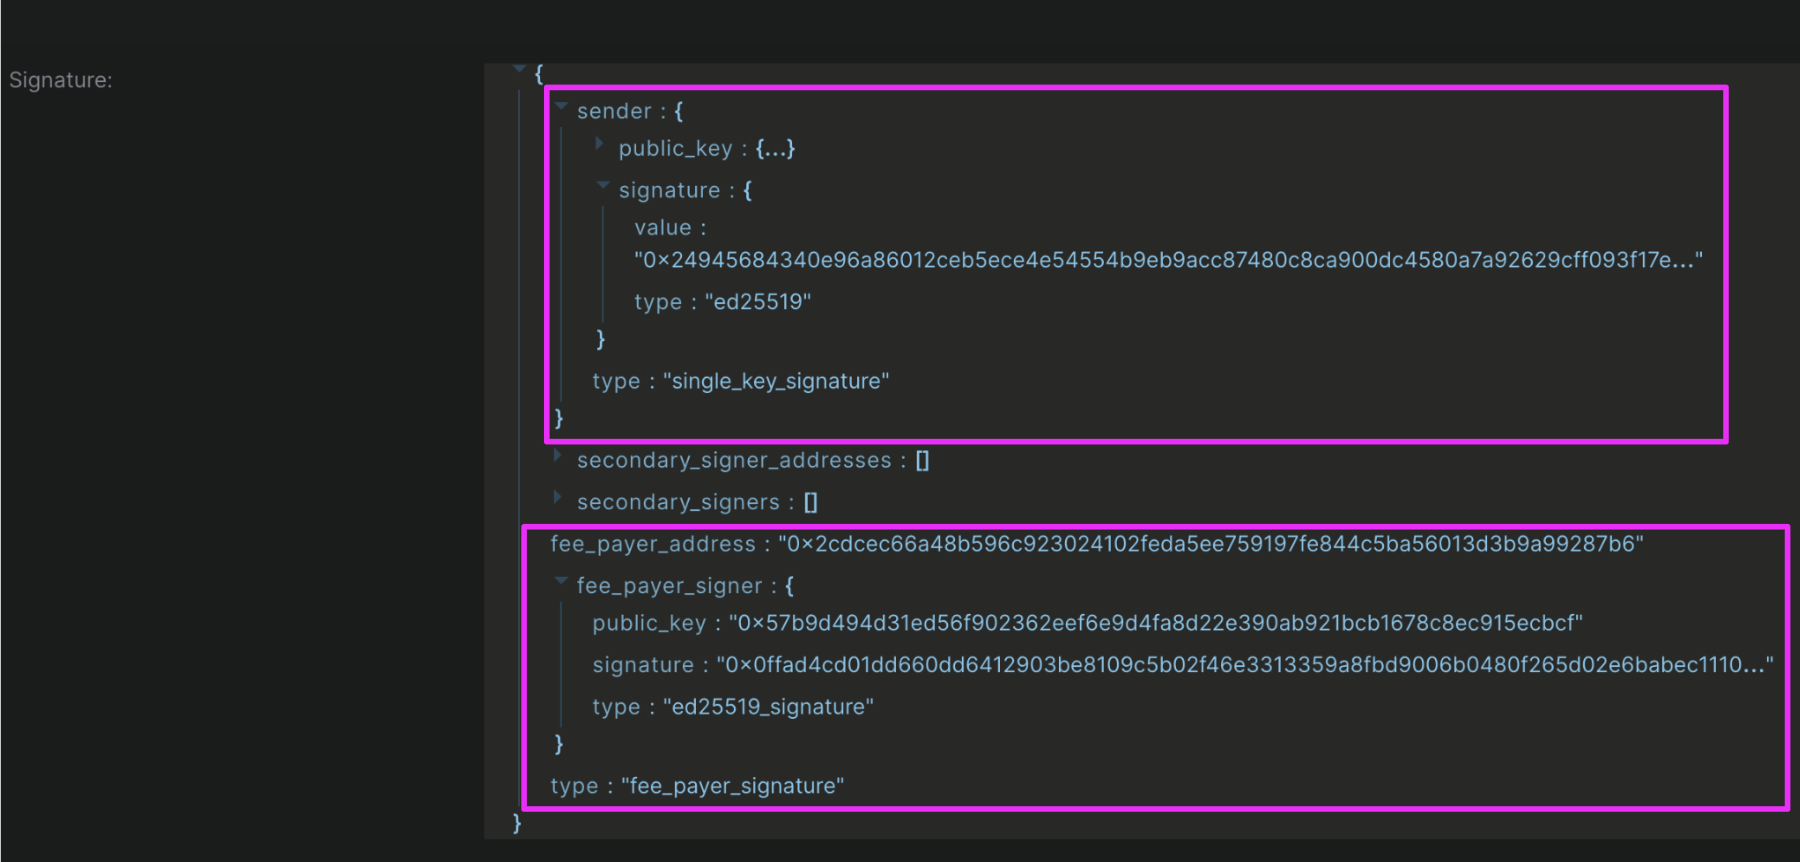
You can look up the digest in the [Movement Explorer](https://explorer.movementnetwork.xyz/?network=bardock+testnet) (make sure the explorer is set to Testnet). This is an image showing that [my transaction](https://explorer.movementnetwork.xyz/txn/0x0ef95fed63f9ca8d8ce4b1b1676511cfb5a61cd97b3e43b47cdc3224788f4346?network=bardock+testnet) had both a sender and a fee payer signature (your sender and feePayer addresses will be different):
## Code examples
### Overview
Below, we'll review each of our sample code functions and how to run them. At a high-level, you'll uncomment just one sample code function - e.g. `sponsorTransactionSimple()` in the code block below. Then, save the change, Run `tsc` in the `shinami-examples/movement/typescript/backend_examples` directory to transpile, and run `node build/gas_station.js` to run. This will work as downloaded for the simple transaction examples, but the multi-agent ones require compiling a Move script (explained in the Appendix).
```bash TypeScript expandable theme={null}
const committedTransaction = await
sponsorTransactionSimple();
// sponsorTransactionMultiAgent(fundedSenderAccount, fundedSecondarySignerAccount);
// sponsorAndSubmitSignedTransactionSimple();
// sponsorAndSubmitSignedTransactionMultiAgent(fundedSenderAccount, fundedSecondarySignerAccount);
// checkFundBalanceAndDepositIfNeeded(fundedSenderAccount);
// Wait for the transaction to move past the pending state
if (committedTransaction) {
console.log("Polling for tx hash: ", committedTransaction.hash);
const executedTransaction = await movementClient.waitForTransaction({
transactionHash: committedTransaction.hash
});
console.log("Transaction status:", executedTransaction.vm_status);
} else {
console.log("There was an issue with building and submitting the transaction.");
}
```
Each of the sample code functions returns a `Promise`. If our function was successful, we wait for the transaction to be committed to the blockchain and then print out the hash and status. Example:
```
Polling for tx hash: 0x0ef95fed63f9ca8d8ce4b1b1676511cfb5a61cd97b3e43b47cdc3224788f4346
Transaction status: Executed successfully
```
You can look up the digest in the [Movement Explorer](https://explorer.movementnetwork.xyz/?network=bardock+testnet) (make sure the explorer is set to Testnet). This is an image showing that [my transaction](https://explorer.movementnetwork.xyz/txn/0x0ef95fed63f9ca8d8ce4b1b1676511cfb5a61cd97b3e43b47cdc3224788f4346?network=bardock+testnet) had both a sender and a fee payer signature (your sender and feePayer addresses will be different):
 ### Sponsor a simple transaction
**Understand the code**
The `sponsorTransactionSimple` function performs all the steps needed to build, sponsor, sign, and submit a simple transaction:
Creates an Account to use as the sender.
Builds the transaction (see how it's done in the [Appendix](/developer-guides/movement/tutorials/gas-station-backend-only#build-a-simpletransaction-for-sponsorship)).
Sponsors the transaction with a call to Shinami Gas Station. Note that our TypeScript SDK updates the feePayer address upon a successful sponsorship as shown by the `console.log()` statement below.
Signs the transaction as the sender.
Submits the transaction with the sender and feePayer signatures and returns the result.
```bash TypeScript expandable theme={null}
async function sponsorTransactionSimple(): Promise {
// 1. Set up our sender.
const sender = await generateSingleKeyAccountEd25519();
// 2. Build a simple transaction.
let transaction = await buildSimpleMoveCallTransaction(sender.accountAddress);
// 3. Sponsor the transaction with Shinami Gas Station.
let feePayerAuthenticator = await gasStationClient.sponsorTransaction(transaction);
// Note that the SDK updates the transaction's feePayer address on a successful sponsorship
console.log("\ntransaction.feePayerAddress post-sponsorship:", transaction.feePayerAddress);
// 4. Generate the sender's signature.
const senderAuthenticator = movementClient.transaction.sign({
signer: sender,
transaction: transaction
});
// 5. Submit the transaction with the sender and fee payer signatures
return await movementClient.transaction.submit.simple({
transaction,
senderAuthenticator,
feePayerAuthenticator: feePayerAuthenticator,
});
}
```
**Update, save, compile, run**
Make sure the function is the only sample code function uncommented:
```bash TypeScript theme={null}
//
// -- Choose which sample code function to use to generate a PendingTransactionResponse //
//
const committedTransaction = await
sponsorTransactionSimple();
// sponsorTransactionMultiAgent();
// sponsorAndSubmitSignedTransactionSimple();
// sponsorAndSubmitSignedTransactionMultiAgent();
// checkFundBalanceAndDepositIfNeeded();
```
Save the file if you made a change. Run `tsc` in the `shinami-examples/movement/typescript/backend_examples` directory to transpile. Then, run `node build/gas_station.js`. If successful, you can view the sponsorship on the ["Completed transactions" tab of the Movement Gas Station page](https://app.shinami.com/movement/gas/#movement_gas_completed_tx) of your Shinami Dashboard. You can also look up the transaction digest printed to the console in the [Movement Explorer](https://explorer.movementnetwork.xyz/?network=bardock+testnet) (make sure the explorer is set to Testnet).
### Sponsor a multi-agent transaction
**Understand the code**
The `sponsorTransactionMultiAgent` function performs all the steps needed to build, sponsor, sign, and submit a multi-agent Move script transaction. Before you run it, you'll need to generate two funded Accounts that will swap Octa (see how it's done in the [Appendix](/developer-guides/movement/tutorials/gas-station-backend-only#generating-funded-accounts-for-testing)). The function:
Builds the transaction (see how it's done in the [Appendix](/developer-guides/movement/tutorials/gas-station-backend-only#build-a-multiagenttransaction-with-a-compiled-move-script)).
Sponsors the transaction with a request to Shinami Gas Station. Note that our TypeScript SDK updates the feePayer address upon a successful sponsorship as shown by the `console.log()` statement below.
Generates the sender and secondary signer signatures.
Submits the transaction with the sender, secondary signer, and feePayer signatures and returns the result.
```bash TypeScript expandable theme={null}
async function sponsorTransactionMultiAgent(
fundedSenderAccount: SingleKeyAccount,
fundedSecondarySigner: SingleKeyAccount):
Promise {
// 1. Build a multiAgent transaction
let transaction = await buildMultiAgentScriptTransaction(
fundedSenderAccount.accountAddress,
fundedSecondarySigner.accountAddress);
// 2. Sponsor the transaction with Shinami Gas Station
let feePayerAuthenticator = await gasStationClient.sponsorTransaction(transaction);
// Note that the SDK updates the transaction's feePayer address on a successful sponsorship
console.log("\ntransaction.feePayerAddress post-sponsorship:", transaction.feePayerAddress);
// 3. Generate the sender and secondary signer signatures
const senderAuthenticator = movementClient.transaction.sign({
signer: fundedSenderAccount,
transaction
});
const secondarySignerAuthenticator = movementClient.transaction.sign({
signer: fundedSecondarySigner,
transaction
});
// 4. Submit the transaction with the sender, seconardy signer, and feePayer signatures
return await movementClient.transaction.submit.multiAgent({
transaction,
senderAuthenticator,
additionalSignersAuthenticators: [secondarySignerAuthenticator],
feePayerAuthenticator: feePayerAuthenticator
});
}
```
**Update, save, compile, run**
In order to run this example, you'll need to compile the Move script used as shown in the [Appendix](/developer-guides/movement/tutorials/gas-station-backend-only#build-a-multiagenttransaction-with-a-compiled-move-script).
Make sure the function is the only sample code function uncommented:
```bash TypeScript theme={null}
//
// -- Choose which sample code function to use to generate a PendingTransactionResponse //
//
const committedTransaction = await
//sponsorTransactionSimple();
sponsorTransactionMultiAgent(fundedSenderAccount, fundedSecondarySignerAccount);
//sponsorAndSubmitSignedTransactionSimple();
//sponsorAndSubmitSignedTransactionMultiAgent(fundedSenderAccount,fundedSecondarySignerAccount);
//checkFundBalanceAndDepositIfNeeded(fundedSenderAccount);
```
Save the file if you made a change. Run `tsc` in the `shinami-examples/movement/typescript/backend_examples` directory to transpile. Then, run `node build/gas_station.js`. If successful, you can view the sponsorship on the ["Completed transactions" tab of the Movement Gas Station page](https://app.shinami.com/movement/gas/#movement_gas_completed_tx) of your Shinami Dashboard. You can also look up the transaction digest printed to the console in the [Movement Explorer](https://explorer.movementnetwork.xyz/?network=bardock+testnet) (make sure the explorer is set to Testnet).
## Sponsor and submit a signed, simple transaction
**Understand the code**
The `sponsorAndSubmitSignedTransactionSimple` function performs all the steps needed to build and sign a simple transaction, and then send it to Gas Station for sponsorship and submission to the Movement blockchain:
Creates an Account to use as the sender.
Builds the transaction (see how it's done in the [Appendix](/developer-guides/movement/tutorials/gas-station-backend-only#build-a-simpletransaction-for-sponsorship)).
Generates the sender's signature.
Makes a request to Gas Station to sponsor and submit the signed transaction, returning the result.
```bash TypeScript expandable theme={null}
async function sponsorAndSubmitSignedTransactionSimple(): Promise {
// 1. Set up our sender.
const sender = await generateSingleKeyAccountEd25519();
// 2. Build a simple transaction.
const transaction = await buildSimpleMoveCallTransaction(sender.accountAddress);
// 3. Generate the sender's signature.
const senderAuthenticator = movementClient.transaction.sign({
signer: sender,
transaction
});
// 4. Ask Shinami to sponsor and submit the transaction
return await gasStationClient.sponsorAndSubmitSignedTransaction(
transaction,
senderAuthenticator
);
}
```
**Update, save, compile, run**
Make sure the function is the only sample code function uncommented:
```bash TypeScript theme={null}
//
// -- Choose which sample code function to use to generate a PendingTransactionResponse //
//
const committedTransaction = await
//sponsorTransactionSimple();
//sponsorTransactionMultiAgent(fundedSenderAccount, fundedSecondarySignerAccount);
sponsorAndSubmitSignedTransactionSimple();
//sponsorAndSubmitSignedTransactionMultiAgent(fundedSenderAccount,fundedSecondarySignerAccount);
//checkFundBalanceAndDepositIfNeeded(fundedSenderAccount);
```
Save the file if you made a change. Run `tsc` in the `shinami-examples/movement/typescript/backend_examples` directory to transpile. Then, run `node build/gas_station.js`. If successful, you can view the sponsorship on the ["Completed transactions" tab of the Movement Gas Station page](https://app.shinami.com/movement/gas/#movement_gas_completed_tx) of your Shinami Dashboard. You can also look up the transaction digest printed to the console in the [Movement Explorer](https://explorer.movementnetwork.xyz/?network=bardock+testnet) (make sure the explorer is set to Testnet).
## Sponsor and submit a multi-agent transaction
**Understand the code**
The `sponsorAndSubmitSignedTransactionMultiAgent` function performs all the steps needed to build and sign a multi-agent Move script transaction, and then send it to Gas Station for sponsorship and submission to the Movement blockchain. Before you run it, you'll need to generate two, funded Accounts that will swap Octa if you haven't already done so (see how it's done in the [Appendix](/developer-guides/aptos/tutorials/gas-station-backend-only#generating-funded-accounts-for-testing)). The function:
Builds the transaction (see how it's done in the [Appendix](/developer-guides/movement/tutorials/gas-station-backend-only#build-a-multiagenttransaction-with-a-compiled-move-script)).
Generates the sender and secondary signer signatures.
Makes a request to Gas Station to sponsor and submit the signed transaction, returning the result.
```bash TypeScript expandable theme={null}
async function sponsorAndSubmitSignedTransactionMultiAgent(
fundedSenderAccount:SingleKeyAccount,
fundedSecondarySigner: SingleKeyAccount):
Promise {
// 1. Build a multiAgent transaction
let transaction = await buildMultiAgentScriptTransaction(
fundedSenderAccount.accountAddress,
fundedSecondarySigner.accountAddress);
// 2. Generate the sender and secondary signer signatures
const senderAuthenticator = movementClient.transaction.sign({
signer: fundedSenderAccount,
transaction
});
const secondarySignerAuthenticator = movementClient.transaction.sign({
signer: fundedSecondarySigner,
transaction
});
// 3. Ask Shinami to sponsor and submit the transaction
return await gasStationClient.sponsorAndSubmitSignedTransaction(
transaction,
senderAuthenticator,
[secondarySignerAuthenticator]
);
}
```
**Update, save, compile, run**
In order to run this example, you'll need to compile the Move script used as shown in the [Appendix](/developer-guides/movement/tutorials/gas-station-backend-only#build-a-multiagenttransaction-with-a-compiled-move-script).
Make sure the function is the only sample code function uncommented:
```bash TypeScript theme={null}
//
// -- Choose which sample code function to use to generate a PendingTransactionResponse //
//
const committedTransaction = await
// sponsorTransactionSimple();
// sponsorTransactionMultiAgent(fundedSenderAccount, fundedSecondarySignerAccount);
// sponsorAndSubmitSignedTransactionSimple();
sponsorAndSubmitSignedTransactionMultiAgent(fundedSenderAccount, fundedSecondarySignerAccount);
// checkFundBalanceAndDepositIfNeeded(fundedSenderAccount);
```
Save the file if you made a change. Run `tsc` in the `shinami-examples/movement/typescript/backend_examples` directory to transpile. Then, run `node build/gas_station.js`. If successful, you can view the sponsorship on the ["Completed transactions" tab of the Movement Gas Station page](https://app.shinami.com/movement/gas/#movement_gas_completed_tx) of your Shinami Dashboard. You can also look up the transaction digest printed to the console in the [Movement Explorer](https://explorer.movementnetwork.xyz/?network=bardock+testnet) (make sure the explorer is set to Testnet).
## Check your fund balance and make a deposit
**Understand the code**
The `checkFundBalanceAndDepositIfNeeded` function does... well, exactly what it says it does 😄. Before you run it, you'll need to generate a funded Account if you haven't already done so (see how it's done in the [Appendix](/developer-guides/movement/tutorials/gas-station-backend-only#generating-funded-accounts-for-testing)). The function:
Makes a call to [`gas_getFund`](/api-docs/movement/gas-station/api#gas-getfund) to obtain your fund's balance.
Checks if the amount that's available to use is less than the minimum amount you want.
1. If true, it:
1. creates the transaction to transfer MOVE to your fund address
2. obtains the sender's signature (from the funded Account you made)
3. submits the transaction and returns the result.
2. Else, it returns `undefined`.
```bash TypeScript expandable theme={null}
async function checkFundBalanceAndDepositIfNeeded(fundedSenderAccount: SingleKeyAccount):
Promise {
const MIN_FUND_BALANCE_OCTA = 1_000_000_000; // 10 MOVE
const { balance, inFlight, depositAddress } = await gasStationClient.getFund();
console.log("Fund balance not in use (in Move):", (balance - inFlight) / 100_000_000);
// You'll want to deposit more than 1000 Octa, and what you want may be dynamic based on the
// current (balance - inFlight) amount, etc. This is just a simple example.
const STANDARD_DEPOSIT_AMOUNT = 1000;
// Deposit address can be null - see our Help Center for how to generate an address:
// https://docs.shinami.com/help-center/movement/gas-station-faq#how-do-i-generate-and-find-the-deposit-address-of-a-fund%3F
if (depositAddress && ((balance - inFlight) < MIN_FUND_BALANCE_OCTA)) {
// Create a SimpleTransaction that transfers MOVE from the sender to your Gas Station fund
const transferTx = await movementClient.transferCoinTransaction({
sender: fundedSenderAccount.accountAddress,
recipient: depositAddress,
amount: STANDARD_DEPOSIT_AMOUNT
});
// Obtain the sender's signature
const senderAuth = fundedSenderAccount.signTransactionWithAuthenticator(transferTx);
// Submit the transaction
return await movementClient.transaction.submit.simple({
transaction: transferTx,
senderAuthenticator: senderAuth
});
}
console.log("No deposit because no deposit address or a balance above the minimum you've set.");
return undefined;
}
```
**Update, save, compile, run**
Make sure the function is the only sample code function uncommented:
```bash TypeScript theme={null}
//
// -- Choose which sample code function to use to generate a PendingTransactionResponse //
//
const committedTransaction = await
//sponsorTransactionSimple();
//sponsorTransactionMultiAgent(fundedSenderAccount, fundedSecondarySignerAccount);
//sponsorAndSubmitSignedTransactionSimple();
//sponsorAndSubmitSignedTransactionMultiAgent(fundedSenderAccount,fundedSecondarySignerAccount);
checkFundBalanceAndDepositIfNeeded(fundedSenderAccount);
```
Save the file if you made a change. Run `tsc` in the `shinami-examples/movement/typescript/backend_examples` directory to transpile. Then, run `node build/gas_station.js`. If successful, you can view the sponsorship on the ["Completed transactions" tab of the Movement Gas Station page](https://app.shinami.com/movement/gas/#movement_gas_completed_tx) of your Shinami Dashboard. You can also look up the transaction digest printed to the console in the [Movement Explorer](https://explorer.movementnetwork.xyz/?network=bardock+testnet) (make sure the explorer is set to Testnet).
## Appendix
### Build a SimpleTransaction for sponsorship
The below function creates a transaction that calls a function on a Move module we've [deployed to Testnet](https://explorer.movementnetwork.xyz/account/0xe56b2729723446cd0836a7d1273809491030ccf2ec9935d598bfdf0bffee4486/modules/packages/hello_blockchain?network=bardock+testnet) (it's from a [Movement tutorial](https://docs.movementnetwork.xyz/devs/firstMoveContract)). The `set_message` function allows the caller to store a message at their address inside a `MessageHolder` struct.
The transaction's expiration timestamp must be set to a time within the next hour (as is required by our Gas Station). When you control the generation of the sender's signature, as with an embedded wallet you control for the user, you can likely use the SDK default, which is 20 seconds from now. When you need to wait on a signature you don't control, as with a connected wallet where the user must approve a signing message, you can explicitly set it.
```bash TypeScript theme={null}
async function buildSimpleMoveCallTransaction(sender: AccountAddress, expirationSeconds?: number):
Promise {
let transaction = await movementClient.transaction.build.simple({
sender: sender,
withFeePayer: true,
data: {
function: "0xe56b2729723446cd0836a7d1273809491030ccf2ec9935d598bfdf0bffee4486::message::set_message",
functionArguments: ["hello"]
},
options: {
expireTimestamp: expirationSeconds
}
});
console.log("\nResponse from movementClient.transaction.build.simple()");
console.log(transaction);
return transaction;
}
```
### Build a MultiAgentTransaction with a compiled Move script
**Step 1: Building a MultiAgentTransaction for sponsorship.**
For a multi-agent transaction, you'll need to provide the secondary signers when building the transaction (in addition to the sender). The transaction's expiration timestamp must be set to a time within the next hour (as is required by our Gas Station). When you control the generation of the sender's signature, as with an embedded wallet you control for the user, you can likely use the SDK default, which is 20 seconds from now. When you need to wait on a signature you don't control, as with a connected wallet where the user must approve a signing message, you can explicitly set it.
This function reads a complied Move script inside your local directory and builds a MultiAgentTransaction with it. You'll need to compile the script to use this function (see "Step 2" below).
```bash TypeScript expandable theme={null}
async function buildMultiAgentScriptTransaction(
sender: AccountAddress,
secondarySigner: AccountAddress,
expirationSeconds?: number):
Promise {
let buffer = readFileSync("./move/build/test/bytecode_scripts/unfair_swap_coins.mv");
let bytecode = Uint8Array.from(buffer);
let transaction = await movementClient.transaction.build.multiAgent({
sender: sender,
secondarySignerAddresses: [secondarySigner],
withFeePayer: true,
data: {
bytecode: bytecode,
functionArguments: []
},
options: {
expireTimestamp: expirationSeconds
}
});
console.log("\nResponse from movementClient.transaction.build.multiAgent()");
console.log(transaction);
return transaction;
}
```
**Step 2: Aptos Move**
**Move script**
The script we'll use is located at `shinami-examples/movement/typescript/backend_examples/move/sources/unfair_swap_coins.move`
```bash TypeScript theme={null}
script {
use aptos_framework::aptos_coin;
use aptos_framework::coin;
use aptos_framework::signer;
fun unfair_swap_coins(
sender: &signer,
secondary: &signer
) {
let coin_first = coin::withdraw(sender, 100);
let coin_second = coin::withdraw(secondary, 200);
coin::deposit(signer::address_of(secondary), coin_first);
coin::deposit(signer::address_of(sender), coin_second);
}
}
```
**Build the Move script**
For this, you'll need to install the [Movement CLI](https://docs.movementnetwork.xyz/devs/movementcli). Once you've done so, run `cd move` to get to the root of the `shinami-examples/movement/typescript/backend_examples/move` directory. Then, run `movement move compile`. You should see a `build/test/bytecode_scripts/unfair_swap_coins.mv`. That's the compiled, bytecode version of the below Move script.
This Move script has the sender give the secondary signer 100 Octa in exchange for 200 Octa - not fair! For more guidance on how to run a multi-agent transaction see [here](https://github.com/aptos-labs/developer-docs/blob/fde289de3d02368d3fe878a3e5cd9c725a22a376/apps/nextra/pages/en/build/sdks/ts-sdk/building-transactions/multi-agent-transactions.mdx#L196), and for guidance on running Move scripts see [here](https://aptos.dev/build/smart-contracts/scriptsrunning-scripts/).
### Generating funded accounts for testing
For the purposes of reusing the same account for repeated tests with this tutorial - which is required when you use one of the functions that takes a funded account as an argument - you can find and reuse a SingleKeyAccount's private key as shown in the below code (which is near the top of the file). This is just provided for easy testing. Your app should determine the best way to manage any keys it controls, and you should always protect your private keys and not share them.
There are three steps, as outlined in the code:
Uncomment out step 1 (you may want to also comment out other code below that would run, but it's not necessary). Then, Save changes the file, transpile with `tsc`, and run with `node build/gas_station.js`.
Look at your console for the two addresses printed out. Go to [https://faucet.movementnetwork.xyz/](https://faucet.movementnetwork.xyz/) and copying in each address to give it Testnet MOVE. You may need to refresh the page after funding the first address. Note that the faucet currently has a limit of a few requests per day.
Comment out step 1. Look at your console for the two private keys printed out. Uncomment step 3 and set one as the value for `PKEY_ONE` and one as the value for `PKEY_TWO`. Save changes to the file. Now, the next time you transpile and run the code, you'll be able to use these two funded accounts
```bash TypeScript expandable theme={null}
// ****
// Code for generating two reusable, funded accounts for testing purposes
// Step 1: uncomment the next six lines. Save the file, transpile with tsc, and run with node build/gas_station.js
const accountOne = await generateSingleKeyAccountEd25519();
console.log("Address 1: ", accountOne.accountAddress.toString());
console.log("Private key 1: ", PrivateKey.formatPrivateKey(Buffer.from(accountOne.privateKey.toUint8Array()).toString('hex'), PrivateKeyVariants.Ed25519));
const accountTwo = await generateSingleKeyAccountEd25519();
console.log("Address 2: ", accountTwo.accountAddress.toString());
console.log("Private key 2: ", PrivateKey.formatPrivateKey(Buffer.from(accountTwo.privateKey.toUint8Array()).toString('hex'), PrivateKeyVariants.Ed25519));
// End step 1
// Step 2: visit the Movement Testnet faucet page at https://faucet.movementnetwork.xyz/ and
// request MOVE for each of the two addresses that were printed to the console from step 1.
// Step 3:
// a. Comment out the four lines from run 1.
// b. Uncomment the eight code lines below.
// c. Set the values of `PKEY_ONE` and `PKEY_TWO` to the private key values printed to the console in Step 1.
// d. Save the file, transpile with tsc, and run with node build/gas_station.js
// const PKEY_ONE = "ed25519-priv-0x...";
// const fundedSenderAccount = new SingleKeyAccount({
// privateKey: new Ed25519PrivateKey(PKEY_ONE)
// });
// const PKEY_TWO = "ed25519-priv-0x...";
// const fundedSecondarySignerAccount = new SingleKeyAccount({
// privateKey: new Ed25519PrivateKey(PKEY_TWO)
// });
// End step 3
// ****
```
### Sponsoring a transaction for a non-funded account
As our examples above show, you can sponsor a transaction for an Account that has not yet been funded. The transaction fee for an account's first transaction will cost more than the fee for the same transaction at the same time for a funded account. Example fee statements are below, but your results may vary.
Example `0x1::transaction_fee::FeeStatement` for a `message::setmessage` Testnet Move call sponsored transaction from an unfunded account:
```
{
execution_gas_units:"4"
io_gas_units:"1"
storage_fee_octas:"92840"
storage_fee_refund_octas:"0"
total_charge_gas_units:"933"
}
```
Example `0x1::transaction_fee::FeeStatement` for a `message::setmessage` Testnet Move call sponsored transaction from a funded account:
```
{
execution_gas_units:"3"
io_gas_units:"1"
storage_fee_octas:"43680"
storage_fee_refund_octas:"0"
total_charge_gas_units:"441"
}
```
### Tips for setting your sponsorship budget
See the Aptos doc on [Gas and Storage Fees](https://aptos.dev/concepts/gas-txn-fee/) for a more detailed overview of how transaction costs are determined, as well as guidance on how to estimate the costs for a transaction.
See the [Movmement Gas Station tab on the Billing page](https://app.shinami.com/billing/#movement_gas) of your dashboard to see how Shinami charges for sponsorships. Note: only workspace admins can view and change billing information.
### Sponsor a simple transaction
**Understand the code**
The `sponsorTransactionSimple` function performs all the steps needed to build, sponsor, sign, and submit a simple transaction:
Creates an Account to use as the sender.
Builds the transaction (see how it's done in the [Appendix](/developer-guides/movement/tutorials/gas-station-backend-only#build-a-simpletransaction-for-sponsorship)).
Sponsors the transaction with a call to Shinami Gas Station. Note that our TypeScript SDK updates the feePayer address upon a successful sponsorship as shown by the `console.log()` statement below.
Signs the transaction as the sender.
Submits the transaction with the sender and feePayer signatures and returns the result.
```bash TypeScript expandable theme={null}
async function sponsorTransactionSimple(): Promise {
// 1. Set up our sender.
const sender = await generateSingleKeyAccountEd25519();
// 2. Build a simple transaction.
let transaction = await buildSimpleMoveCallTransaction(sender.accountAddress);
// 3. Sponsor the transaction with Shinami Gas Station.
let feePayerAuthenticator = await gasStationClient.sponsorTransaction(transaction);
// Note that the SDK updates the transaction's feePayer address on a successful sponsorship
console.log("\ntransaction.feePayerAddress post-sponsorship:", transaction.feePayerAddress);
// 4. Generate the sender's signature.
const senderAuthenticator = movementClient.transaction.sign({
signer: sender,
transaction: transaction
});
// 5. Submit the transaction with the sender and fee payer signatures
return await movementClient.transaction.submit.simple({
transaction,
senderAuthenticator,
feePayerAuthenticator: feePayerAuthenticator,
});
}
```
**Update, save, compile, run**
Make sure the function is the only sample code function uncommented:
```bash TypeScript theme={null}
//
// -- Choose which sample code function to use to generate a PendingTransactionResponse //
//
const committedTransaction = await
sponsorTransactionSimple();
// sponsorTransactionMultiAgent();
// sponsorAndSubmitSignedTransactionSimple();
// sponsorAndSubmitSignedTransactionMultiAgent();
// checkFundBalanceAndDepositIfNeeded();
```
Save the file if you made a change. Run `tsc` in the `shinami-examples/movement/typescript/backend_examples` directory to transpile. Then, run `node build/gas_station.js`. If successful, you can view the sponsorship on the ["Completed transactions" tab of the Movement Gas Station page](https://app.shinami.com/movement/gas/#movement_gas_completed_tx) of your Shinami Dashboard. You can also look up the transaction digest printed to the console in the [Movement Explorer](https://explorer.movementnetwork.xyz/?network=bardock+testnet) (make sure the explorer is set to Testnet).
### Sponsor a multi-agent transaction
**Understand the code**
The `sponsorTransactionMultiAgent` function performs all the steps needed to build, sponsor, sign, and submit a multi-agent Move script transaction. Before you run it, you'll need to generate two funded Accounts that will swap Octa (see how it's done in the [Appendix](/developer-guides/movement/tutorials/gas-station-backend-only#generating-funded-accounts-for-testing)). The function:
Builds the transaction (see how it's done in the [Appendix](/developer-guides/movement/tutorials/gas-station-backend-only#build-a-multiagenttransaction-with-a-compiled-move-script)).
Sponsors the transaction with a request to Shinami Gas Station. Note that our TypeScript SDK updates the feePayer address upon a successful sponsorship as shown by the `console.log()` statement below.
Generates the sender and secondary signer signatures.
Submits the transaction with the sender, secondary signer, and feePayer signatures and returns the result.
```bash TypeScript expandable theme={null}
async function sponsorTransactionMultiAgent(
fundedSenderAccount: SingleKeyAccount,
fundedSecondarySigner: SingleKeyAccount):
Promise {
// 1. Build a multiAgent transaction
let transaction = await buildMultiAgentScriptTransaction(
fundedSenderAccount.accountAddress,
fundedSecondarySigner.accountAddress);
// 2. Sponsor the transaction with Shinami Gas Station
let feePayerAuthenticator = await gasStationClient.sponsorTransaction(transaction);
// Note that the SDK updates the transaction's feePayer address on a successful sponsorship
console.log("\ntransaction.feePayerAddress post-sponsorship:", transaction.feePayerAddress);
// 3. Generate the sender and secondary signer signatures
const senderAuthenticator = movementClient.transaction.sign({
signer: fundedSenderAccount,
transaction
});
const secondarySignerAuthenticator = movementClient.transaction.sign({
signer: fundedSecondarySigner,
transaction
});
// 4. Submit the transaction with the sender, seconardy signer, and feePayer signatures
return await movementClient.transaction.submit.multiAgent({
transaction,
senderAuthenticator,
additionalSignersAuthenticators: [secondarySignerAuthenticator],
feePayerAuthenticator: feePayerAuthenticator
});
}
```
**Update, save, compile, run**
In order to run this example, you'll need to compile the Move script used as shown in the [Appendix](/developer-guides/movement/tutorials/gas-station-backend-only#build-a-multiagenttransaction-with-a-compiled-move-script).
Make sure the function is the only sample code function uncommented:
```bash TypeScript theme={null}
//
// -- Choose which sample code function to use to generate a PendingTransactionResponse //
//
const committedTransaction = await
//sponsorTransactionSimple();
sponsorTransactionMultiAgent(fundedSenderAccount, fundedSecondarySignerAccount);
//sponsorAndSubmitSignedTransactionSimple();
//sponsorAndSubmitSignedTransactionMultiAgent(fundedSenderAccount,fundedSecondarySignerAccount);
//checkFundBalanceAndDepositIfNeeded(fundedSenderAccount);
```
Save the file if you made a change. Run `tsc` in the `shinami-examples/movement/typescript/backend_examples` directory to transpile. Then, run `node build/gas_station.js`. If successful, you can view the sponsorship on the ["Completed transactions" tab of the Movement Gas Station page](https://app.shinami.com/movement/gas/#movement_gas_completed_tx) of your Shinami Dashboard. You can also look up the transaction digest printed to the console in the [Movement Explorer](https://explorer.movementnetwork.xyz/?network=bardock+testnet) (make sure the explorer is set to Testnet).
## Sponsor and submit a signed, simple transaction
**Understand the code**
The `sponsorAndSubmitSignedTransactionSimple` function performs all the steps needed to build and sign a simple transaction, and then send it to Gas Station for sponsorship and submission to the Movement blockchain:
Creates an Account to use as the sender.
Builds the transaction (see how it's done in the [Appendix](/developer-guides/movement/tutorials/gas-station-backend-only#build-a-simpletransaction-for-sponsorship)).
Generates the sender's signature.
Makes a request to Gas Station to sponsor and submit the signed transaction, returning the result.
```bash TypeScript expandable theme={null}
async function sponsorAndSubmitSignedTransactionSimple(): Promise {
// 1. Set up our sender.
const sender = await generateSingleKeyAccountEd25519();
// 2. Build a simple transaction.
const transaction = await buildSimpleMoveCallTransaction(sender.accountAddress);
// 3. Generate the sender's signature.
const senderAuthenticator = movementClient.transaction.sign({
signer: sender,
transaction
});
// 4. Ask Shinami to sponsor and submit the transaction
return await gasStationClient.sponsorAndSubmitSignedTransaction(
transaction,
senderAuthenticator
);
}
```
**Update, save, compile, run**
Make sure the function is the only sample code function uncommented:
```bash TypeScript theme={null}
//
// -- Choose which sample code function to use to generate a PendingTransactionResponse //
//
const committedTransaction = await
//sponsorTransactionSimple();
//sponsorTransactionMultiAgent(fundedSenderAccount, fundedSecondarySignerAccount);
sponsorAndSubmitSignedTransactionSimple();
//sponsorAndSubmitSignedTransactionMultiAgent(fundedSenderAccount,fundedSecondarySignerAccount);
//checkFundBalanceAndDepositIfNeeded(fundedSenderAccount);
```
Save the file if you made a change. Run `tsc` in the `shinami-examples/movement/typescript/backend_examples` directory to transpile. Then, run `node build/gas_station.js`. If successful, you can view the sponsorship on the ["Completed transactions" tab of the Movement Gas Station page](https://app.shinami.com/movement/gas/#movement_gas_completed_tx) of your Shinami Dashboard. You can also look up the transaction digest printed to the console in the [Movement Explorer](https://explorer.movementnetwork.xyz/?network=bardock+testnet) (make sure the explorer is set to Testnet).
## Sponsor and submit a multi-agent transaction
**Understand the code**
The `sponsorAndSubmitSignedTransactionMultiAgent` function performs all the steps needed to build and sign a multi-agent Move script transaction, and then send it to Gas Station for sponsorship and submission to the Movement blockchain. Before you run it, you'll need to generate two, funded Accounts that will swap Octa if you haven't already done so (see how it's done in the [Appendix](/developer-guides/aptos/tutorials/gas-station-backend-only#generating-funded-accounts-for-testing)). The function:
Builds the transaction (see how it's done in the [Appendix](/developer-guides/movement/tutorials/gas-station-backend-only#build-a-multiagenttransaction-with-a-compiled-move-script)).
Generates the sender and secondary signer signatures.
Makes a request to Gas Station to sponsor and submit the signed transaction, returning the result.
```bash TypeScript expandable theme={null}
async function sponsorAndSubmitSignedTransactionMultiAgent(
fundedSenderAccount:SingleKeyAccount,
fundedSecondarySigner: SingleKeyAccount):
Promise {
// 1. Build a multiAgent transaction
let transaction = await buildMultiAgentScriptTransaction(
fundedSenderAccount.accountAddress,
fundedSecondarySigner.accountAddress);
// 2. Generate the sender and secondary signer signatures
const senderAuthenticator = movementClient.transaction.sign({
signer: fundedSenderAccount,
transaction
});
const secondarySignerAuthenticator = movementClient.transaction.sign({
signer: fundedSecondarySigner,
transaction
});
// 3. Ask Shinami to sponsor and submit the transaction
return await gasStationClient.sponsorAndSubmitSignedTransaction(
transaction,
senderAuthenticator,
[secondarySignerAuthenticator]
);
}
```
**Update, save, compile, run**
In order to run this example, you'll need to compile the Move script used as shown in the [Appendix](/developer-guides/movement/tutorials/gas-station-backend-only#build-a-multiagenttransaction-with-a-compiled-move-script).
Make sure the function is the only sample code function uncommented:
```bash TypeScript theme={null}
//
// -- Choose which sample code function to use to generate a PendingTransactionResponse //
//
const committedTransaction = await
// sponsorTransactionSimple();
// sponsorTransactionMultiAgent(fundedSenderAccount, fundedSecondarySignerAccount);
// sponsorAndSubmitSignedTransactionSimple();
sponsorAndSubmitSignedTransactionMultiAgent(fundedSenderAccount, fundedSecondarySignerAccount);
// checkFundBalanceAndDepositIfNeeded(fundedSenderAccount);
```
Save the file if you made a change. Run `tsc` in the `shinami-examples/movement/typescript/backend_examples` directory to transpile. Then, run `node build/gas_station.js`. If successful, you can view the sponsorship on the ["Completed transactions" tab of the Movement Gas Station page](https://app.shinami.com/movement/gas/#movement_gas_completed_tx) of your Shinami Dashboard. You can also look up the transaction digest printed to the console in the [Movement Explorer](https://explorer.movementnetwork.xyz/?network=bardock+testnet) (make sure the explorer is set to Testnet).
## Check your fund balance and make a deposit
**Understand the code**
The `checkFundBalanceAndDepositIfNeeded` function does... well, exactly what it says it does 😄. Before you run it, you'll need to generate a funded Account if you haven't already done so (see how it's done in the [Appendix](/developer-guides/movement/tutorials/gas-station-backend-only#generating-funded-accounts-for-testing)). The function:
Makes a call to [`gas_getFund`](/api-docs/movement/gas-station/api#gas-getfund) to obtain your fund's balance.
Checks if the amount that's available to use is less than the minimum amount you want.
1. If true, it:
1. creates the transaction to transfer MOVE to your fund address
2. obtains the sender's signature (from the funded Account you made)
3. submits the transaction and returns the result.
2. Else, it returns `undefined`.
```bash TypeScript expandable theme={null}
async function checkFundBalanceAndDepositIfNeeded(fundedSenderAccount: SingleKeyAccount):
Promise {
const MIN_FUND_BALANCE_OCTA = 1_000_000_000; // 10 MOVE
const { balance, inFlight, depositAddress } = await gasStationClient.getFund();
console.log("Fund balance not in use (in Move):", (balance - inFlight) / 100_000_000);
// You'll want to deposit more than 1000 Octa, and what you want may be dynamic based on the
// current (balance - inFlight) amount, etc. This is just a simple example.
const STANDARD_DEPOSIT_AMOUNT = 1000;
// Deposit address can be null - see our Help Center for how to generate an address:
// https://docs.shinami.com/help-center/movement/gas-station-faq#how-do-i-generate-and-find-the-deposit-address-of-a-fund%3F
if (depositAddress && ((balance - inFlight) < MIN_FUND_BALANCE_OCTA)) {
// Create a SimpleTransaction that transfers MOVE from the sender to your Gas Station fund
const transferTx = await movementClient.transferCoinTransaction({
sender: fundedSenderAccount.accountAddress,
recipient: depositAddress,
amount: STANDARD_DEPOSIT_AMOUNT
});
// Obtain the sender's signature
const senderAuth = fundedSenderAccount.signTransactionWithAuthenticator(transferTx);
// Submit the transaction
return await movementClient.transaction.submit.simple({
transaction: transferTx,
senderAuthenticator: senderAuth
});
}
console.log("No deposit because no deposit address or a balance above the minimum you've set.");
return undefined;
}
```
**Update, save, compile, run**
Make sure the function is the only sample code function uncommented:
```bash TypeScript theme={null}
//
// -- Choose which sample code function to use to generate a PendingTransactionResponse //
//
const committedTransaction = await
//sponsorTransactionSimple();
//sponsorTransactionMultiAgent(fundedSenderAccount, fundedSecondarySignerAccount);
//sponsorAndSubmitSignedTransactionSimple();
//sponsorAndSubmitSignedTransactionMultiAgent(fundedSenderAccount,fundedSecondarySignerAccount);
checkFundBalanceAndDepositIfNeeded(fundedSenderAccount);
```
Save the file if you made a change. Run `tsc` in the `shinami-examples/movement/typescript/backend_examples` directory to transpile. Then, run `node build/gas_station.js`. If successful, you can view the sponsorship on the ["Completed transactions" tab of the Movement Gas Station page](https://app.shinami.com/movement/gas/#movement_gas_completed_tx) of your Shinami Dashboard. You can also look up the transaction digest printed to the console in the [Movement Explorer](https://explorer.movementnetwork.xyz/?network=bardock+testnet) (make sure the explorer is set to Testnet).
## Appendix
### Build a SimpleTransaction for sponsorship
The below function creates a transaction that calls a function on a Move module we've [deployed to Testnet](https://explorer.movementnetwork.xyz/account/0xe56b2729723446cd0836a7d1273809491030ccf2ec9935d598bfdf0bffee4486/modules/packages/hello_blockchain?network=bardock+testnet) (it's from a [Movement tutorial](https://docs.movementnetwork.xyz/devs/firstMoveContract)). The `set_message` function allows the caller to store a message at their address inside a `MessageHolder` struct.
The transaction's expiration timestamp must be set to a time within the next hour (as is required by our Gas Station). When you control the generation of the sender's signature, as with an embedded wallet you control for the user, you can likely use the SDK default, which is 20 seconds from now. When you need to wait on a signature you don't control, as with a connected wallet where the user must approve a signing message, you can explicitly set it.
```bash TypeScript theme={null}
async function buildSimpleMoveCallTransaction(sender: AccountAddress, expirationSeconds?: number):
Promise {
let transaction = await movementClient.transaction.build.simple({
sender: sender,
withFeePayer: true,
data: {
function: "0xe56b2729723446cd0836a7d1273809491030ccf2ec9935d598bfdf0bffee4486::message::set_message",
functionArguments: ["hello"]
},
options: {
expireTimestamp: expirationSeconds
}
});
console.log("\nResponse from movementClient.transaction.build.simple()");
console.log(transaction);
return transaction;
}
```
### Build a MultiAgentTransaction with a compiled Move script
**Step 1: Building a MultiAgentTransaction for sponsorship.**
For a multi-agent transaction, you'll need to provide the secondary signers when building the transaction (in addition to the sender). The transaction's expiration timestamp must be set to a time within the next hour (as is required by our Gas Station). When you control the generation of the sender's signature, as with an embedded wallet you control for the user, you can likely use the SDK default, which is 20 seconds from now. When you need to wait on a signature you don't control, as with a connected wallet where the user must approve a signing message, you can explicitly set it.
This function reads a complied Move script inside your local directory and builds a MultiAgentTransaction with it. You'll need to compile the script to use this function (see "Step 2" below).
```bash TypeScript expandable theme={null}
async function buildMultiAgentScriptTransaction(
sender: AccountAddress,
secondarySigner: AccountAddress,
expirationSeconds?: number):
Promise {
let buffer = readFileSync("./move/build/test/bytecode_scripts/unfair_swap_coins.mv");
let bytecode = Uint8Array.from(buffer);
let transaction = await movementClient.transaction.build.multiAgent({
sender: sender,
secondarySignerAddresses: [secondarySigner],
withFeePayer: true,
data: {
bytecode: bytecode,
functionArguments: []
},
options: {
expireTimestamp: expirationSeconds
}
});
console.log("\nResponse from movementClient.transaction.build.multiAgent()");
console.log(transaction);
return transaction;
}
```
**Step 2: Aptos Move**
**Move script**
The script we'll use is located at `shinami-examples/movement/typescript/backend_examples/move/sources/unfair_swap_coins.move`
```bash TypeScript theme={null}
script {
use aptos_framework::aptos_coin;
use aptos_framework::coin;
use aptos_framework::signer;
fun unfair_swap_coins(
sender: &signer,
secondary: &signer
) {
let coin_first = coin::withdraw(sender, 100);
let coin_second = coin::withdraw(secondary, 200);
coin::deposit(signer::address_of(secondary), coin_first);
coin::deposit(signer::address_of(sender), coin_second);
}
}
```
**Build the Move script**
For this, you'll need to install the [Movement CLI](https://docs.movementnetwork.xyz/devs/movementcli). Once you've done so, run `cd move` to get to the root of the `shinami-examples/movement/typescript/backend_examples/move` directory. Then, run `movement move compile`. You should see a `build/test/bytecode_scripts/unfair_swap_coins.mv`. That's the compiled, bytecode version of the below Move script.
This Move script has the sender give the secondary signer 100 Octa in exchange for 200 Octa - not fair! For more guidance on how to run a multi-agent transaction see [here](https://github.com/aptos-labs/developer-docs/blob/fde289de3d02368d3fe878a3e5cd9c725a22a376/apps/nextra/pages/en/build/sdks/ts-sdk/building-transactions/multi-agent-transactions.mdx#L196), and for guidance on running Move scripts see [here](https://aptos.dev/build/smart-contracts/scriptsrunning-scripts/).
### Generating funded accounts for testing
For the purposes of reusing the same account for repeated tests with this tutorial - which is required when you use one of the functions that takes a funded account as an argument - you can find and reuse a SingleKeyAccount's private key as shown in the below code (which is near the top of the file). This is just provided for easy testing. Your app should determine the best way to manage any keys it controls, and you should always protect your private keys and not share them.
There are three steps, as outlined in the code:
Uncomment out step 1 (you may want to also comment out other code below that would run, but it's not necessary). Then, Save changes the file, transpile with `tsc`, and run with `node build/gas_station.js`.
Look at your console for the two addresses printed out. Go to [https://faucet.movementnetwork.xyz/](https://faucet.movementnetwork.xyz/) and copying in each address to give it Testnet MOVE. You may need to refresh the page after funding the first address. Note that the faucet currently has a limit of a few requests per day.
Comment out step 1. Look at your console for the two private keys printed out. Uncomment step 3 and set one as the value for `PKEY_ONE` and one as the value for `PKEY_TWO`. Save changes to the file. Now, the next time you transpile and run the code, you'll be able to use these two funded accounts
```bash TypeScript expandable theme={null}
// ****
// Code for generating two reusable, funded accounts for testing purposes
// Step 1: uncomment the next six lines. Save the file, transpile with tsc, and run with node build/gas_station.js
const accountOne = await generateSingleKeyAccountEd25519();
console.log("Address 1: ", accountOne.accountAddress.toString());
console.log("Private key 1: ", PrivateKey.formatPrivateKey(Buffer.from(accountOne.privateKey.toUint8Array()).toString('hex'), PrivateKeyVariants.Ed25519));
const accountTwo = await generateSingleKeyAccountEd25519();
console.log("Address 2: ", accountTwo.accountAddress.toString());
console.log("Private key 2: ", PrivateKey.formatPrivateKey(Buffer.from(accountTwo.privateKey.toUint8Array()).toString('hex'), PrivateKeyVariants.Ed25519));
// End step 1
// Step 2: visit the Movement Testnet faucet page at https://faucet.movementnetwork.xyz/ and
// request MOVE for each of the two addresses that were printed to the console from step 1.
// Step 3:
// a. Comment out the four lines from run 1.
// b. Uncomment the eight code lines below.
// c. Set the values of `PKEY_ONE` and `PKEY_TWO` to the private key values printed to the console in Step 1.
// d. Save the file, transpile with tsc, and run with node build/gas_station.js
// const PKEY_ONE = "ed25519-priv-0x...";
// const fundedSenderAccount = new SingleKeyAccount({
// privateKey: new Ed25519PrivateKey(PKEY_ONE)
// });
// const PKEY_TWO = "ed25519-priv-0x...";
// const fundedSecondarySignerAccount = new SingleKeyAccount({
// privateKey: new Ed25519PrivateKey(PKEY_TWO)
// });
// End step 3
// ****
```
### Sponsoring a transaction for a non-funded account
As our examples above show, you can sponsor a transaction for an Account that has not yet been funded. The transaction fee for an account's first transaction will cost more than the fee for the same transaction at the same time for a funded account. Example fee statements are below, but your results may vary.
Example `0x1::transaction_fee::FeeStatement` for a `message::setmessage` Testnet Move call sponsored transaction from an unfunded account:
```
{
execution_gas_units:"4"
io_gas_units:"1"
storage_fee_octas:"92840"
storage_fee_refund_octas:"0"
total_charge_gas_units:"933"
}
```
Example `0x1::transaction_fee::FeeStatement` for a `message::setmessage` Testnet Move call sponsored transaction from a funded account:
```
{
execution_gas_units:"3"
io_gas_units:"1"
storage_fee_octas:"43680"
storage_fee_refund_octas:"0"
total_charge_gas_units:"441"
}
```
### Tips for setting your sponsorship budget
See the Aptos doc on [Gas and Storage Fees](https://aptos.dev/concepts/gas-txn-fee/) for a more detailed overview of how transaction costs are determined, as well as guidance on how to estimate the costs for a transaction.
See the [Movmement Gas Station tab on the Billing page](https://app.shinami.com/billing/#movement_gas) of your dashboard to see how Shinami charges for sponsorships. Note: only workspace admins can view and change billing information.