> ## Documentation Index
> Fetch the complete documentation index at: https://docs.shinami.com/llms.txt
> Use this file to discover all available pages before exploring further.
# Authentication and API Keys
> How to create and manage your API access keys and authenticate your requests.
## Overview
### How to authenticate
You can authenticate with all Shinami services via an access key passed in a header (`'X-Api-Key: ACCESS_KEY'`). Some service API docs will list additional methods, but this method works across the board.
We have a lot of helpful content below, but if you don't find an answer to your question you can [reach out to us](/help-center/overview#contacting-support).
### Security callout: when to send from your backend
**Gas Station and Wallet Services - always send from your backend**
You will need to send requests to our Gas Station and Wallet Services APIs from your backend. These services do not support CORS, so if you attempt to make requests to them from the FE you'll get a CORS error. We do this because exposing these keys on the FE is a security risk. With a Gas Station key access key, an attacker could drain your Gas Station fund associated with the key by using it to sponsor transactions. With a wallet services access key, a bad actor could sign transactions from your user's wallets.
### Rotating API access keys
You can disable an API access key and create a new one as needed (see [Disable, enable, or delete a key](/developer-guides/core-integration-topics/authentication-and-api-keys#disable-enable-or-delete-a-key)).
### API Access Key Limit
You can make a total of 10 API access keys. You may use this allotment across whatever combination of Shinami services and (Chain, Network) pairs that works best for you.
## Create an Access Key
### 1. Visit the Access Keys page and choose a chain
All access key creations start with clicking "+ Create Key" on the [Access Keys page](https://app.shinami.com/access-keys) of your dashboard and then selecting a chain.

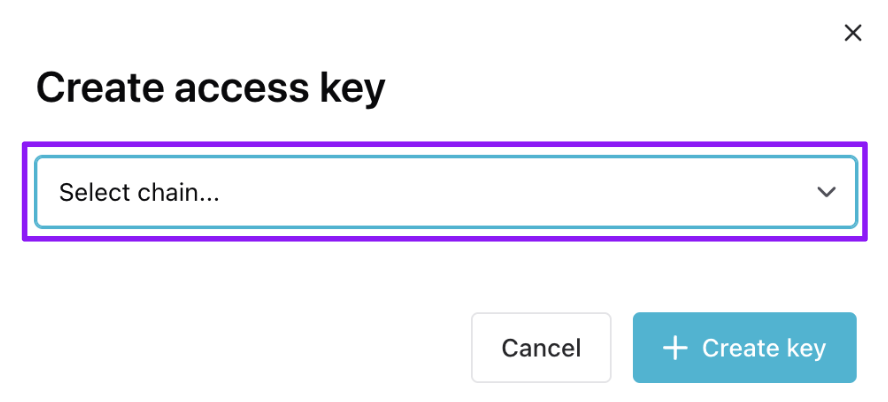
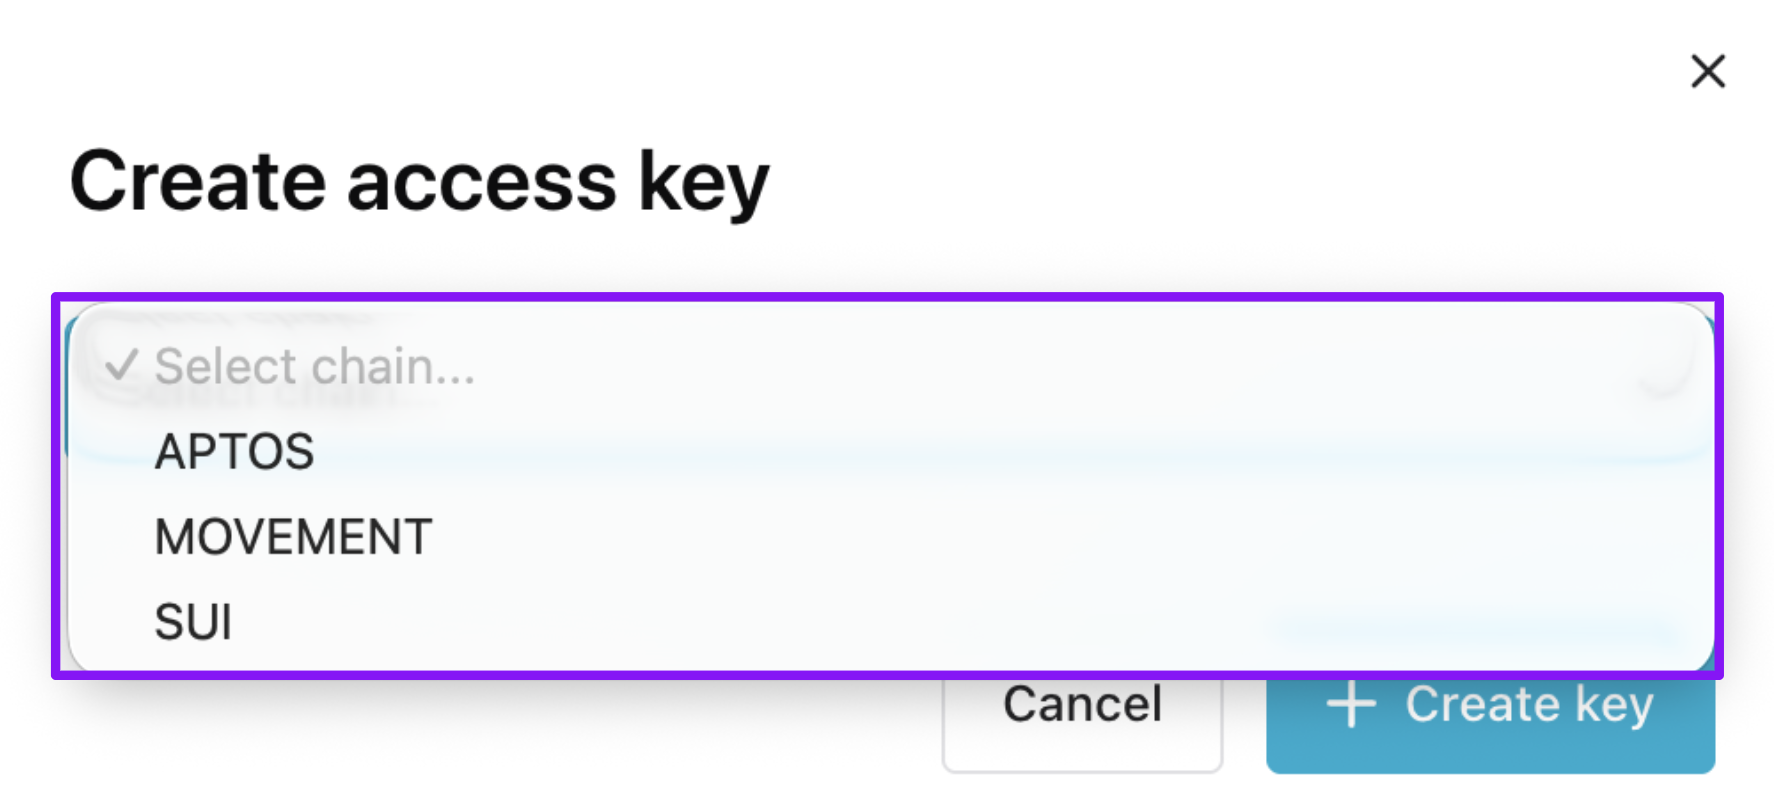 Once the chain is selected, the modal expands to show the key configuration options for the given chain as shown in the Aptos, Movement, and Sui key configuration sections below.
### 2a. Aptos key configuration
Below, we show the creation of a Testnet access key with all services selected. Choose only the services you need for your key.
You can't add or remove a service to a key after creating it (but you can make a new key).
Once the chain is selected, the modal expands to show the key configuration options for the given chain as shown in the Aptos, Movement, and Sui key configuration sections below.
### 2a. Aptos key configuration
Below, we show the creation of a Testnet access key with all services selected. Choose only the services you need for your key.
You can't add or remove a service to a key after creating it (but you can make a new key).
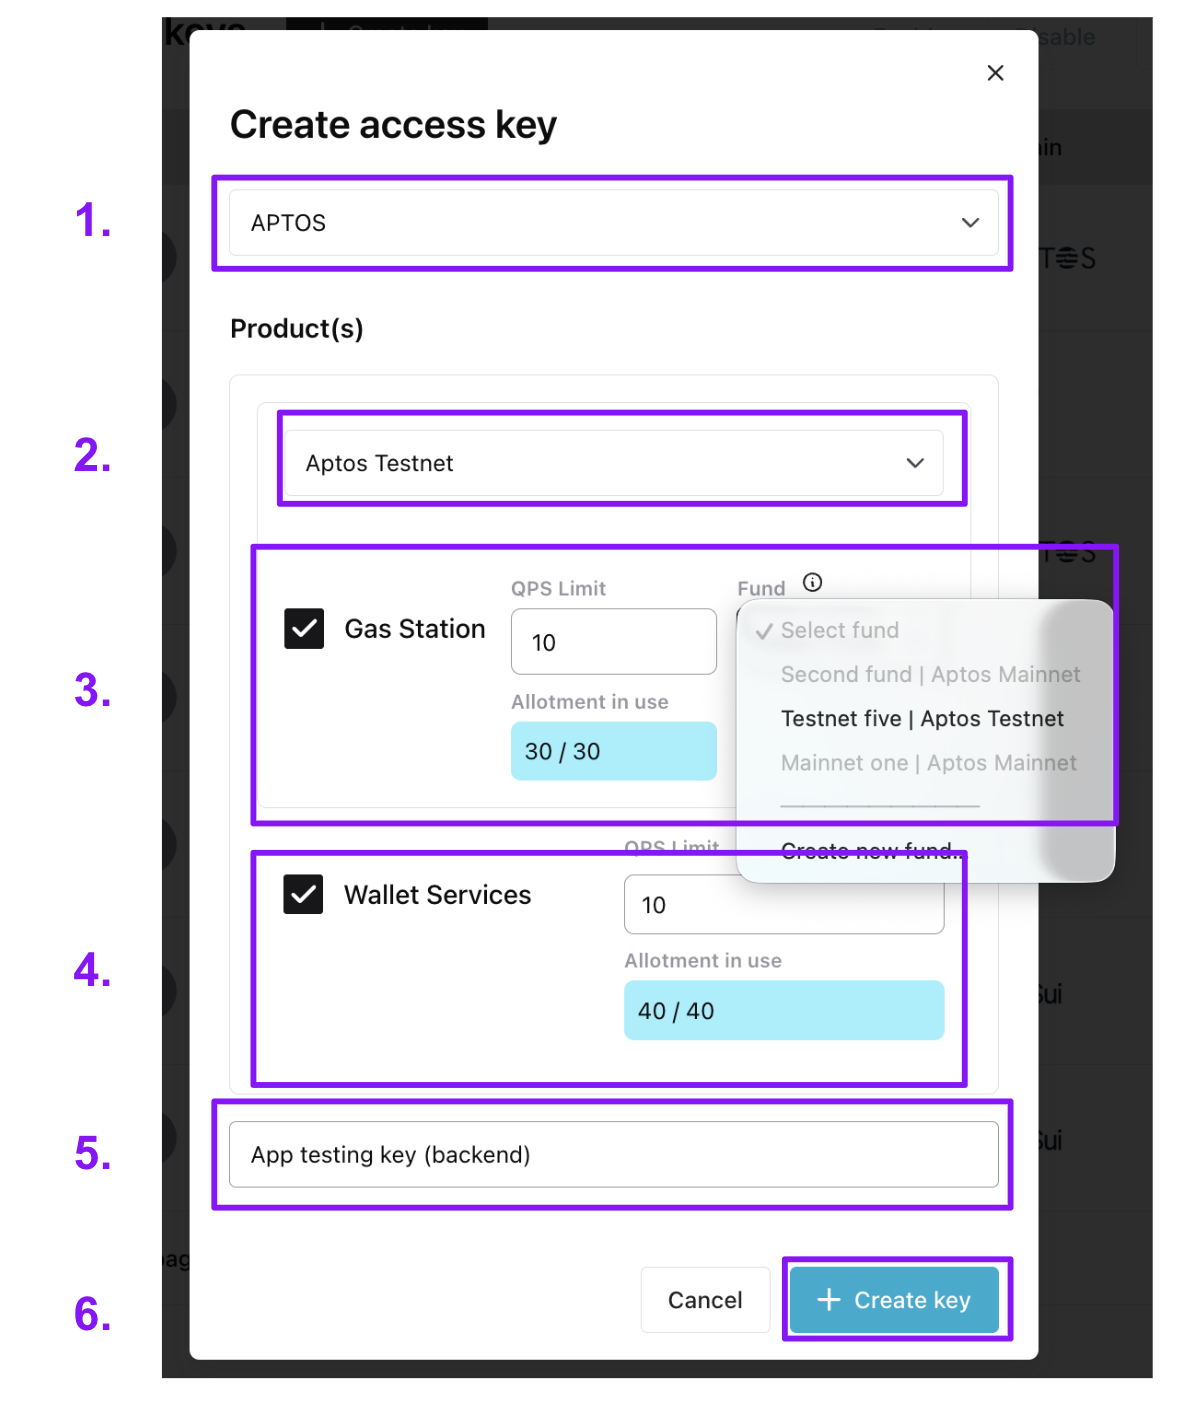 1. The chain the key works for (Aptos)
2. Select the network the key works for (Aptos Testnet or Aptos Mainnet).
3. If sponsoring transactions, select the "Gas Station" checkbox to give the key Gas Station rights.
1. Assign a max QPS (requests per second) to the key. If you need more QPS, reach out to us at \`[support@shinami.com](mailto:support@shinami.com) and let us know the email you sign in to your workspace with, how much QPS you need and for how long (a one-time event vs sustained high QPS needs).
2. Then, link the key to a Gas Station fund on the network. If you don't already have one, you can create it through the modal. This link cannot later be changed to a different fund (but you can make a new key). All requests for sponsorship using the key will draw APT from the linked fund. For guidance on creating a Gas Station fund see the [Aptos Gas Station page of our Help Center](/help-center/aptos/gas-station-faq).
4. If using our Invisible Wallets, select the "Wallet Services" checkbox to give the key Wallet Services rights.
1. Assign a max QPS (requests per second) to the key (noting that you'll need to periodically [create a session token](/api-docs/aptos/wallet-services/invisible-wallet-api#key-createsession) for interacting with each a wallet). Your QPS allotment per network is based on your [Wallet Services plan](https://app.shinami.com/billing#aptos_wallet).
2. Note that Invisible Wallet keys will need rights to all services to use certain methods, like [submitting a sponsored transaction on behalf of a wallet](/api-docs/aptos/wallet-services/invisible-wallet-api#wal-executegaslesstransaction).
5. Give the key a name. We recommend something useful, describing the app or service the key is for.
6. Click "+ Create key". The key will then show up in the Access Keys table.
See below for how to find sample code and make configuration changes to your key.
### 2b. Movement key configuration
Below, we show the creation of a Testnet access key.
You can't add or remove a service to a key after creating it (but you can make a new key).
1. The chain the key works for (Aptos)
2. Select the network the key works for (Aptos Testnet or Aptos Mainnet).
3. If sponsoring transactions, select the "Gas Station" checkbox to give the key Gas Station rights.
1. Assign a max QPS (requests per second) to the key. If you need more QPS, reach out to us at \`[support@shinami.com](mailto:support@shinami.com) and let us know the email you sign in to your workspace with, how much QPS you need and for how long (a one-time event vs sustained high QPS needs).
2. Then, link the key to a Gas Station fund on the network. If you don't already have one, you can create it through the modal. This link cannot later be changed to a different fund (but you can make a new key). All requests for sponsorship using the key will draw APT from the linked fund. For guidance on creating a Gas Station fund see the [Aptos Gas Station page of our Help Center](/help-center/aptos/gas-station-faq).
4. If using our Invisible Wallets, select the "Wallet Services" checkbox to give the key Wallet Services rights.
1. Assign a max QPS (requests per second) to the key (noting that you'll need to periodically [create a session token](/api-docs/aptos/wallet-services/invisible-wallet-api#key-createsession) for interacting with each a wallet). Your QPS allotment per network is based on your [Wallet Services plan](https://app.shinami.com/billing#aptos_wallet).
2. Note that Invisible Wallet keys will need rights to all services to use certain methods, like [submitting a sponsored transaction on behalf of a wallet](/api-docs/aptos/wallet-services/invisible-wallet-api#wal-executegaslesstransaction).
5. Give the key a name. We recommend something useful, describing the app or service the key is for.
6. Click "+ Create key". The key will then show up in the Access Keys table.
See below for how to find sample code and make configuration changes to your key.
### 2b. Movement key configuration
Below, we show the creation of a Testnet access key.
You can't add or remove a service to a key after creating it (but you can make a new key).
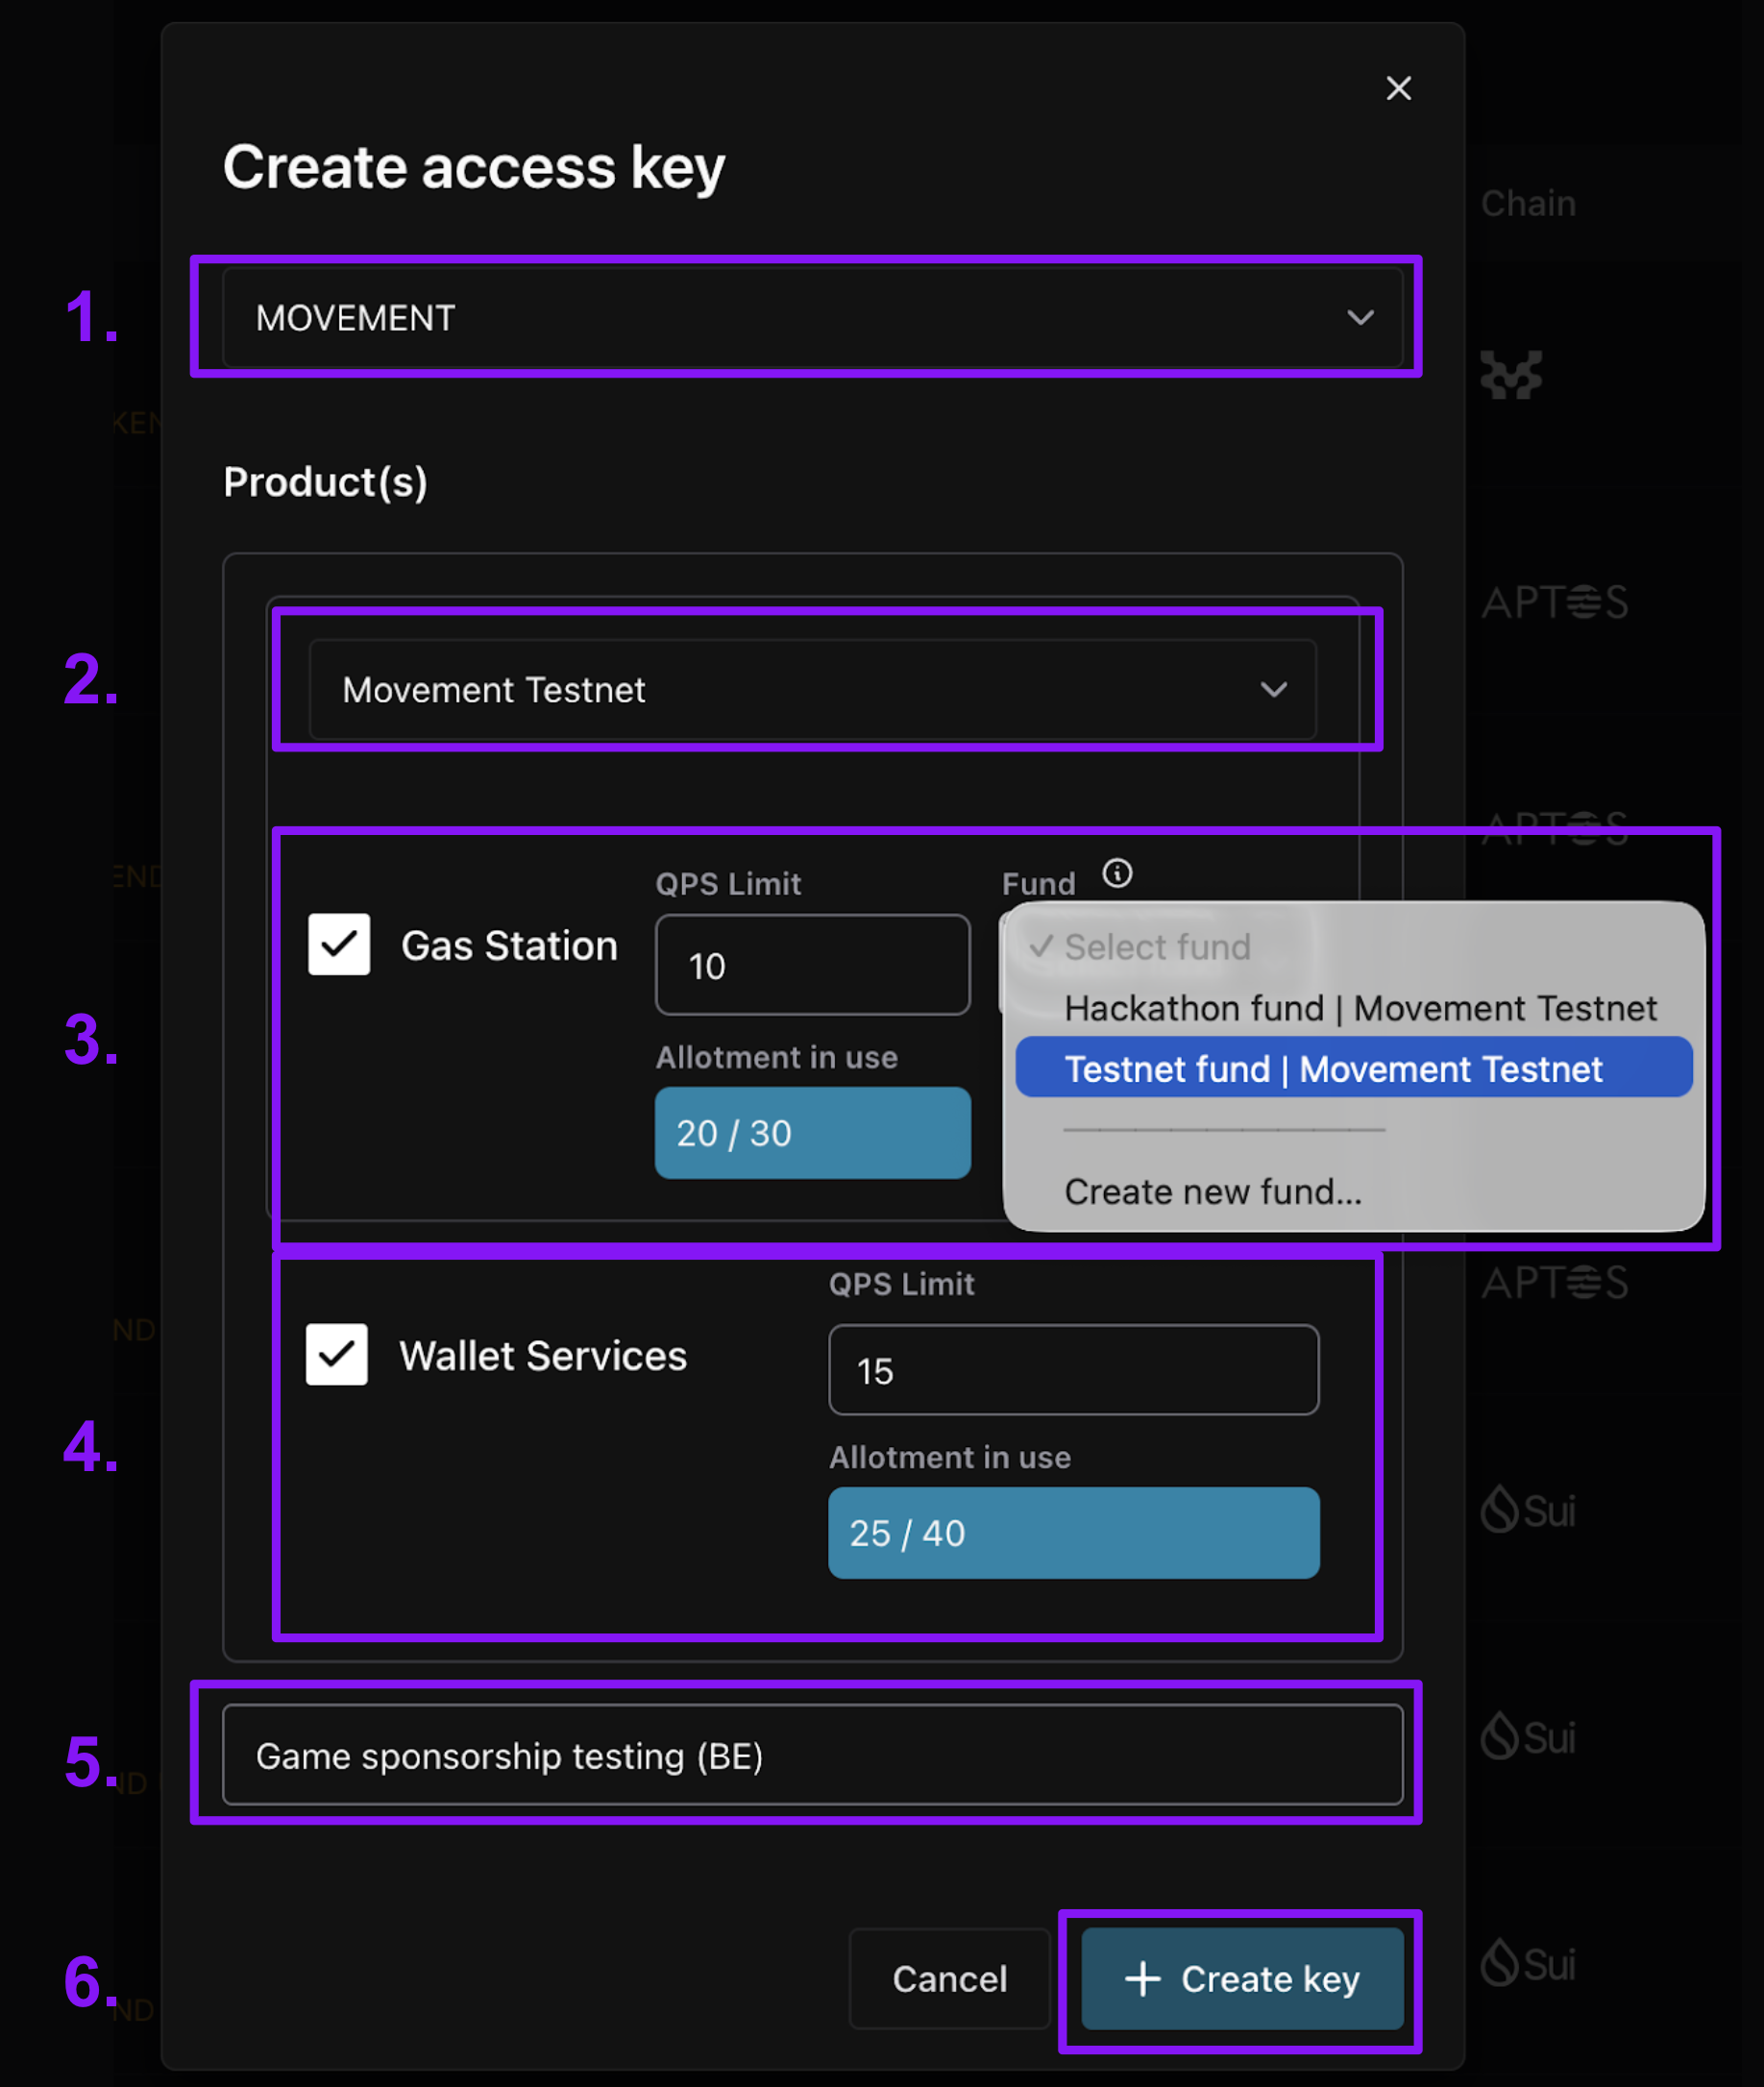 1. The chain the key works for (Movement)
2. Select the network the key works for (Movement Testnet or Movement Mainnet).
3. If sponsoring transactions, select the "Gas Station" checkbox to give the key Gas Station rights.
1. Assign a max QPS (requests per second) to the key. If you need more QPS, reach out to us at `support@shinami.com` and let us know the email you sign in to your workspace with, how much QPS you need and for how long (a one-time event vs sustained high QPS needs).
2. Then, link the key to a Gas Station fund on the network. If you don't already have one, you can create it through the modal. This link cannot later be changed to a different fund (but you can make a new key). All requests for sponsorship using the key will draw MOVE from the linked fund. For guidance on creating a Gas Station fund see the [Movement Gas Station page of our Help Center](/help-center/movement/gas-station-faq#how-do-i-create-a-fund%3F).
4. If using our Invisible Wallets, select the “Wallet Services” checkbox to give the key Wallet Services rights.
1. Assign a max QPS (requests per second) to the key (noting that you’ll need to periodically [create a session token](/api-docs/movement/wallet-services/invisible-wallet-api#key-createsession) for interacting with each a wallet). Your QPS allotment per network is based on your [Wallet Services plan](https://app.shinami.com/billing/#movement_wallet).
2. Note that Invisible Wallet keys will need rights to all services to use certain methods, like [submitting a sponsored transaction on behalf of a wallet](/api-docs/movement/wallet-services/invisible-wallet-api#wal-executegaslesstransaction).
5. Give the key a name. We recommend something useful, describing the app or service the key is for, e.g. "Best Swap App BE sponsorship".
6. Click "+ Create key". The key will then show up in the Access Keys table.
See below for how to find sample code and make configuration changes to your key.
### 2c. Sui key configuration
Below, we show the creation of a Testnet access key with all services selected. Choose only the services you need for your key.
You can't add or remove a service to a key after creating it (but you can make a new key).
1. The chain the key works for (Movement)
2. Select the network the key works for (Movement Testnet or Movement Mainnet).
3. If sponsoring transactions, select the "Gas Station" checkbox to give the key Gas Station rights.
1. Assign a max QPS (requests per second) to the key. If you need more QPS, reach out to us at `support@shinami.com` and let us know the email you sign in to your workspace with, how much QPS you need and for how long (a one-time event vs sustained high QPS needs).
2. Then, link the key to a Gas Station fund on the network. If you don't already have one, you can create it through the modal. This link cannot later be changed to a different fund (but you can make a new key). All requests for sponsorship using the key will draw MOVE from the linked fund. For guidance on creating a Gas Station fund see the [Movement Gas Station page of our Help Center](/help-center/movement/gas-station-faq#how-do-i-create-a-fund%3F).
4. If using our Invisible Wallets, select the “Wallet Services” checkbox to give the key Wallet Services rights.
1. Assign a max QPS (requests per second) to the key (noting that you’ll need to periodically [create a session token](/api-docs/movement/wallet-services/invisible-wallet-api#key-createsession) for interacting with each a wallet). Your QPS allotment per network is based on your [Wallet Services plan](https://app.shinami.com/billing/#movement_wallet).
2. Note that Invisible Wallet keys will need rights to all services to use certain methods, like [submitting a sponsored transaction on behalf of a wallet](/api-docs/movement/wallet-services/invisible-wallet-api#wal-executegaslesstransaction).
5. Give the key a name. We recommend something useful, describing the app or service the key is for, e.g. "Best Swap App BE sponsorship".
6. Click "+ Create key". The key will then show up in the Access Keys table.
See below for how to find sample code and make configuration changes to your key.
### 2c. Sui key configuration
Below, we show the creation of a Testnet access key with all services selected. Choose only the services you need for your key.
You can't add or remove a service to a key after creating it (but you can make a new key).
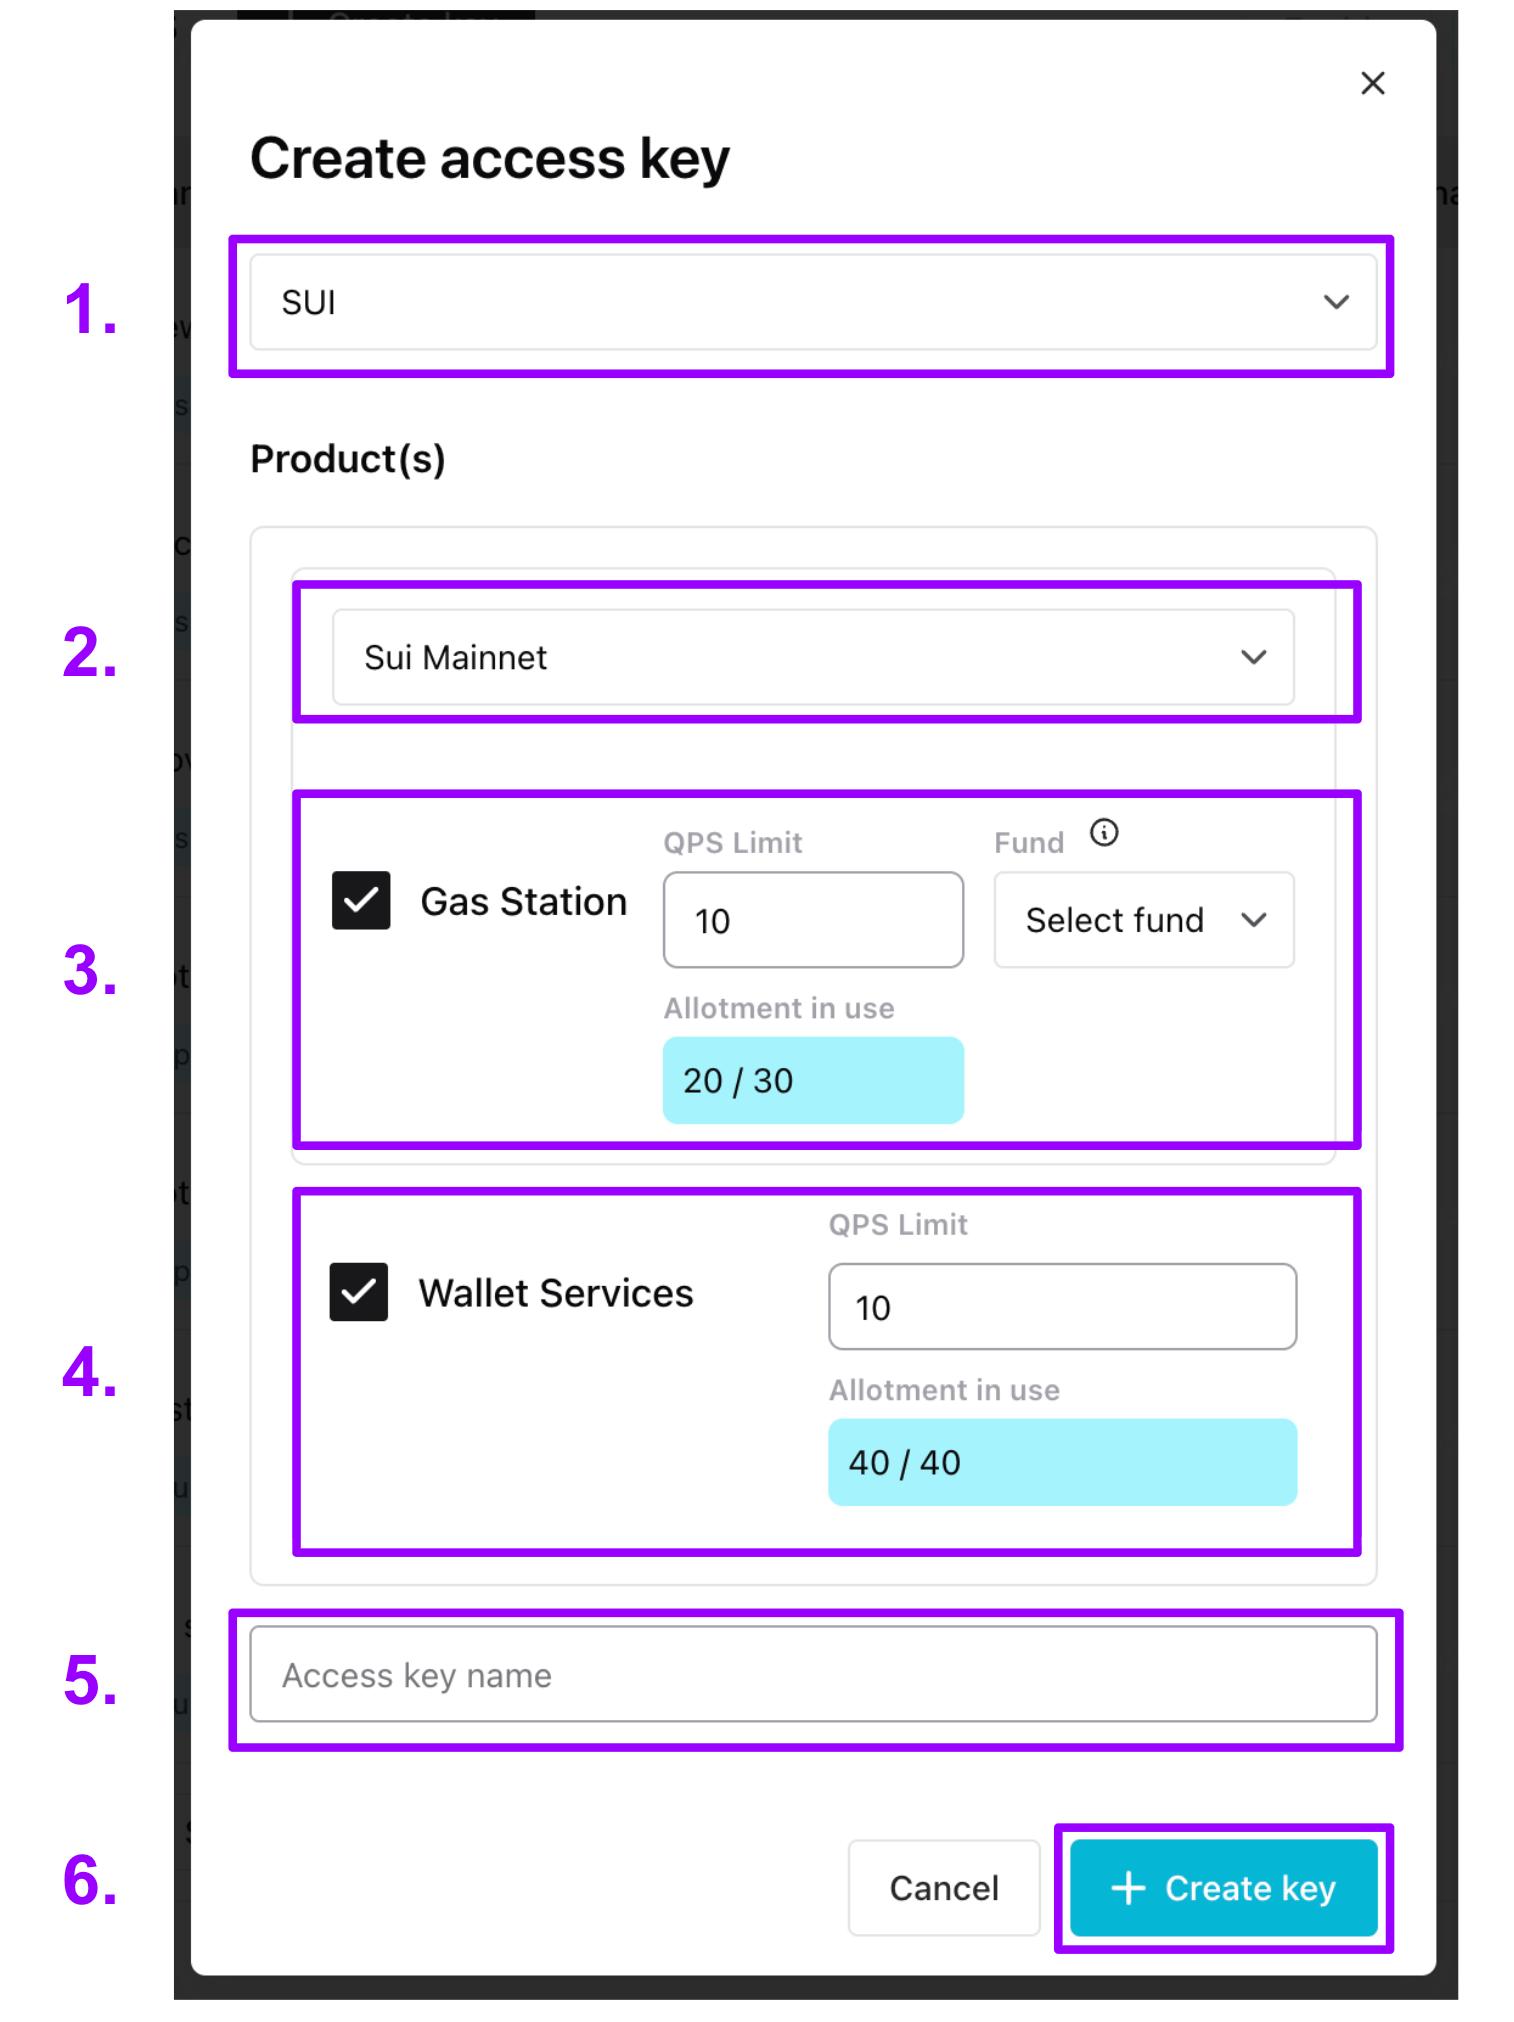 1. The chain the key works for (Sui)
2. Select the network the key works for (Sui Testnet or Sui Mainnet).
3. If sponsoring transactions, select the "Gas Station" checkbox to give the key Gas Station rights.
1. Assign a max QPS (requests per second) to the key. If you need more QPS, reach out to us at `support@shinami.com` and let us know the email you sign in to your workspace with, how much QPS you need and for how long (a one-time event vs sustained high QPS needs).
2. Then, link the key to a Gas Station fund on the network. If you don't already have one, you can create it through the modal. This link cannot later be changed to a different fund (but you can make a new key). All requests for sponsorship using the key will draw SUI from the linked fund. For guidance on creating a Gas Station fund see the [Sui Gas Station page of our Help Center](/help-center/sui/gas-station-faq#/how-do-i-create-a-fund).
4. If using our Invisible Wallets or zkLogin wallet API, select the "Wallet Services" checkbox to give the key Wallet Services rights.
1. Assign a max QPS (requests per second) to the key (noting that for Invisible Wallets you'll need to periodically [create a session token](/api-docs/sui/wallet-services/invisible-wallet-api#shinami-key-createsession) for interacting with each wallet). Your QPS allotment per network is based on your [Wallet Services plan](https://app.shinami.com/billing#sui_wallet).
2. Note that Invisible Wallet keys will need rights to all services to use certain methods, like [submitting a sponsored transaction on behalf of a wallet](/api-docs/sui/wallet-services/invisible-wallet-api#shinami-wal-executegaslesstransactionblock).
5. Give the key a name. We recommend something useful, describing the app or service the key is for as well as whether you intend it for the frontend or backend, e.g. "Best Swap App FE testing".
6. Click "+ Create key". The key will then show up in the Access Keys table.
See below for how to find sample code and make configuration changes to your key.
## Key management
### Edit name and QPS; find service URLs and sample code
1. The chain the key works for (Sui)
2. Select the network the key works for (Sui Testnet or Sui Mainnet).
3. If sponsoring transactions, select the "Gas Station" checkbox to give the key Gas Station rights.
1. Assign a max QPS (requests per second) to the key. If you need more QPS, reach out to us at `support@shinami.com` and let us know the email you sign in to your workspace with, how much QPS you need and for how long (a one-time event vs sustained high QPS needs).
2. Then, link the key to a Gas Station fund on the network. If you don't already have one, you can create it through the modal. This link cannot later be changed to a different fund (but you can make a new key). All requests for sponsorship using the key will draw SUI from the linked fund. For guidance on creating a Gas Station fund see the [Sui Gas Station page of our Help Center](/help-center/sui/gas-station-faq#/how-do-i-create-a-fund).
4. If using our Invisible Wallets or zkLogin wallet API, select the "Wallet Services" checkbox to give the key Wallet Services rights.
1. Assign a max QPS (requests per second) to the key (noting that for Invisible Wallets you'll need to periodically [create a session token](/api-docs/sui/wallet-services/invisible-wallet-api#shinami-key-createsession) for interacting with each wallet). Your QPS allotment per network is based on your [Wallet Services plan](https://app.shinami.com/billing#sui_wallet).
2. Note that Invisible Wallet keys will need rights to all services to use certain methods, like [submitting a sponsored transaction on behalf of a wallet](/api-docs/sui/wallet-services/invisible-wallet-api#shinami-wal-executegaslesstransactionblock).
5. Give the key a name. We recommend something useful, describing the app or service the key is for as well as whether you intend it for the frontend or backend, e.g. "Best Swap App FE testing".
6. Click "+ Create key". The key will then show up in the Access Keys table.
See below for how to find sample code and make configuration changes to your key.
## Key management
### Edit name and QPS; find service URLs and sample code
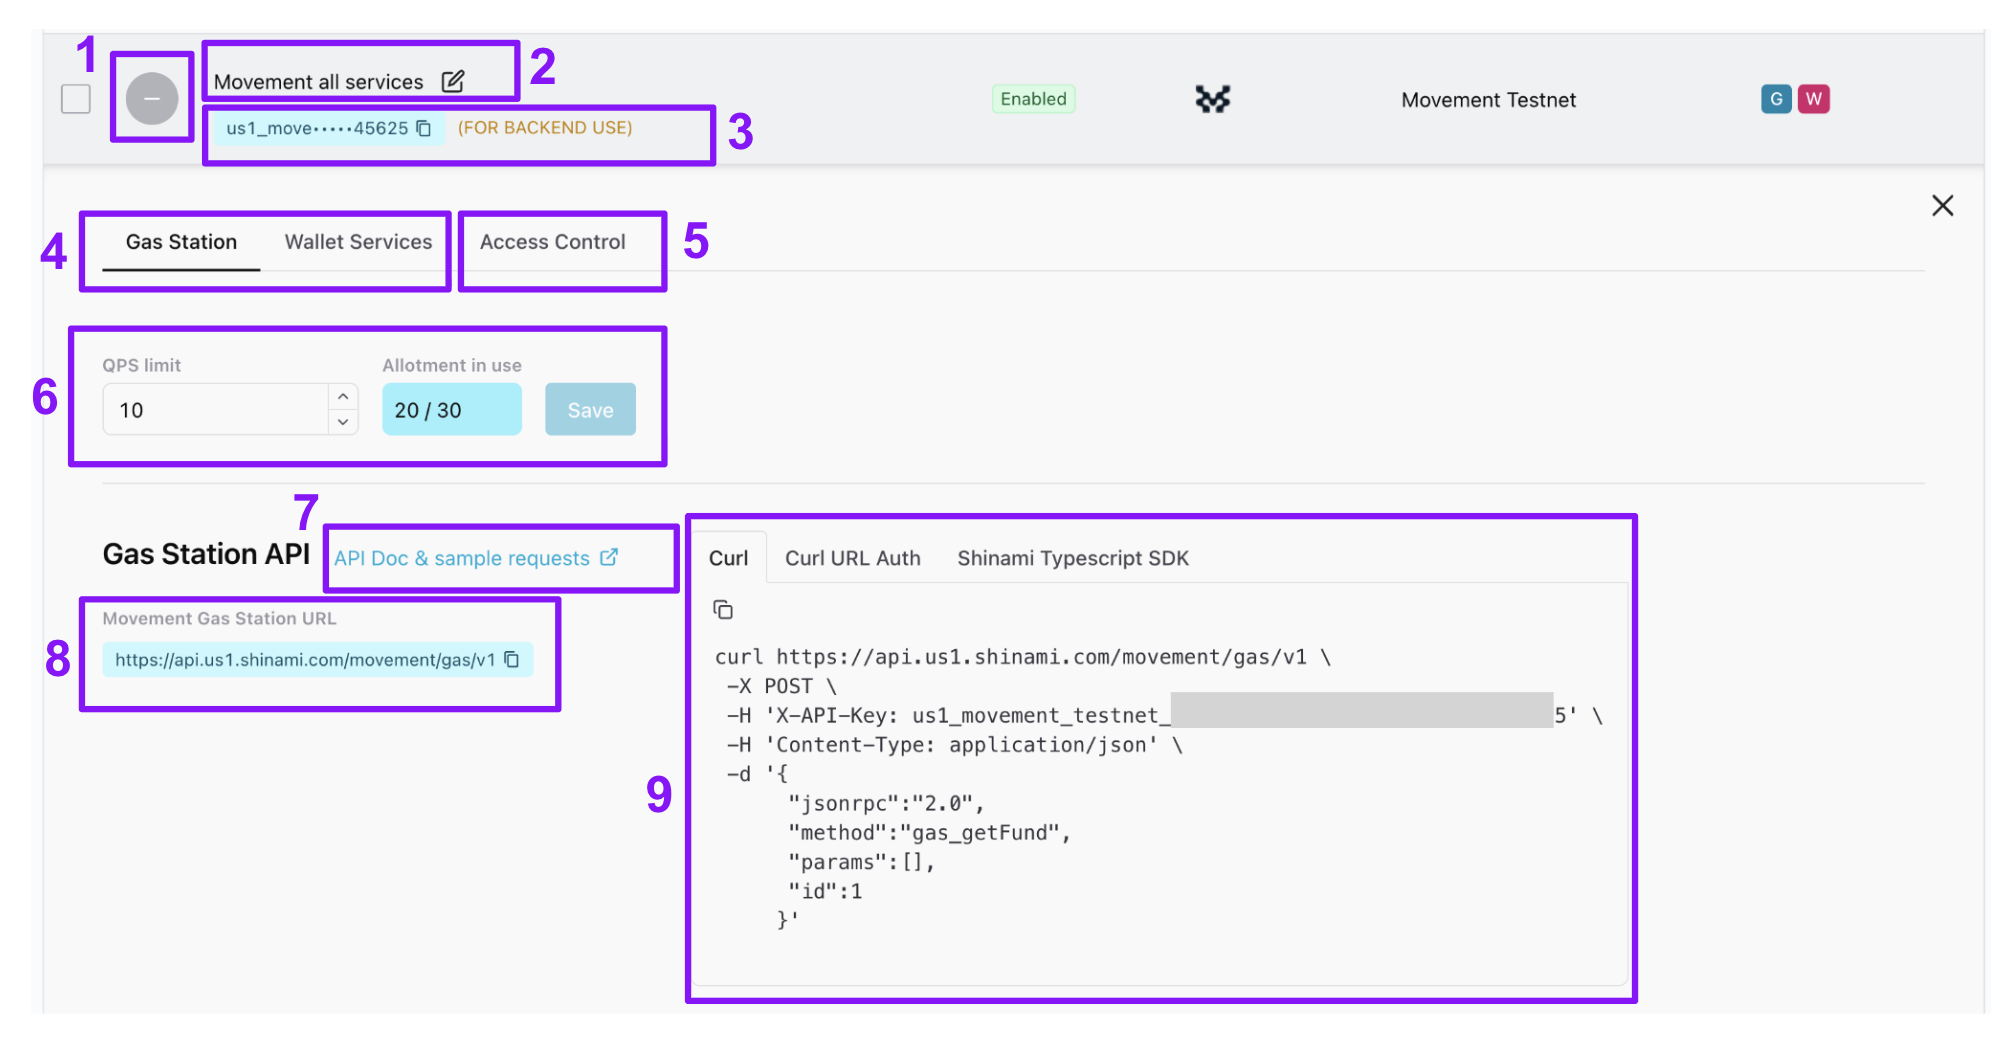 1. In the [Access Keys table](https://app.shinami.com/access-keys), expand and collapse the expanded tray for a key.
2. Change the name of a key.
3. Copy your key value. We put "(FOR BACKEND USE)" next to any key with Gas Station and/or Wallet Services rights because those services do not support CORS and are intended for BE-only use for security reasons.
4. Switch between services for a given key.
5. If needed, set an IP allowlist (BE keys) or a domain allowlist (FE keys) - see the next section below.
6. Update the QPS allotments for the service for the key (and click "Save").
7. Visit the API docs for the service.
8. Find the relevant URL(s) for the service.
9. Find sample code you can copy and paste to make a sample request to get you up and running quickly (your API key value is already added to the code). The SDK examples aren't meant as a production code template, since you'll likely import your API key value, etc.
### Set sender domain and IP address allowlists for a key
When a key's allowlists are empty, we accept all valid requests that use that key. If you've entered values into an allowlist, we check against it when getting a request that uses that access key. If the domain and/or IP address the request originates from is not in the corresponding allowlist, we'll return a `HTTP 401 Unauthorized`. If you have entries in both lists, we'll check that a request satisfies both lists. You can add up to 10 entries in both domain and IP allowlists.
**General advice**
* Test with empty allowlists first to ensure your requests are working properly.
* Allowlists are generally not needed for backend keys because HTTPs means others can't see your key.
* IP whitelists are rare and should only be considered when requests are *guaranteed* to come from a fixed set of IP addresses.
1. In the [Access Keys table](https://app.shinami.com/access-keys), expand and collapse the expanded tray for a key.
2. Change the name of a key.
3. Copy your key value. We put "(FOR BACKEND USE)" next to any key with Gas Station and/or Wallet Services rights because those services do not support CORS and are intended for BE-only use for security reasons.
4. Switch between services for a given key.
5. If needed, set an IP allowlist (BE keys) or a domain allowlist (FE keys) - see the next section below.
6. Update the QPS allotments for the service for the key (and click "Save").
7. Visit the API docs for the service.
8. Find the relevant URL(s) for the service.
9. Find sample code you can copy and paste to make a sample request to get you up and running quickly (your API key value is already added to the code). The SDK examples aren't meant as a production code template, since you'll likely import your API key value, etc.
### Set sender domain and IP address allowlists for a key
When a key's allowlists are empty, we accept all valid requests that use that key. If you've entered values into an allowlist, we check against it when getting a request that uses that access key. If the domain and/or IP address the request originates from is not in the corresponding allowlist, we'll return a `HTTP 401 Unauthorized`. If you have entries in both lists, we'll check that a request satisfies both lists. You can add up to 10 entries in both domain and IP allowlists.
**General advice**
* Test with empty allowlists first to ensure your requests are working properly.
* Allowlists are generally not needed for backend keys because HTTPs means others can't see your key.
* IP whitelists are rare and should only be considered when requests are *guaranteed* to come from a fixed set of IP addresses.
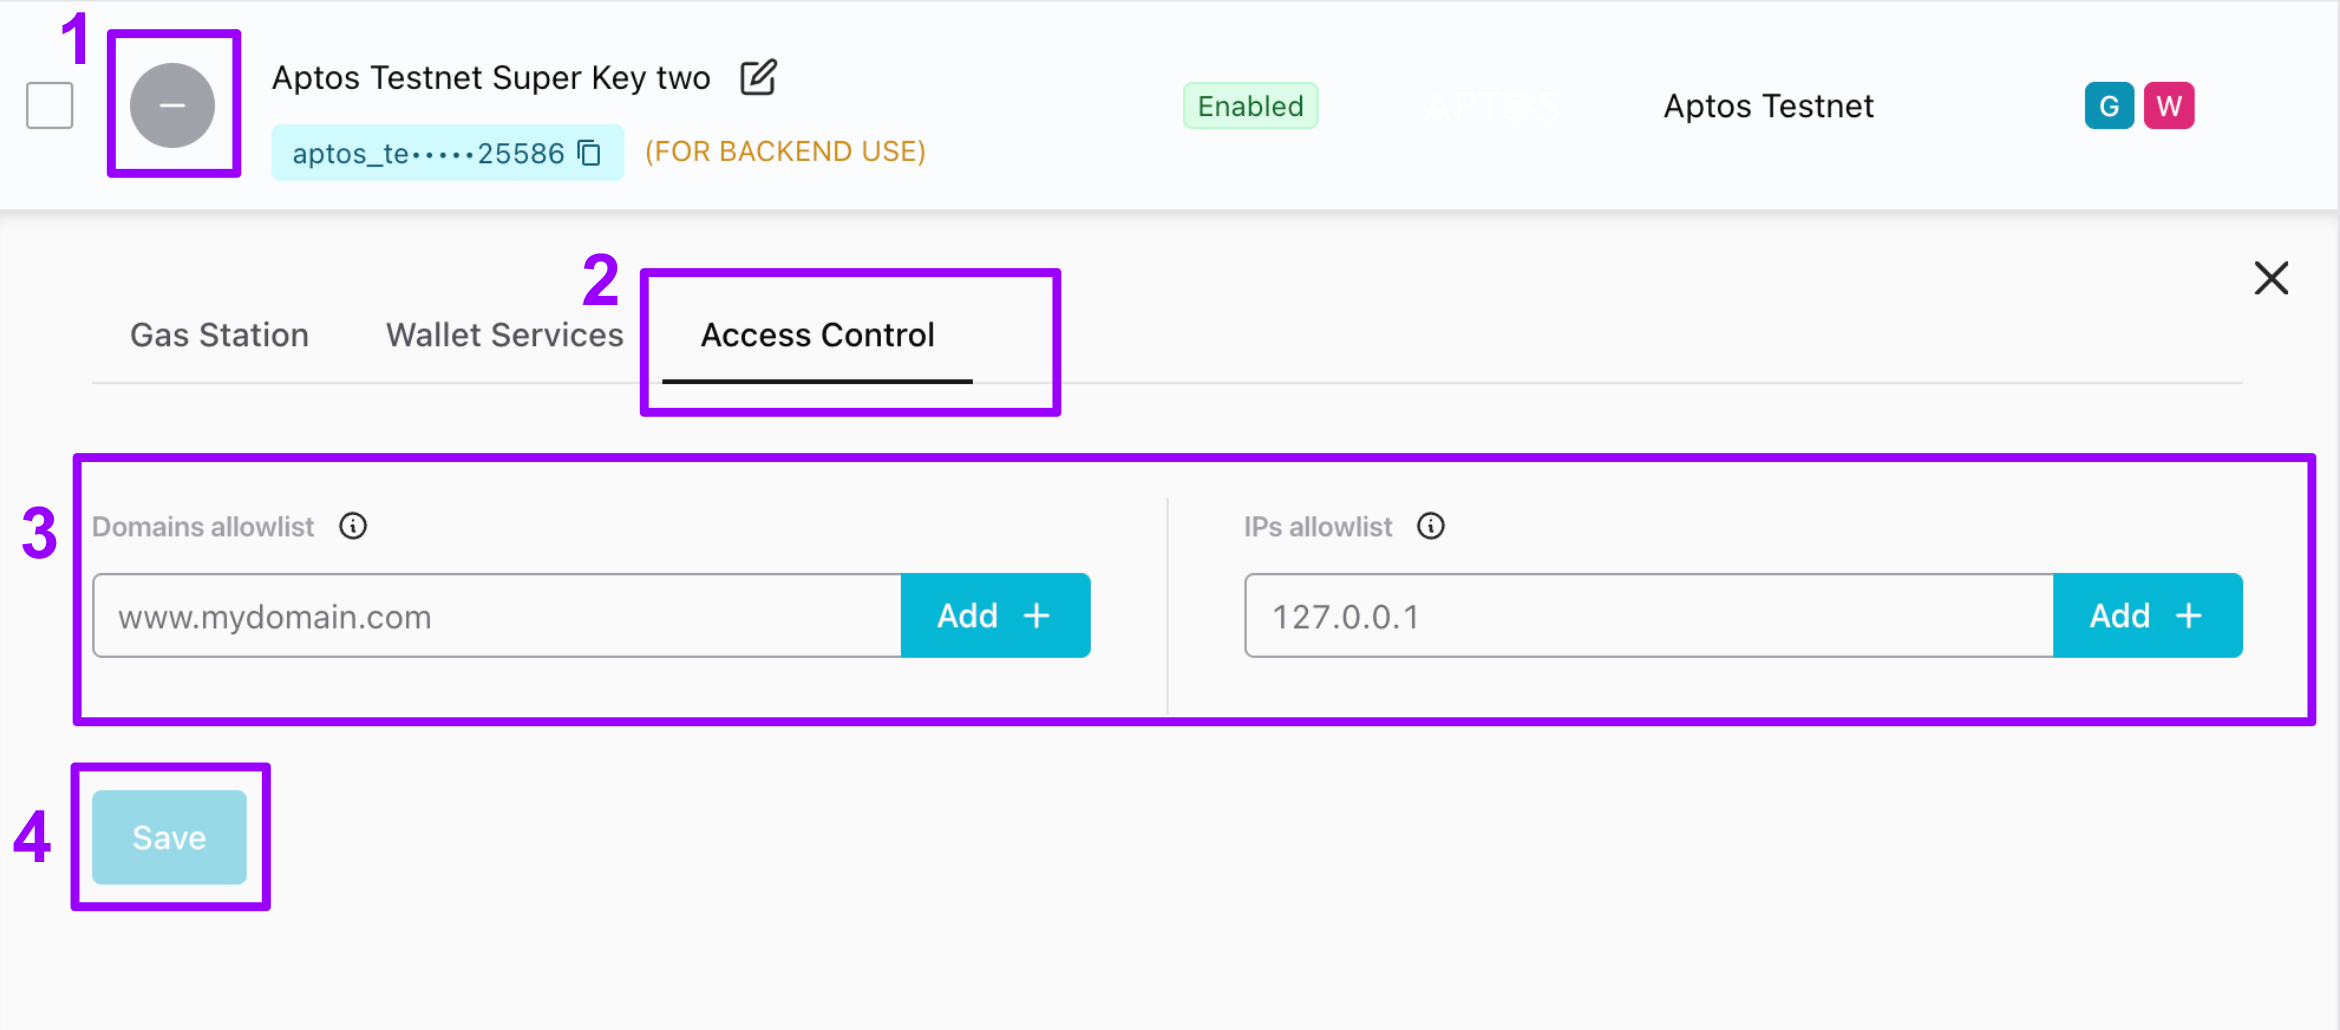 1. In the [Access Keys table](https://app.shinami.com/access-keys), click the "+" to open the key's details tray. The icon then becomes a "-" you can click to collapse the tray.
2. Select the "Access Control" tab.
3. Enter the value you want and click "Add +".
4. Click "Save".
**Note:**
It may take up to five minutes for the changes to take effect.
### Disable-enable or delete a key
1. In the [Access Keys table](https://app.shinami.com/access-keys), click the "+" to open the key's details tray. The icon then becomes a "-" you can click to collapse the tray.
2. Select the "Access Control" tab.
3. Enter the value you want and click "Add +".
4. Click "Save".
**Note:**
It may take up to five minutes for the changes to take effect.
### Disable-enable or delete a key
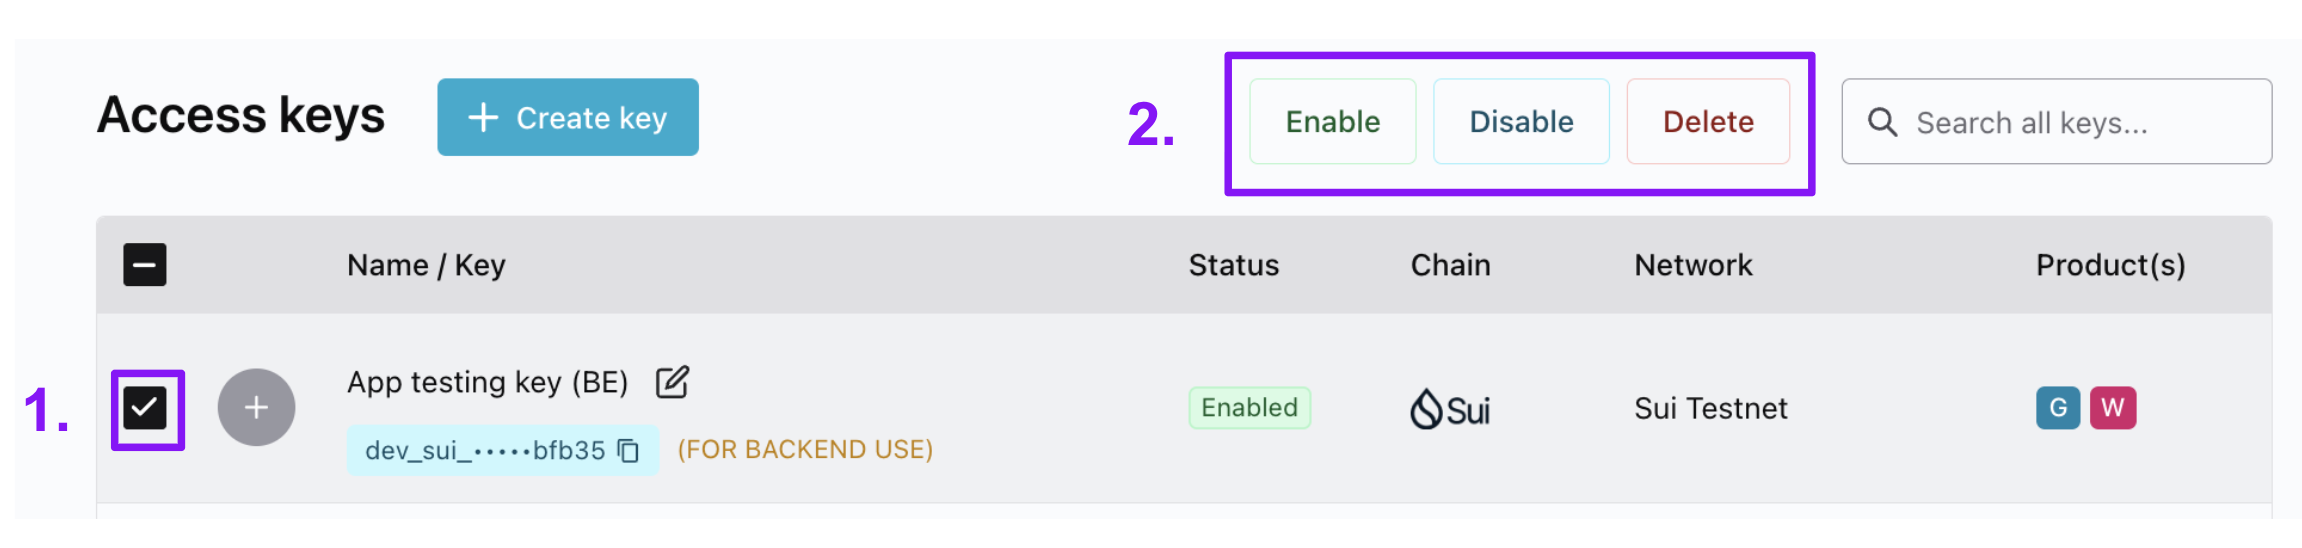 1. In the [Access Keys table](https://app.shinami.com/access-keys), select the key(s) you want to update.
2. Choose the action you want to take for the key(s).
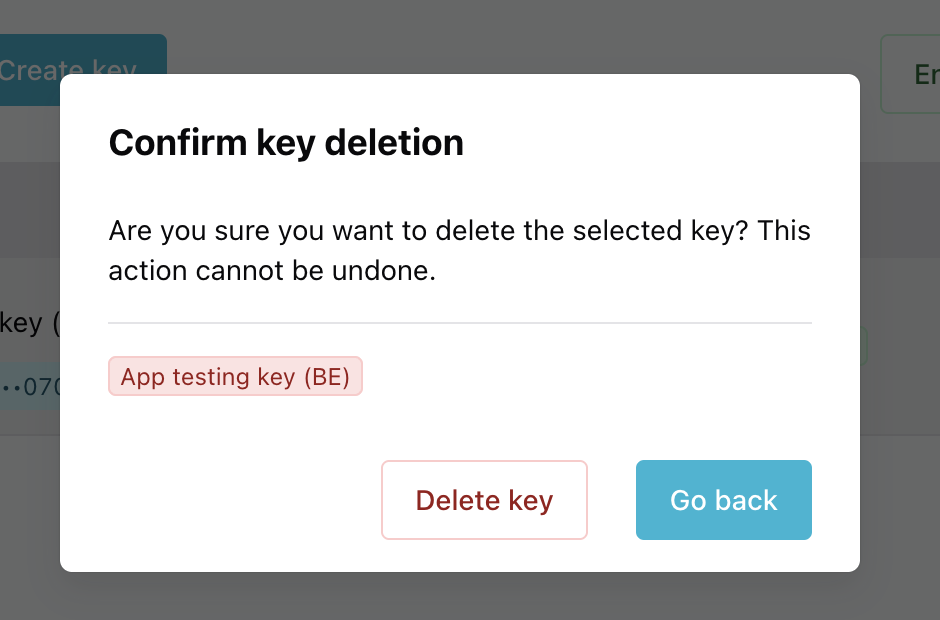
We encourage you to opt for disable over delete, since deletion is unrecoverable. You may, for example, wish to keep a disabled key in your Access keys table for a while after disabling it so that you can find the key's value if needed for an investigation. If you do choose to delete a key, you'll need to then confirm the deletion through a dialog box:
1. In the [Access Keys table](https://app.shinami.com/access-keys), select the key(s) you want to update.
2. Choose the action you want to take for the key(s).
We encourage you to opt for disable over delete, since deletion is unrecoverable. You may, for example, wish to keep a disabled key in your Access keys table for a while after disabling it so that you can find the key's value if needed for an investigation. If you do choose to delete a key, you'll need to then confirm the deletion through a dialog box: